Posted on Tuesday, February 3rd, 2015
Microsoft Word: Love it or hate it, practically everyone uses it. I’ve been using it so long, I thought I knew everything about it. But I stumbled across some super helpful shortcuts — hidden tricks and timesavers that make Microsoft Word easier and faster.
One caveat for these tips: different versions of Word may have different commands, so some of these may not work in your version. That said, here are my top eight shortcuts:
1. Double Click And Drag
If you’re like most people, when you want to move a section of text from one place to another, you use Control-C to copy and Control-V to paste. That’s fine. It works. But there’s a faster way: Double click or highlight what you want to move, then simply drag what you’ve highlighted to where you want it to land.
2. Double Underline
You know you can affect text by hitting Control-B to make it bold or Control-U to underline. But if one line of underlining just isn’t emphatic enough, Control-Shift-D will double underline. (On a Mac, use Command-Shift-D.)
If that doesn’t make your point, you may have to go to ALL CAPS, and I’ve got a shortcut for that too…
3. Change Case
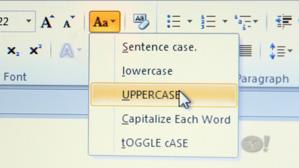
Instead of retyping everything to change from lower case to Title Case or to UPPERCASE, just highlight the text you want to change, click the case button, and then choose which case you want.
4. Adding Buttons to Your Toolbar
Suppose you just tried using shortcut #3, but the case button isn’t on your toolbar, no worries; you can add it (and almost any other command). Go to View, Toolbars, Customize Toolbars, Commands, then scroll to find the command you want — and drag it to where on the toolbar you want it.
Posted on Tuesday, January 27th, 2015
There are free screen readers and other Assistive Technologies available that can be used for testing your documents accessibility. You don’t have to become an expert user, but simple tests with Assistive Technologies can provide valuable insights into whether certain features in a document might present common accessibility problems.
Here are some common Assistive Technologies:
Posted on Tuesday, January 20th, 2015
Do you need additional information on Algonquin College’s Accessibility Standards?
Here are a few links to some additional resources the College has to offer with regards to Accessibility:
Accessible Education Tools – Videos, tips and tricks to making content more accessible.
Annual Accessibility Plans and Policies – Algonquin College’s multi-year AODA plans, policies and procedures.
AODA Training – Links to mandatory training modules for all new College employees.
Centre for Accessible Learning – Providing academic accommodations and educational support services for students with documented disabilities applying to or attending Algonquin College.
For additional resources or alternate accommodations, please contact the Accessibility Office.
Posted on Tuesday, January 6th, 2015
Individuals with disabilities use navigation structures to orient themselves and navigate within documents and web pages. Often, navigation structures are used as a waypoint – a method for orienting ones self within page content. The use of consistent navigation and structure is key to ensuring that users with disabilities can rapidly orient themselves in a complex visual environment.
One of the most simple ways to achieve this is by ensuring Proper Heading Levels are used constantly and consistently within a document or web page.
Posted on Tuesday, December 2nd, 2014
You can use different numbering formats in different parts of your document.
For example, maybe you want i, ii, iii numbering for the table of contents and introduction, and you want 1, 2, 3 numbering for the rest of the document, and then no page numbers for the index.
IMPORTANT To use different numbering in different sections of your document, you need to make sure that the sections are not linked.
- Click at the beginning of the page where you want to start, stop, or change the header, footer, or page numbering.
- On the Page Layout tab, in the Page Setup group, click Breaks.
- Under Section Breaks, click Next Page.
- On the page that follows the section break, double-click in the header area or the footer area (near the top of the page or near the bottom of the page). This opens the Design tab under Header & Footer Tools.
- On the Design tab, in the Navigation group, click Link to Previous to turn it off.
- To choose a numbering format or the starting number, click Page Number in the Header & Footer group, click Format Page Numbers, click the format that you want and the Start at number that you want to use, and then click OK.
- To return to the body of your document, click Close Header and Footer on the Design tab (under Header & Footer Tools).
IMPORTANT If your page number is in the header, be sure that you turn off linking for headers. If your page number is in the footer, be sure that you turn off linking for footers. Headers and footers are linked or unlinked separately.
Posted on Tuesday, November 25th, 2014
Below are some general tips for making our online content more accessible:
- Add alternative text to images and objects
- Specify column header rows in tables
- Use styles in long documents
- Use short titles in headings
- Ensure all heading styles are in the correct order
- Use hyperlink text that is meaningful
- Use simple table structure
- Avoid using blank cells for formatting
- Avoid using repeated blank characters
- Avoid using floating objects
- Avoid image watermarks
- Include closed captions for any audio
Following these general rules will help make our documents more accessible and usable for all.
Posted on Tuesday, November 18th, 2014
As you pass a document around to other people to work on, you may want Word to automatically save a version of your document every time it is closed. This is easy to do by following these steps:
- Choose Versions from the file menu. Word displays the Versions dialog box.

- Make sure the “Automatically Save a Version On Close” check box is selected.
- Click on Close to dismiss the Versions dialog box.
Remember that Word saves a version every time the file is closed. Thus, if the document is worked on in a lot of small sessions, it is very easy for the document to get very large very fast. To overcome this problem, make sure you review the versions periodically and delete those you no longer need.
Posted on Tuesday, November 11th, 2014
When working in Print Layout view you can display multiple pages on the screen at the same time. This is a great help if you have a large, high-resolution monitor. Seeing two pages at one time allows you to get a real sense of how your words appear on the page.
To start, click the View tab of the ribbon and then click the Zoom tool. Word displays the Zoom dialog box.

Click the Many Pages radio button, and then click the button that has a picture of a monitor on it. Word displays a drop-down list from which you can select how many pages you want to view at once. Select a “configuration” from those offered, and Word displays that many pages on your screen.
Note: This now becomes your default view every time you open Word.
Posted on Tuesday, November 4th, 2014
Many of us have inherited documents from our predecessors and not all of these documents have been formatted with AODA or accessibility in mind.
If you are working with a document that is highly formatted, and you are looking for a quick and easy way to get rid of any and all formatting for a selection of text (or all text), here is a quick way to do it:
- Highlight your text selection.
- Cut or copy the selection to the Clipboard.
- In Windows, start the Notepad accessory.
- Paste the Clipboard contents (your selection) into the Notepad.
Since the Notepad accessory can only work with unformatted text, all formatting for your text selection is removed. You can then either save your selection as a text file, or copy it back to the Clipboard and paste it back into Word. Then feel free to add formatting that is AODA compliant.
Posted on Tuesday, October 28th, 2014
When you use a typewriter, you press the Return, or Enter, key at the end of each line. This signifies you are done with one line and ready to begin the next. In Word, however, you do not have to do this. When you set up your page margins, Word is programmed to know that when you reach the right margin your text should automatically wrap to the next line.
There may be times, however, when you want to end a line before you get to the right margin. In these instances, you can end a line in either of two ways. The first way is to press the Enter key where you want the line to end. This results in a hard return being entered in the document. This action (pressing Enter) indicates that you have reached the end of the paragraph and want to start a new one.
The other way to end a line is to press Shift+Enter; this results in a soft return, sometimes called a line break or a newline character, being entered in the document. Hard returns are used to signify the end of a paragraph, whereas soft returns simply signify the end of a line.
If you have changed your view options so you can see all nonprinting characters, then a hard return appears on your screen as a paragraph mark (a backwards P), and a soft return appears as a down-and-left pointing arrow.