Posted on Tuesday, October 21st, 2014
Wherever possible, avoid using images of text on the web or in your documents because some people will find them hard, if not impossible, to read. For instance, people with reading problems such as dyslexia may struggle to read certain fonts, line spacing or text alignment.
People with low vision who use screen magnification software to enlarge content so they can see it, may also find it difficult to read an image of text. The text can become too pixelated to be legible when the image is magnified. The smaller the text, the more pixelated it will become.
Sometimes an image of text is acceptable
You can use an image of text for:
- Your organization’s logo
- Presenting a font when the content on the page is about a particular font (for instance, in a font library)
- Presenting information in its original format when this is essential to the content (for instance, an image of an historical document).
In cases, such as these, you would be required to provide an alternative text for each image.
Posted on Tuesday, October 7th, 2014
There may be times when you want to convert an existing table into text. To do this, follow these steps:
- Select the entire table you want to convert to text.
- If you are using Word 97, choose the Convert Table to Text option from the Table menu. If you are using a later version of Word, choose Convert from the Table menu, then chose Table to Text from the resulting submenu. Either way Word displays the Convert Table to Text dialog box.

- Select the appropriate character that Word should use to separate the columns of text.
- Click on OK.
Remember, for information to be placed into a table format, two things must exist
- Header cells
- Data cells that link to the Header cells
Posted on Tuesday, September 23rd, 2014
Once you have defined a style in Word, you can change it at any time. To do this, follow these steps if you are using Word 2002 or Word 2003:
- Choose Styles and Formatting from the Format menu. Word displays the Styles and Formatting pane.
- In the Pick Formatting to Apply List, locate the style you want to change and simply point to it. (Don’t click on it.) Word displays a down-arrow at the right side of the style name.
- Click on the down-arrow. Word displays a drop-down menu.
- Click on Modify. Word displays the Modify Style dialog box.

- Change the attributes of the style, as desired. You may need to use the Format button to make your changes.
- When completed, click on OK.
- To change other styles, repeat steps 2 through 6.
- When you are done changing styles, close the Styles and Formatting pane.
Remember, you can modify styles to the look and feel of your choosing, as long as you maintain a logical heading structure in your document.
Posted on Tuesday, July 8th, 2014
Assistive technology is an umbrella term that includes assistive, adaptive, and rehabilitative devices for people with disabilities and also includes the process used in selecting, locating, and using them.
Some examples of assistive technology are listed below:
Screen Enhancement Software
This type of software allows a person to enlarge the information on the computer screen and change the contrast of elements. It is typically used by people who have low vision. Examples are ZoomText or Magic. Both Windows and Macintosh operating systems have basic screen enlargement features.
Screen Readers
Screen readers are aural interfaces that voice all the information displayed on a computer screen. They are typically used by people who are blind or who have very low vision. Two examples of a screen reader are JAWS and Window Eyes. Macintosh OS comes with a screen reader built into its operating system called Voice Over. These types of aural interfaces are being used more often in eyes busy environments such as driving.
Text to Speech
Text to speech software is able to speak the text on the screen in a computerized voice. This software is used to support reading by people with a reading related disability (such as a learning disability or dyslexia.) Text to speech can also be useful for people who are reading in a second language. Examples of text to speech software include Kurzweil 3000, Read & Write or Read Please.
Speech Recognition
Speech recognition is a technology that allows the computer user to enter text and commands using voice instead of the keyboard and mouse. This software is useful for people who have repetitive strain injuries, mobility impairments or sometimes a learning disability that interferes with written language. An example of speech recognition software is Dragon Naturally Speaking. This type of adaptive software can be used in hands busy environments (such as surgery or driving) to control a computer.
Alternative Keyboards
Keyboards can be modified so they are easier to use by a person with a mobility impairment. Examples of keyboard traits that can be modified are force required to push a button, organization of the keys, size of buttons, or size of the keyboard so it can fit under one hand. The most common alternative keyboard is the ergonomic wave keyboard, which is used to reduce the risk of a repetitive strain injury.
Alternative Pointing Devices
There are many devices that can be used to replace the typical computer mouse. The most common alternative pointing device is the track ball. These are very useful for people who have mobility impairments or repetitive strain injuries.
Word Prediction
Word prediction is a technology that has become very common on mobile phones. It predicts the word a person is typing and offers to complete the word for them. This is very helpful to people with mobility impairments as it reduces the number of keystrokes needed to type a word and speeds up data entry.
Posted on Tuesday, June 24th, 2014
Word, Excel, and PowerPoint all have a new feature that saves documents that you’ve neglected to save when you closed them—including documents that you haven’t even bothered to save with a name more specific than “Document1.”
This feature builds on Office’s long-standing autosave feature, which automatically backs up the current version of your document every ten minutes (or whatever interval you set in the app’s options).
Earlier versions of Office deleted the last of these automated backups when you closed a document, but Office 2010 preserves the last automated backup and lets you open it.
Click File – Recent – Recover Unsaved Documents, and then choose the document from a standard File/Open dialog box.

Posted on Tuesday, June 10th, 2014
When formatting text:
- Use font sizes between 12 and 18 points for body text.
- Use fonts of normal weight.
- Limit the use of font variations such as bold, italics, and ALL CAPITAL LETTERS.
- Do not refer to colour or font changes as a way of distinguishing information.
Suggested font types:
- Arial
- Helvetica
- Calibri
- Times New Roman
- Verdana
- Tahoma
- Trebuchet MS
- Georgia
Posted on Tuesday, June 3rd, 2014
Most charts will appear as images within Word and PowerPoint documents.
Generally speaking, an alternative text cannot do justice to a complex chart. One way to describe a chart is to provide both a text summary and a properly coded data table near the chart.
This serves multiple audiences because a chart can show trends, but a table can provide exact data for those who are interested.

| Gender |
Upper Middle Class |
Lower Middle |
Upper Middle |
Lower Working |
| Female |
90% |
70% |
44.2% |
31.7% |
| Male |
66.7% |
52.5% |
20% |
25% |
Summary of Trends
The numbers show that /r/ dropping becomes more common in lower classes (lower percentages of final /r/), but that women consistently preserve more /r/’s then men across social classes.
That is, women are more likely then men to approach standard English across social classes.
Posted on Tuesday, May 13th, 2014
By default Word 2007 and Word 2010 save documents in the My Documents folder. If you want to save Word documents in a different location, you can change this default.
To change the default save location and file format, click the Office button.
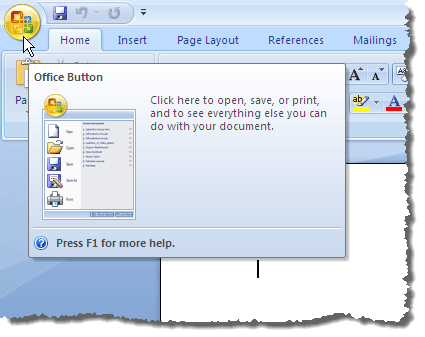
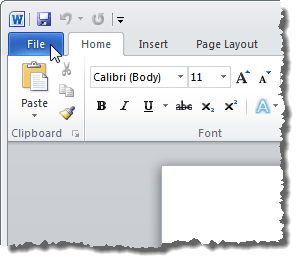
NOTE: In Word 2010, click the File tab.
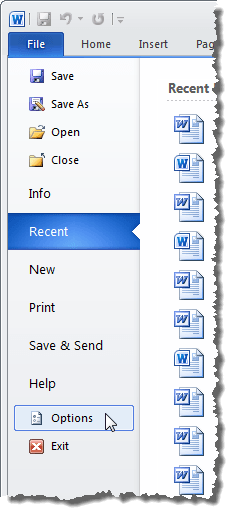
In Word 2010, click Options in the list on the left side of the File tab.
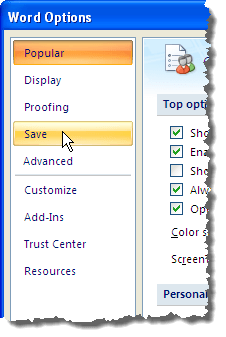
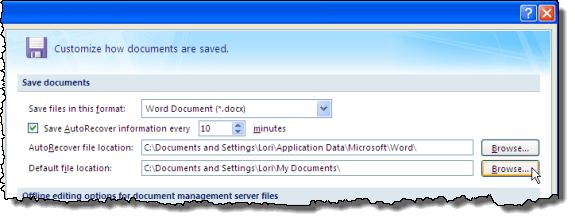
The Word Options dialog box displays. Click Save in the list on the left side of the dialog box.
In the Save documents section on the right side of the dialog box, click the Browse button to the right of the Default file location edit box.
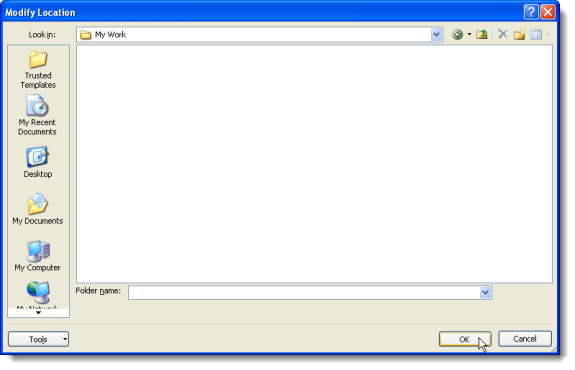
The Modify Location dialog box displays. Navigate to the folder in which you want to save Word documents by default. Click OK.
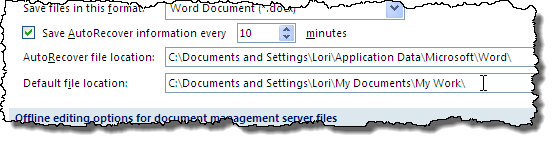
The path to the selected folder is automatically inserted into the Default file location edit box.
Posted on Tuesday, May 6th, 2014
Specify the expansion of each abbreviation or acronym when it first occurs.
Abbreviations and acronyms may be indecipherable when machine spoken or output as Braille. Correct mark-up of abbreviations or acronyms makes reading easier for users of screen readers, audio browsers and Braille devices.
Providing explanations of acronyms and abbreviations also improves readability for foreign language users, those who have never encountered the abbreviation before and those with reading difficulties.
Remember, just because you know the what an abbreviation or acronym stands for, doesn’t mean everyone else does.
Posted on Tuesday, April 29th, 2014
In order for assistive technologies (e.g., screen readers) to be able to present your document accurately, it is important to indicate the natural language of the document. If a different natural language is used for a paragraph or selected text, this also needs to be clearly indicated.
To change the default language
- Go to menu item: File
- Select Options from the list in the left window pane
- Select Language from the list in the left of the Options dialog
- Under Choose Editing Languages, select the editing language you want to use Note: to add an editing language, select the language from the drop down list labelled [Add additional editing languages]
- Select Set as Default
- Close all Office 2010 programs and open them again for the changes to take effect

Word 2010 has an automatic language detection mechanism, which can automatically detect the language of your text. If you type a section of text in a different language than the rest of your document, Word 2010 will programmatically mark the language of that section of text appropriately.
To turn on automatic language detection
- Go to menu item: Review
- In the Language section, select the Language button
- Select Set Proofing Language
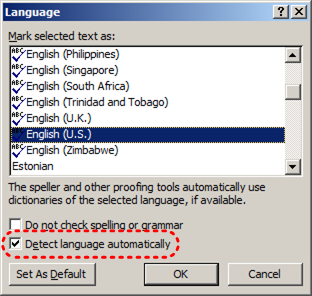
- In the Language dialog, select the Detect language automatically check box
To apply a language directly to selected text
- Select the text
- Go to menu item: Review
- In the Language section, select the Language button
- Select Set Proofing Language
- In the Mark selected text as box, select the language from the list
- Select OK


