Zoom Resources
Zoom Resources for Employees and Faculty
- Brightspace Essentials course includes a walk through on how to use ZOOM: https://brightspace.algonquincollege.com/d2l/le/content/6832/Home?itemIdentifier=D2L.LE.Content.ContentObject.ModuleCO-3133399
- Learning and Teaching Services ZOOM tutorials are included on the following page: https://www.algonquincollege.com/lts/edtech/
- Zoom Privacy and Security Guidelines
Zoom Resources for Students
- Academic Success: https://algonquin-academic-success.libguides.com/zoom
- For Coaches and Tutors: https://algonquincollege.libguides.com/slc/peer-tutors
- Zoom for Students: Zoom licenses are free to all students. Please note that with a basic Zoom license, meetings with more that 2 participants have a 40 minute time limit. Students can host meetings with up to 100 participants.
- AC Zoom Security and Privacy Guidelines for students
Algonquin College Zoom Privacy and Security Guidelines
Please visit the Information Security website for updated Zoom Privacy and Security Guidelines
Frequently Asked Questions
How to create a Zoom account.
Algonquin College staff and faculty are able to take advantage of all of the benefits of the Zoom Pro license.
Tip: All Algonquin College employees have a paid license which allows up to meeting 300 participants. Learners have the free license which is limited to 100 participants and 40 minute meeting duration for meetings with two or more participants.
Note: Please keep in mind that accounts of employees who leave the College are deactivated within 90 days. All meeting recordings will need to be downloaded within that time to avoid losing them.
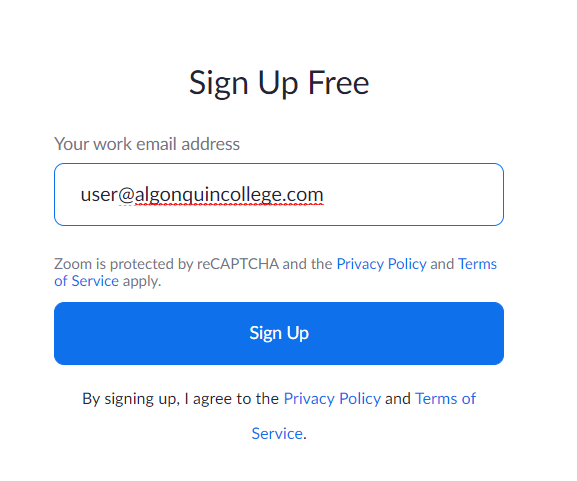
Create an account and begin using it to communicate with colleagues and learners on and off campus.
- Go to https://algonquincollege.zoom.us/signup
- Sign up for an account using your Algonquin College email address.
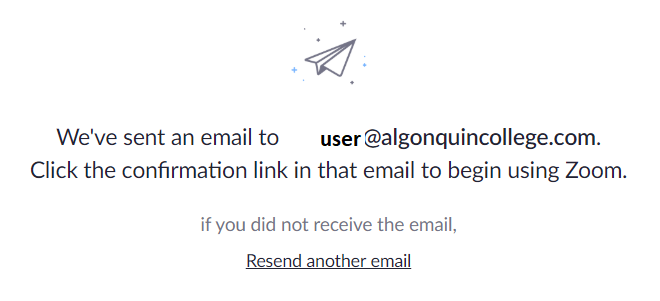
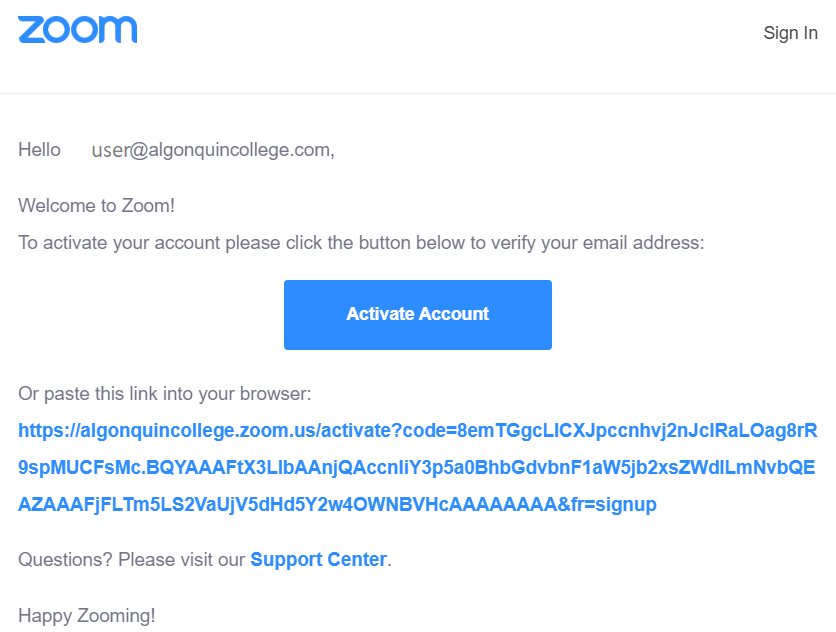
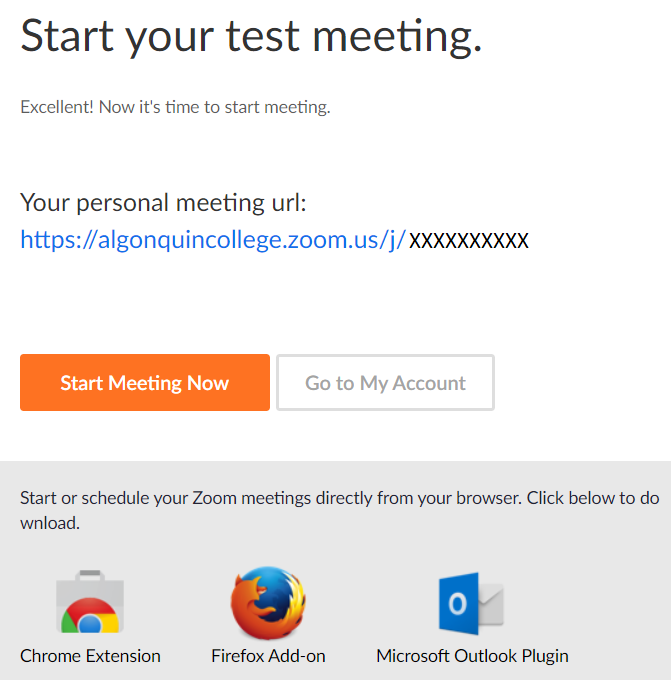
4. Complete the set up and click Continue.
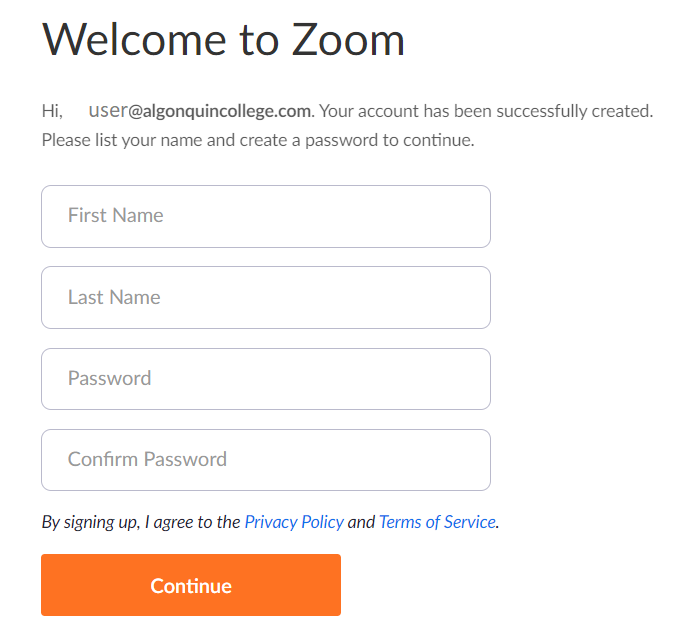
5. You can start a test meeting or go directly to your account to access your personal and admin options.
- Download the Outlook plugin, you will be able to host and schedule your meetings from Outlook.
- See the following articles on Hosting Meetings and Scheduling Meetings
How to schedule Zoom meetings and download the Zoom plug-in
How to schedule Zoom meetings
Zoom offers the following options for scheduling meetings. Tip: All Algonquin College employees have a paid license which allows up to meeting 300 participants. Learners have the free license which is limited to 100 participants and 40 minute meeting duration for meetings with two or more participants.
For information on scheduling for someone else, please see https://assets.zoom.us/docs/user-guides/Outlook_for_Executive_Assistants.pdf
1. Scheduling meetings from Outlook
1. Download the Outlook Plug-in from https://algonquincollege.zoom.us/download
2. Install the plug-in and restart Outlook
You will see two new icons in your inbox and Outlook Calendar
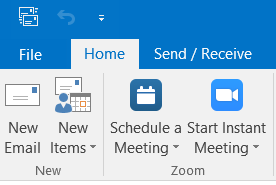 or
or 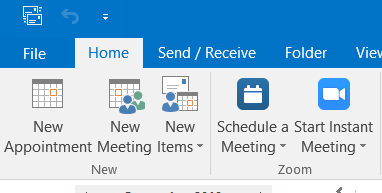
3. Click “Schedule a Meeting”
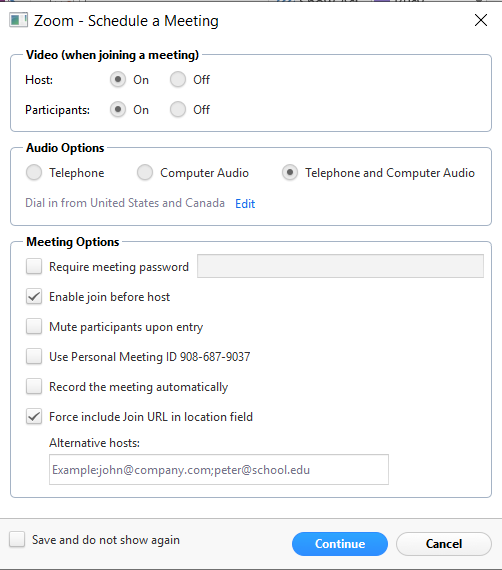
4. Choose all of the applicable options and click Continue
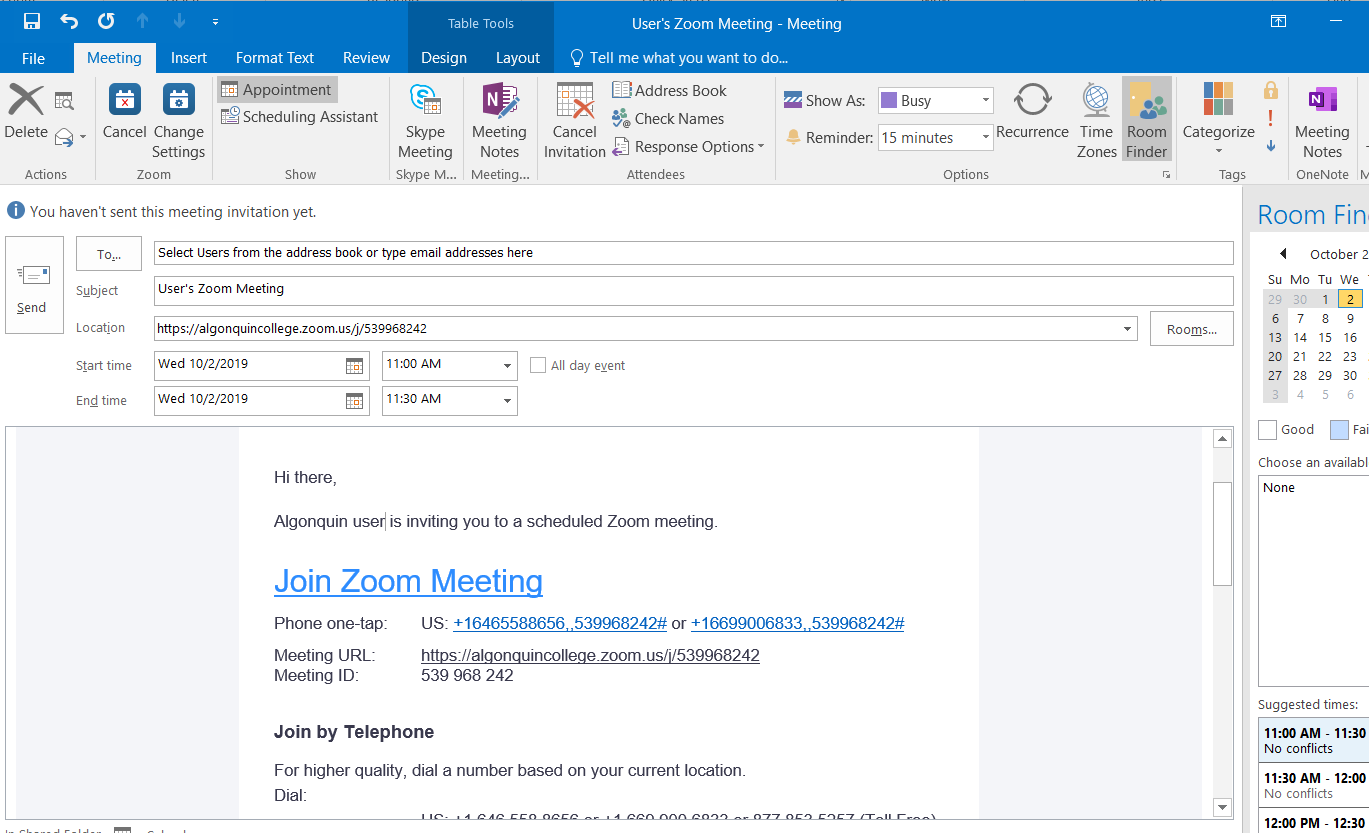
5. Select attendees from your contacts, address book or enter email addresses manually
6. Send the invitation.
The meeting will appear in your calendar where you can open it and change settings, contact or add attendees.
2. Scheduling meetings using the Zoom client app
- Download the Zoom client app from https://algonquincollege.zoom.us/download
- Open the app and sign into Zoom
- Click on Schedule icon
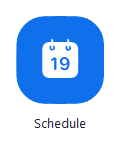
4. Select the meeting options and click “Schedule” to finish.
Open the selected calendar service to add the meeting.
If you are scheduling a recurring meeting, you will need to set the recurrence in your calendar service.
3. Scheduling meetings from the Zoom web portal
- Log into the portal at https://algonquincollege.zoom.us
- Click “Meetings” and select “Schedule a Meeting”
- Select the meeting options and click “Save” to finish.
Once finished, you can either select a calendar option to add the scheduled meeting to your calendar or select ”Copy The Invitation” to send out the invitation to your Zoom meeting.
“Copy the Invitation” will open up a window where you can copy the full invitation to send out via email.
How to host Zoom meetings
How to host Zoom meetings
Zoom offers the following options for hosting meetings:
Tip: All Algonquin College employees have a paid license which allows up to meeting 300 participants. Learners have the free license which is limited to 100 participants and 40 minute meeting duration for meetings with two or more participants.
To host a Zoom meeting from Outlook
- Download the Outlook Plug-in from https://zoom.us/download
- Install the plug-in and restart Outlook.
You will see two new icons in your inbox and Outlook Calendar
or
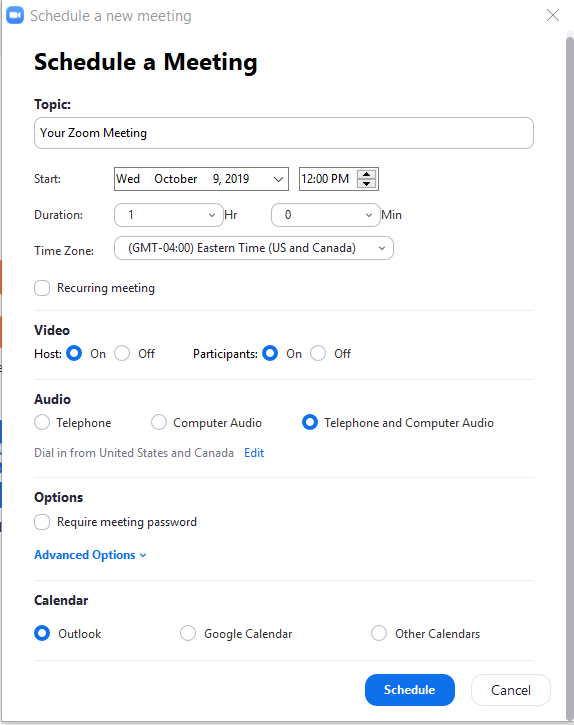
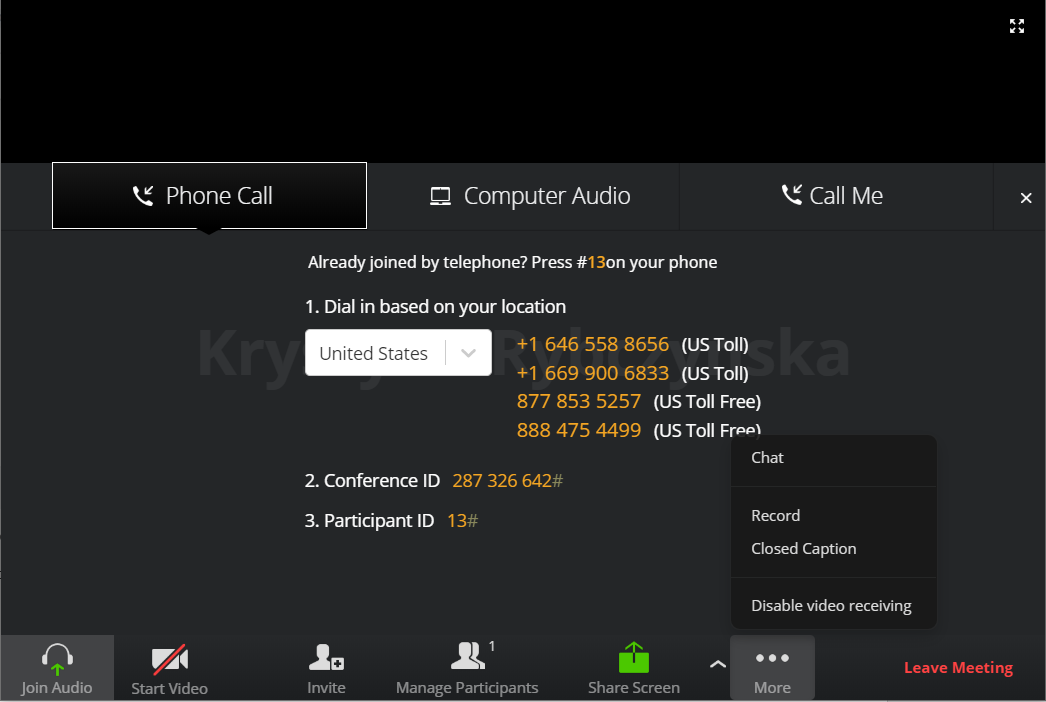
3. Click on “Start Instant Meeting”
- You can start video at any time
- Invite participants via email, using your contacts or by phone
- Participants will have the option to join the meeting via Zoom or their browser
- You can share any of the applications or windows you have open on your computer
- You can record the meeting to the local device or to the cloud
- Closed captions are available if using third party service or a person can be designated to type
- Create breakout rooms
To host a meeting using the Zoom client app
- Download the Zoom client app https://zoom.us/download
- Open the app

3. Click on “New Meeting” to begin
- You can start video at any time
- Invite participants via email, using your contacts or by phone
- Participants will have the option to join the meeting via Zoom or their browser
- You can share any of the applications or windows you have open on your computer
- You can record the meeting to the local device or to the cloud
- Closed captions are available if using third party service or a person can be designated to type
- Create breakout rooms
- If connected to the Youtube livestream service, you can livestream your meeting
From the web portal
- Log into your Zoom account at https://algonquincollege.zoom.us
- In the top right corner select “Host Meeting” and chose one of the options presented
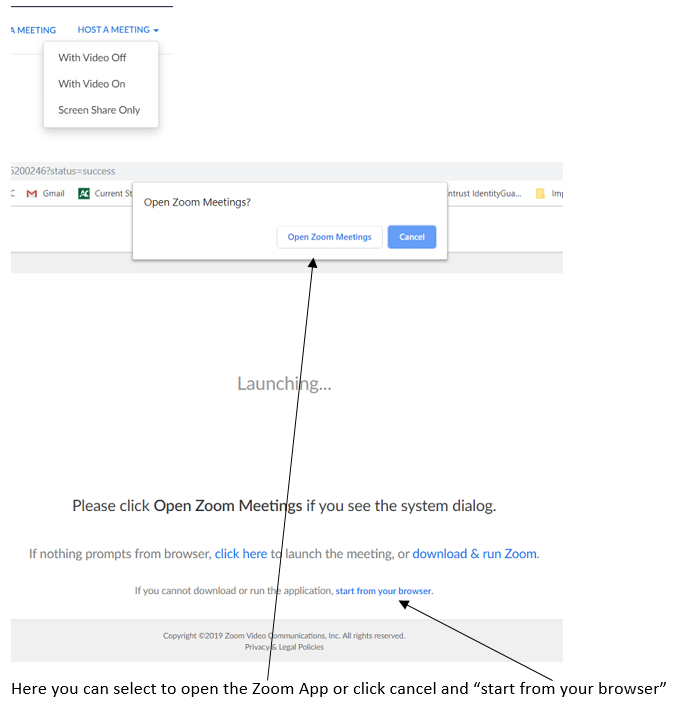
If you select the Zoom client app you will see the following screen:
If you select to start from your browser you will see the following:
- You can start video at any time
- Invite participants via email, using your contacts or by phone
- Participants will have the option to join the meeting via Zoom or their browser
- You can share any of the applications or windows you have open on your computer
- You can record the meeting to the local device or to the cloud
- Closed captions are available if using third party service or a person can be designated to type
- Create breakout rooms
- If connected to the Youtube livestream service, you can livestream your meeting
Managing Zoom Recordings
When you record a meeting and choose Record to the Cloud, the video, audio, and chat text are recorded in the Zoom cloud. The recordings can be downloaded to a computer or streamed from a browser. Cloud recordings are stored for 120 days after which time they are automatically deleted.
Viewing and downloading Zoom Classroom recordings from the Zoom Web Portal
To manage your recorded meetings in the Zoom Portal, share, download or delete them:
- Log in to the Zoom web portal algonquincollege.zoom.ususing your college email and zoom password. (If you have only used Brightspace to hold and record your meetings, please see the instructions below)
- Navigate to My Recordings from the menu on the left.
- Click the meeting topic to display the available file types of the recorded data.
- Click each file to play the recording or download it.
Viewing and downloading Zoom Classroom recordings from Brightspace
- Navigate to Zoom Classroom
- Click on Cloud Recordings Tab
- Click on the recording’s title to access the recording details
- Recording Details screen will provide you with options to download or to share the recording
Note: Cloud recordings are stored for 120 after which time they are automatically deleted and the links to your recording will no longer work. Zoom will store the deleted recordings in “Trash” for 30 days and send you warning messages 7 days prior to them being permanently deleted.
Where can I find my recording?
Local recordings are saved to your documents or downloads folder. Cloud recordings can be found on the Recording page of your Zoom web portal. Learn more about locating your recording.
If you used Zoom Classroom for your meeting, you can also locate your recording in the “Cloud Recordings” tab in Zoom Classroom.
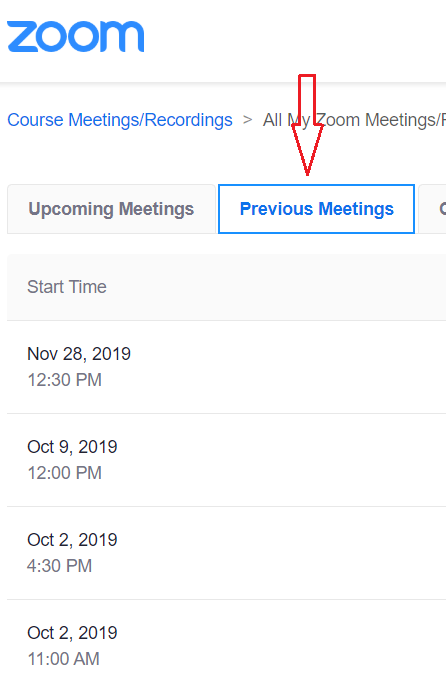
Log into Brightspace and go to Zoom Classroom from any of your courses. Click on the “All my Zoom Meetings/Recordings” link in the top right corner.

On the next page, locate “Previous Meetings” tab to view all of your recordings.
Review the following Zoom resource to learn more: https://support.zoom.us/hc/en-us/articles/206277393-Finding-and-Viewing-Recordings
Why do I need a password to view my recording?
For additional security, Zoom recordings are set to require a password. You will receive the password from Zoom in an email sent when the recording is finalized.
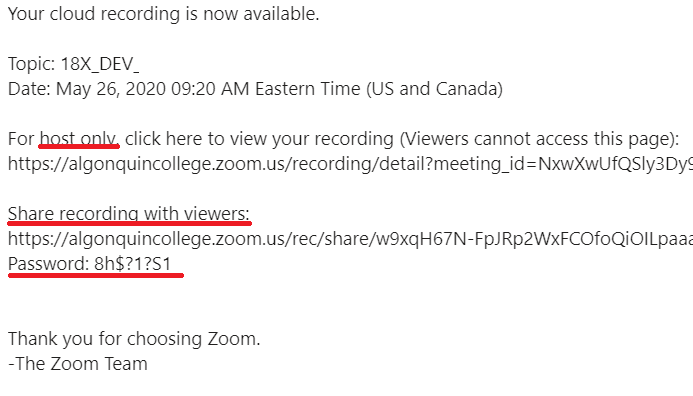
You can share the password with users who are authorized to view the recording.
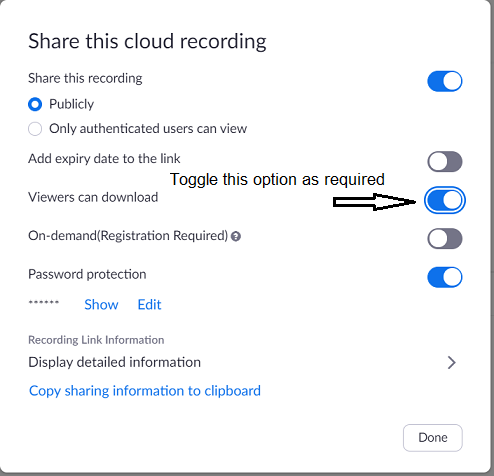
How can I prevent people from downloading my meeting recordings?
Editing sharing options for your meeting recordings
To edit sharing and downloading options for meetings recorded in the cloud:
- Log in to the Zoom web portal algonquincollege.zoom.ususing your college email and zoom password.
- Navigate to My Recordings from the menu on the left.
- Locate the meeting for which you would like to edit sharing options.
- Click the “Share…” button to open the options menu
- Toggle the “Viewers can download” to off if desired
How to pair a Zoom Room from the Zoom desktop client
With heightened avoidance of shared touch surfaces as people return to offices, as well as Zoom Room controllers not always being in the most convenient location, the Zoom desktop client can pair with your Zoom Room to allow you to start a meeting on the Zoom Room from the desktop client.
You can also pair the Zoom mobile app with a nearby Zoom Room, to start or join meetings on the Zoom Room as well as control the Zoom Room directly from your mobile device.
To find out more, please see the following article from Zoom Help Centre: Pairing a Zoom Room from the Zoom desktop client
How to upgrade the Zoom desktop client
Zoom regularly provides new versions of the Zoom desktop client and mobile app to release new features and fix bugs. We recommend upgrading to the latest version when it is available to receive the best video and audio experience.
Please see the following page for up to date instructions on how to upgrade your Zoom client: https://support.zoom.us/hc/en-us/articles/201362233-Upgrading-Zoom-to-the-latest-version
How to add scheduling priviledge
Users can be given privilege to schedule meeting on behalf of other users. User who would like to add another user to schedule on their behalf will nee to:
- Sign in at: https://algonquincollege.zoom.us/
- In the navigation menu, click Settings.
- Click the Meeting tab.
- Under Other, locate Schedule Privilege.
- Next to Assign scheduling privilege to, click Add.
- Under Users, enter a username or email address in the text box.
For more information, please see the following help page from Zoom: https://support.zoom.com/hc/en/article?id=zm_kb&sysparm_article=KB0061749#h_a9476921-e417-4d02-bf62-7bc96554f9a4
What license will be used for scheduling a meeting from Zoom or Teams room – the room license or personal license?
Personal
Zoom Tips
Basic meeting controls
Get a quick introduction to the basic meeting controls available on Zoom calls.
https://support.zoom.us/hc/en-us/articles/201362603-Host-and-Co-Host-Controls-in-a-Meeting
Or watch one of the training videos provided by Zoom: https://learn-zoom.us/show-me
Zoom Security Tips and Resources
How to prevent Zoom Bombing
Unfortunately, your Zoom meetings are wide open to hijacking if you don’t know how to set the host controls properly. Review the following document to learn how to stop bad actors and keep your video calls on track. Find out How to Prevent Zoom Bombing
In-meeting Security Options
The Security icon in the meeting controls allows the host or co-host of a meeting to enable or disable options during a meeting to secure the meeting and minimize disruption during the meeting. Read more about In-meeting Security Options
Ways to combat meeting disruptions
Zoom released two new security features to remove and report disruptive meeting participants. Find out how to use those features and read about what Zoom is doing to prevent disruptions before they happen. Read the Zoom Blog post: 3 New Ways We’re Combating Meeting Disruptions
How to change your background
One of the most played with features in Zoom is the ability to virtually change your background. To find it, go into Settings > Virtual Background. Here, you can choose from several supplied images and or upload your own by pressing the “plus” sign above the images.
How to use the Waiting Room
To avoid meeting interruptions, turn on a feature called Waiting Room. This means you will have to admit participants into your meeting. You can turn it on for all meetings that happen in your personal meeting room or turn it on once you start a meeting by clicking “Manage Participants” near the bottom of the screen, then “More” and choosing “Put Attendee in Waiting Room on Entry.”
“Raise Hand” feature
As the host of the meeting, if you feel the participants are interrupting each other frequently, ZOOM has a feature where participants can raise their hands if they have a question. As a facilitator, you may inform your participants to use this feature. Attendees can raise their hand by clicking the “Raise Hand” button of the Participants window. If they do not see the Participants window, inform them to simply click the Participants Icon at the bottom of the meeting screen. Note that the Host of the meeting cannot raise their hand.
How to mute the microphone
If you are in a loud environment, and you do not mute your microphone, the background noise is often broadcast to the meeting and can make it difficult for all participants to hear the speaker. Please consider muting your microphone if you are in a loud environment. If you quickly need to say something, just hold down the space bar to temporarily turn on your microphone.
Speaker and Gallery view
To see everyone in the meeting on one screen, use Gallery View. Use the Speaker View, to have the speaker be most prominent on screen. You can toggle between them while in the meeting.
HD Video
HD Video is off on Zoom by default to conserve bandwidth. If you want the highest video conference quality, you can toggle it on in Settings > Video >My Video > Enable HD. While you’re there, check out a popular option called “Touch up my appearance.” Switch it on and it will smooth out your skin.
Screen Sharing
The “Share Screen” tab has a number of interesting features. When selected, under “Basic,” you can choose to share your PC screen with others, including your full desktop, browser, or open applications. There is also a whiteboard option that can be annotated. Under “Advanced,” you can share a screen portion, music or sound only, or content from a second, connected camera. To disable screen or desktop sharing for other participants during your meeting, tap the arrow next to “Share Screen” and click “Advanced Sharing Options.” In here, you can specify “Who can share?” by choosing “Only Host” or “All Participants.”
Zoom Chat
The “Chat” tab on the main bar is designed for users to type out questions and messages, as well as share files either hosted by cloud storage providers or stored directly on your PC. As a host, you can also select the “…” button to save a chat session and control who participants can talk to — no one, the host alone, everyone publicly, or everyone publicly and privately.
Meeting Recording
The “Record” option allows the recording of the meeting. By default, no one except the host can record a session unless the host gives permission to do so. It will take some time for your computer to generate a file. The longer the meeting, the longer you’ll have to wait.
Zoom Breakout Rooms
Breakout rooms allow you to split your Zoom meeting into separate sessions. The meeting host can divide the participants into separate sessions automatically or manually, and can switch between sessions at any time.
To learn more, please review the resources provided by Zoom: https://support.zoom.us/hc/en-us/articles/206476313-Managing-breakout-rooms
Participating in Breakout Rooms
Breakout rooms are sessions that are split off from the main Zoom meeting. They allow the participants to meet in smaller groups. Breakout rooms can be used for collaboration and discussion of the meeting. To learn more, please review the following article provided by Zoom:
https://support.zoom.us/hc/en-us/articles/115005769646-Participating-in-breakout-rooms
Polling feature in Zoom
The polling feature allows you to create single choice or multiple choice polling questions for your meetings or webinars.
To learn more about polling for meetings, please review: https://support.zoom.us/hc/en-us/articles/213756303-Polling-for-meetings
To learn more about polling for webinars, please review: https://support.zoom.us/hc/en-us/articles/203749865-Polling-for-webinars
Using Annotation Tools
Meeting participants can annotate on a shared screen in Zoom meetings. You can also use annotation tools when sharing or viewing a whiteboard.
To learn more, please review the following article provided by Zoom: https://support.zoom.us/hc/en-us/articles/115005706806-Using-annotation-tools-on-a-shared-screen-or-whiteboard
Using a co-host or an alternative host in a meeting
The co-host feature allows the host to share hosting privileges with another user, allowing the co-host to manage the administrative side of the meeting, such as managing participants or starting/stopping the recording.
Using co-host in a meeting
There are two ways that you can make a user a co-host.
During a meeting:
- Hover over a user’s video.
- Click the more icon
- Click Make Co-Host.
Using the participants window:
- Click on Manage Participants in the meeting controls at the bottom of the Zoom window.
Hover over the name of the participant who is going to be a co-host, and choose More. - Click Make Co-Host.
Once a participant has been made a co-host, they’ll have access to the co-host controls.
For more information on host and co-host controls in a meeting, please see the following article from the Zoom Help Center: Host and co-host controls in a meeting
Assigning and alternative host
When scheduling a meeting, the host can designate another Licensed user on the same account to be the alternative host. The alternative host can start the meeting on the host’s behalf. This user will receive an email notifying them that they’ve been added as an alternative host, with a link to start the meeting. If this email notification is disabled in the Zoom web portal, the alternative host will not receive an email to start the meeting.
For more information, please see the following article from the Zoom Help Centre: Alternative Host
Language interpretation in meetings and webinars
Users who would like to include interpreters in their meetings or webinars now have the ability to enable language interpretation. This allows the host to designate participants as interpreters on the web portal or during a Zoom session. For more information, please see the following support article from Zoom: https://support.zoom.us/hc/en-us/articles/360034919791-Language-interpretation-in-meetings-and-webinars
The following help article from Zoom explains the Sign Language Interpretation: https://support.zoom.us/hc/en-us/articles/9644962487309-Using-Sign-Language-Interpretation
Closed captioning and live transcription for meetings and webinars
Closed captioning and live transcription are now available for Zoom meetings and webinars. Find out more in the following help article from Zoom: https://support.zoom.us/hc/en-us/articles/207279736-Closed-captioning-and-live-transcription
Adding and sharing your pronouns
We are excited to share with our College community that Zoom enabled adding and sharing your pronouns feature. This feature will improve everyone’s conferencing experience and will allow everyone to express themselves and address others respectfully.
When you add pronouns to your profile, they are visible to your Zoom contacts as part of your Zoom profile card in the Zoom desktop client and mobile app. You can also choose when or if your pronouns are shown during a meeting that you host or join, or webinar that you are the host or panelist for. Webinar attendees’ pronouns are never visible.
To find out how to enable this for your profile, please see the following guide from Zoom: Adding and sharing your pronouns
Note: You must update the Zoom desktop client to 5.7.0 to use the Pronouns feature. Download the latest zoom update.
How to pair a Zoom Room from the Zoom desktop client
With heightened avoidance of shared touch surfaces as people return to offices, as well as Zoom Room controllers not always being in the most convenient location, the Zoom desktop client can pair with your Zoom Room to allow you to start a meeting on the Zoom Room from the desktop client.
You can also pair the Zoom mobile app with a nearby Zoom Room, to start or join meetings on the Zoom Room as well as control the Zoom Room directly from your mobile device.
To find out more, please see the following article from Zoom Help Centre: Pairing a Zoom Room from the Zoom desktop client
Zoom Troubleshooting
Why did the Zoom meeting end unexpectedly?
Why did the Zoom meeting end unexpectedly stating the host has joined another zoom meeting?
Some users may be in a Zoom meeting which may end unexpectedly. This is usually accompanied with a message stating the host has joined another zoom meeting.
This happens when an Executive Assistant or Administrative Assistant has privileges to schedule meetings on behalf of another individual. If the EA/AA attends another meeting that overlaps the meeting scheduled on behalf of (e.g. their Director or VP). Zoom will end the first meeting as it associates all meetings booked by the EA/AA with the same person.
To fix this issue, please see the instructions in the attachment provided by Zoom.
Note: Some of the screen shots in the attachment may subtly differ as Zoom releases new software versions and may not have updated their user manuals.
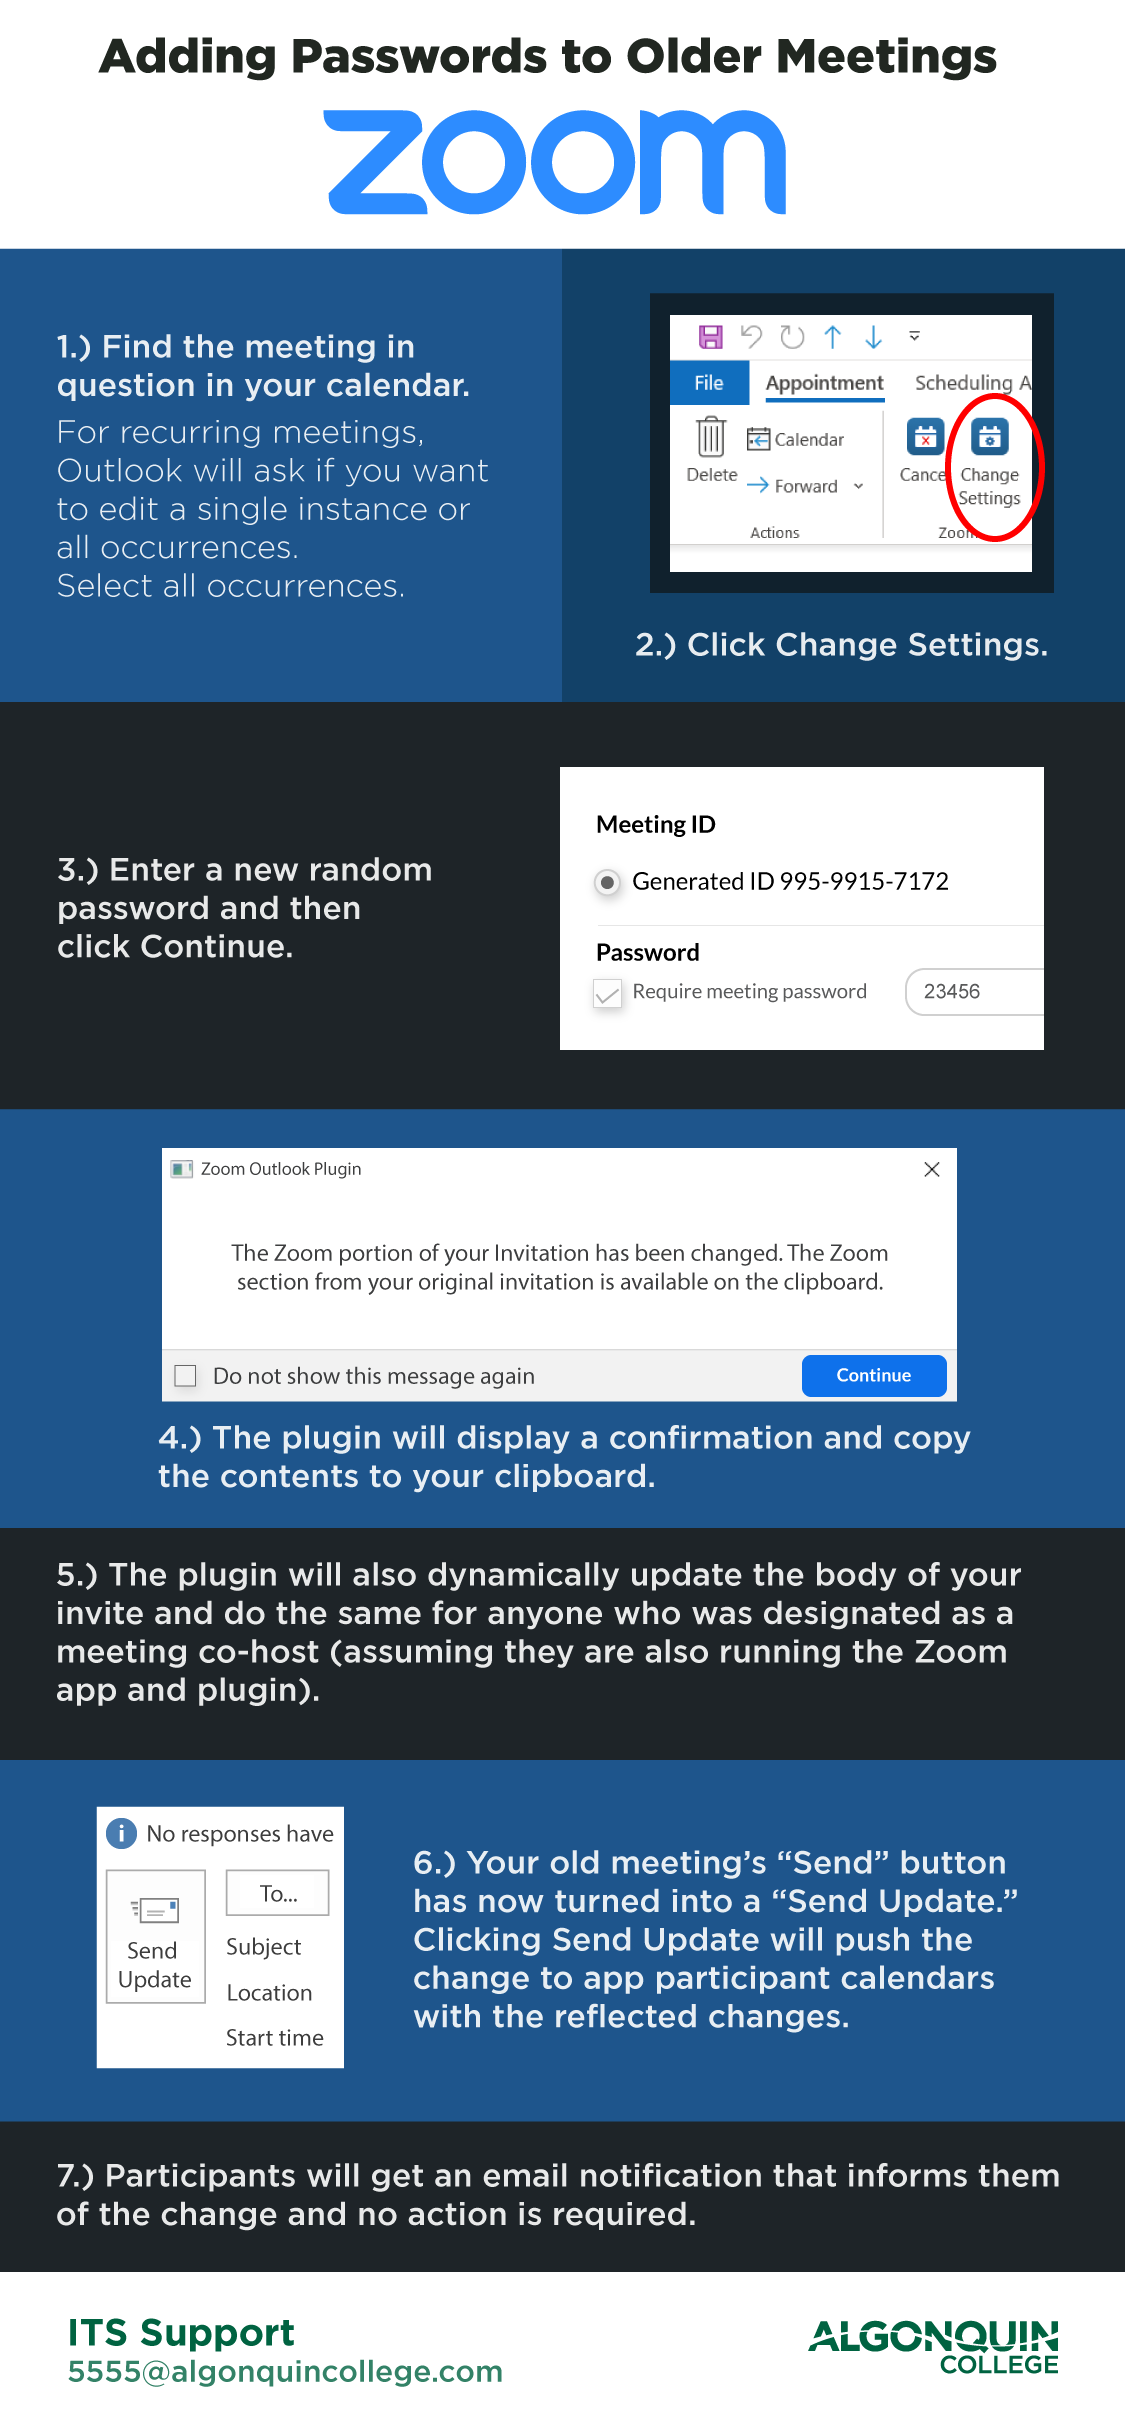
Why are users prompted for a password for recurring Zoom meetings?
Users may be prompted to enter a password for a meeting after clicking the “Join Meeting” link for recurring meetings (in the past, passwords were not required to access the meeting). Meeting organizers need to update meetings set up prior to April 20, 2020 and send out an update containing the password.
How to add passwords to recurring Zoom meetings and send updated links to users.
To avoid zoom bombing, we have turned on a setting such that all meetings require a password. Normally, the Join Meeting link will include this password so it does not need to be entered. But on reoccurring meetings that were created before April 20, 2020, these meet invites still have the old non password “Join Meeting” link. Therefore a password is being requested.
Meeting organizers need to find reoccurring meetings that were created before April 20, 2020 and follow the instructions below.
Troubleshooting audio
- To troubleshoot your audio please see the following https://support.zoom.us/hc/en-us/articles/201362283-Testing-computer-or-device-audio
Troubleshooting video
- If you need to test your video, please see the following: https://support.zoom.us/hc/en-us/articles/201362313-How-Do-I-Test-My-Video-
- If your camera is not showing up in the Zoom Settings or it is selected and not showing any video, review the tips at the following page: https://support.zoom.us/hc/en-us/articles/202952568-My-Video-Camera-Isn-t-Working.
Problems with dialing into a meeting?
- Are you having problems joining a ZOOM meeting using the meeting conference bridge phone number? ZOOM has made us aware that during crisis events (such as COVID-19), phone lines (land lines) are one of the first things that fill up. Assuming you have a computer and Internet service, you can avoid this problem altogether by selecting the “Join with Computer Audio” option when prompted upon entering a ZOOM meeting.
There is echo in my meeting
Several issues can cause echo in a meeting. Read the following article from Zoom about causes of echo. Audio Echo in a meeting.
Where can I find my recording?
Local recordings are saved to your documents or downloads folder. Cloud recordings can be found on the Recording page of your Zoom web portal. Learn more about locating your recording.
If you used Zoom Classroom for your meeting, you can also locate your recording in the “Cloud Recordings” tab in Zoom Classroom.
Log into Brightspace and go to Zoom Classroom from any of your courses. Click on the “All my Zoom Meetings/Recordings” link in the top right corner.
On the next page, locate “Previous Meetings” tab to view all of your recordings.
Review the following Zoom resource to learn more: https://support.zoom.us/hc/en-us/articles/206277393-Finding-and-Viewing-Recordings
Why do I need a password to view my recording?
For additional security, Zoom recordings are set to require a password. You will receive the password from Zoom in an email sent when the recording is finalized.
You can share the password with users who are authorized to view the recording.
How can I prevent people from downloading my meeting recordings?
Editing sharing options for your meeting recordings
To edit sharing and downloading options for meetings recorded in the cloud:
- Log in to the Zoom web portal algonquincollege.zoom.ususing your college email and zoom password.
- Navigate to My Recordings from the menu on the left.
- Locate the meeting for which you would like to edit sharing options.
- Click the “Share…” button to open the options menu
- Toggle the “Viewers can download” to off if desired
Participants are not automatically assigned to pre-assigned breakout rooms.
If participants are not automatically assigned to the breakout room you specified when scheduling the meeting, recover to pre-assigned breakout rooms to re-assign participants to their pre-assigned breakout rooms.
Follow these steps:
- Start the meeting with participants pre-assigned to breakout rooms.
- Click Close All Rooms to end all breakout rooms.
- Click Recreate then Recover to pre-assigned rooms.
You can visit this link for further information:
https://support.zoom.us/hc/en-us/articles/360032752671-Pre-assigning-participants-to-breakout–rooms#h_56bde40a-139d-4a4e-9254-4a10ac128531
Missing Zoom plugin in Outlook
If you do not see the Schedule a meeting icon in the menu ribbon, go to File-> Options-> Add-ins.
Ensure that the Zoom plugin is installed
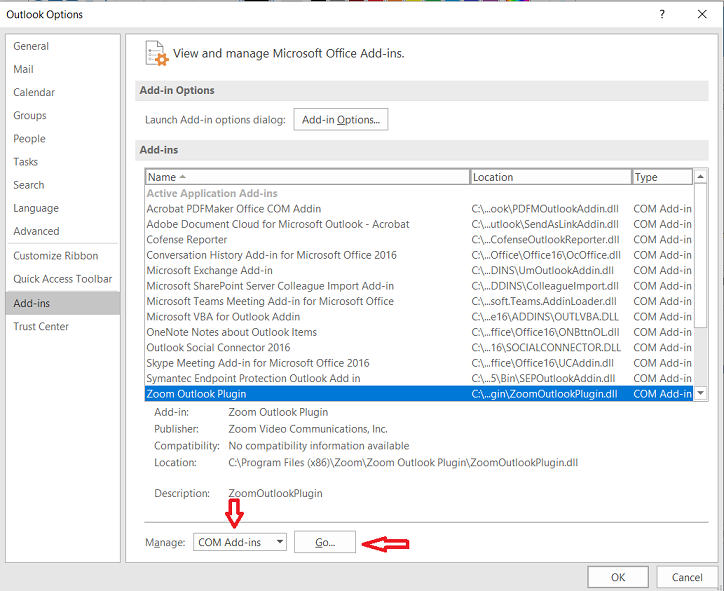
If the plugin is not in the list, please re-install it from: https://zoom.us/download
If the plugin is on the list as in the image above, go to Manage->COM Add-ins and select Go
On the next screen, ensure a check mark is placed next to “Zoom Outlook Plugin”
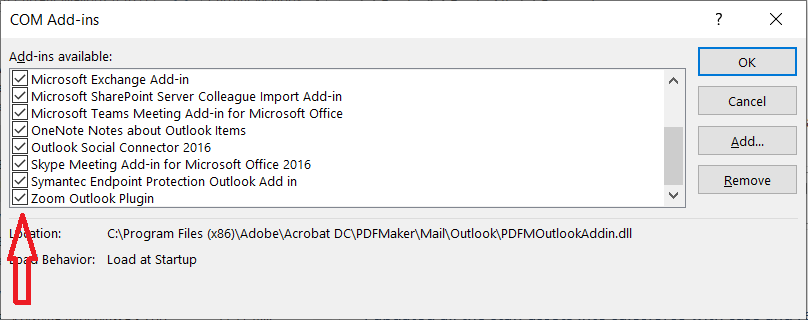
Click Ok to save the change.
For more information on the Zoom plugin for Outlook, please see: https://support.zoom.us/hc/en-us/articles/200881399-Microsoft-Outlook-plugin-desktop
How to upgrade the Zoom desktop client
Zoom regularly provides new versions of the Zoom desktop client and mobile app to release new features and fix bugs. We recommend upgrading to the latest version when it is available to receive the best video and audio experience.
Please see the following page for up to date instructions on how to upgrade your Zoom client: https://support.zoom.us/hc/en-us/articles/201362233-Upgrading-Zoom-to-the-latest-version