Multifactor Authentication and VPN Support for Employees
Students: to set up Multi-factor Authentication please register for Self Service Password Reset on the following page: https://www.algonquincollege.com/its/support-mypass/ and for VPN, please see the following page: https://www.algonquincollege.com/its/vpn-help/
Employee MFA and VPN set up: please complete all of the steps outlined below for the MFA registration to be successful and to set up Cisco AnyConnect to connect to VPN. VPN is required to connect to some of the College services like the Jabber softphone or GeneSIS.
Employees already using Microsoft Authenticator (MFA) who are looking for instructions for VPN set up, please go to Step 3/3 below.
Algonquin College is continuing to enhance the security of digital resources and reducing the number of times you need to enter your login. As part of this standardized approach to authentication for employees the College introduced Multifactor Authentication using the Microsoft Authenticator App. Cisco AnyConnect app is used to connect to VPN.
For more information on Multifactor Authentication, please see the Frequently Asked Questions.
If you have any problems setting up your MFA, ITS Support is available Mon-Fri 7:30 am – 5:00 pm.
Phone: 613-727-4723 ext 5555
Email: 5555@algonquincollege.com
Instructions for setting up and using MFA
To register for MFA, you will need:
- Your Algonquin College credentials (username and password)
- A mobile device (iOS or Android Phone/Tablet)
- Computer with web browser
- An internet connection
In the following instructions you will login to your Algonquin College account, download, install and set-up MS Authenticator on your mobile device and finish the process.
All of the steps below must be completed for the registration to be successful.
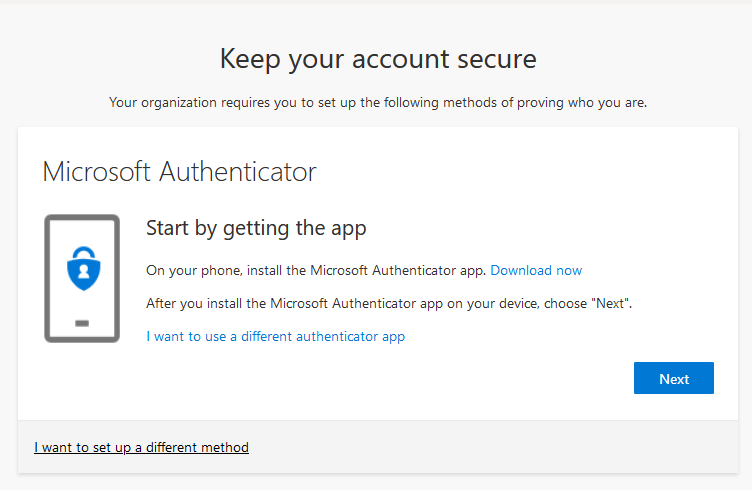
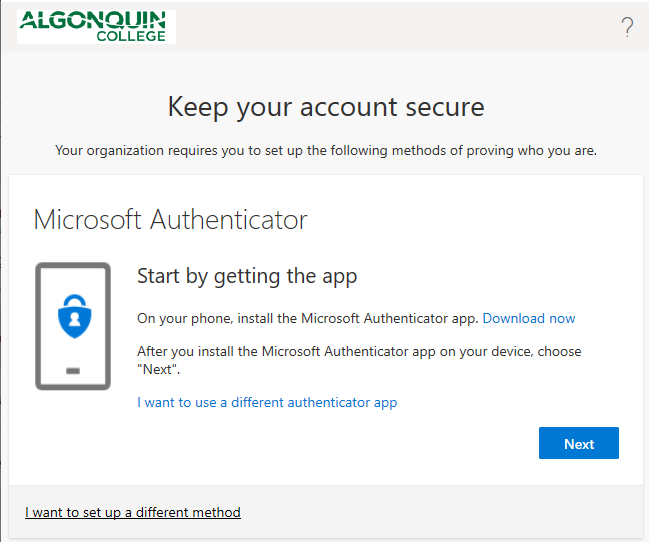
Step 1/3: Sign in and add Multifactor Authentication (MFA) method
Getting started
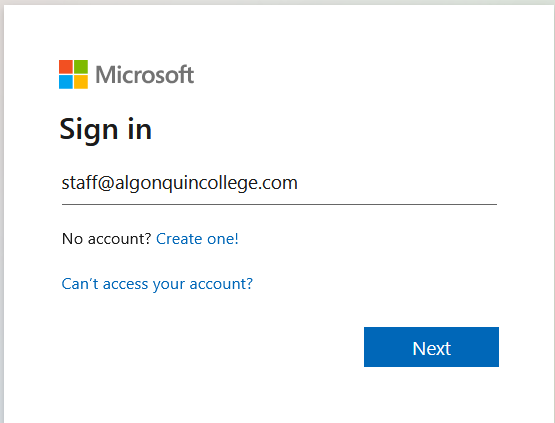
1. On your computer, open a browser and go to https://www.aka.ms/mfasetup/
![]()
2. Enter your Algonquin College email address and password and select ‘Next’.
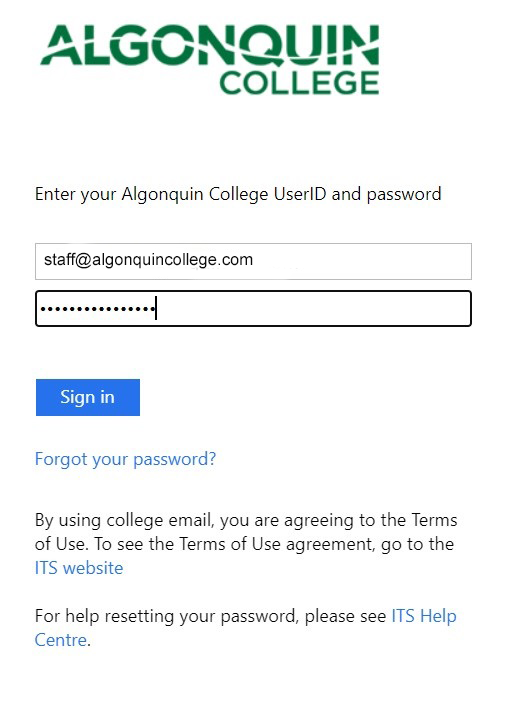
3. Enter your password and click ‘Sign in’
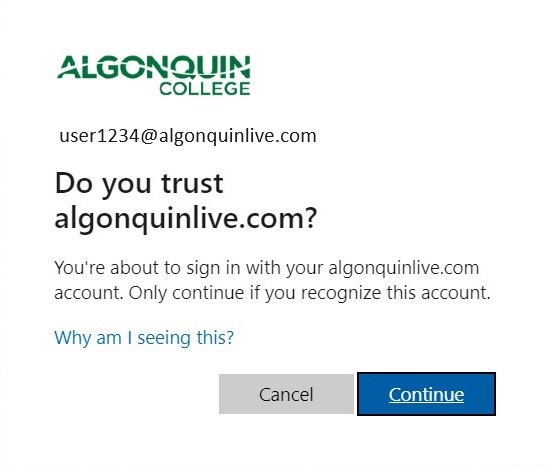
Click ‘Continue’ to trust algonquincollege.com
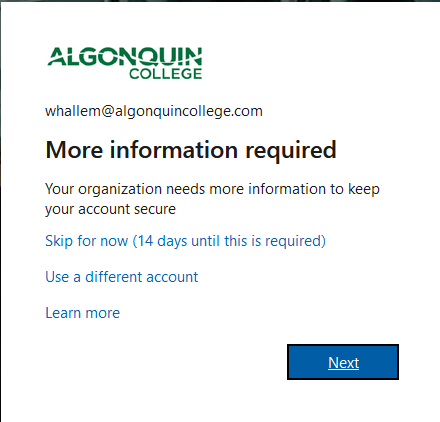
4. Select ‘Next’.
2. You will prompted to download and install the Microsoft Authenticator App on mobile device.
3. Proceed to Step 2: Download and Install MS Authenticator. Leave your Browser Window open, you will return to it to complete the setup

Step 2/3: Download and set up Microsoft Authenticator App
Select the option that matches the version of your mobile device
Android 8.0 or iOS 15.0 and newer and devices with QR scanners
If you have already downloaded Microsoft Authenticator to your mobile device, go to step 4 below.
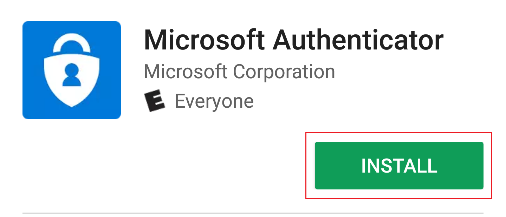
1. Open the app store on your device

2. Search for ‘Microsoft Authenticator’.
 |
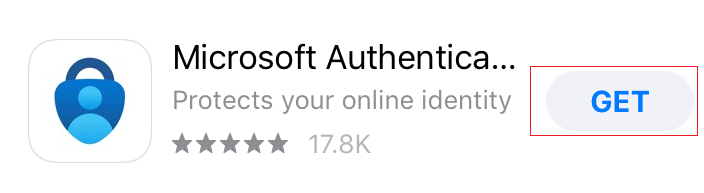 |
3. Select ‘Install’ or ‘Get’, depending on your device.
4. Return to your browser and select ‘Next’ on the ‘Start by getting the app’ dialog box in your web browser. Select ‘Next’ on the ‘Set up your account’ dialog box in your web browser.
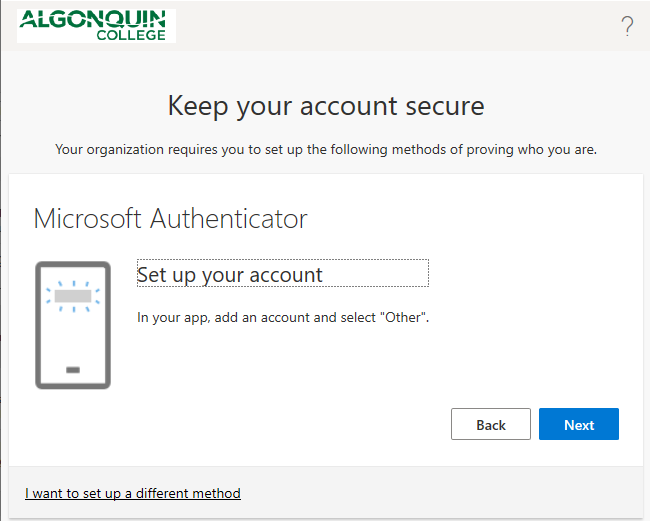
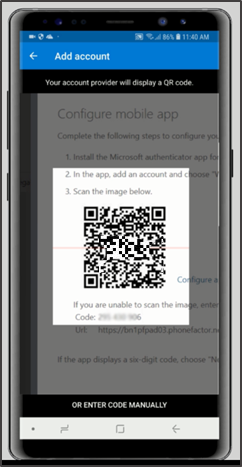
5. A dialog box with a QR code will be displayed. Leave this open while you proceed with Setting up the MS Authenticator on your device.
Setting up MS Authenticator
1.Open the Microsoft Authenticator App on your mobile device. Allow notifications, if prompted.
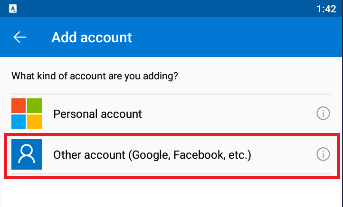
2. Depending on if you are opening the Authenticator App for the first time (Fig 1) or setting an additional account in the app (Fig 2), your view will be different. Users who do not see Work or school account (Fig 3) need to select Other account.
Fig 1.
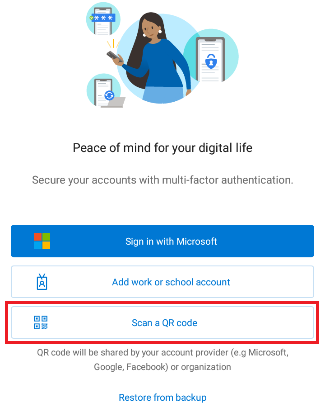
Fig. 2
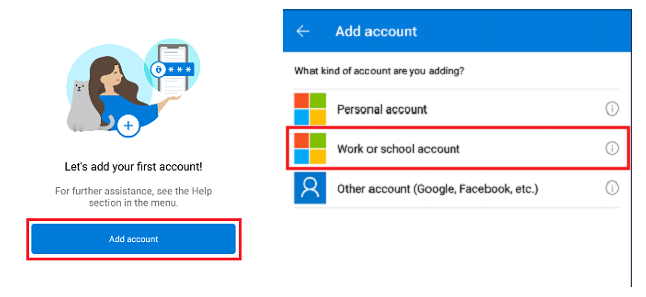
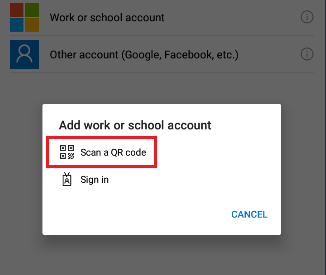
Fig. 3
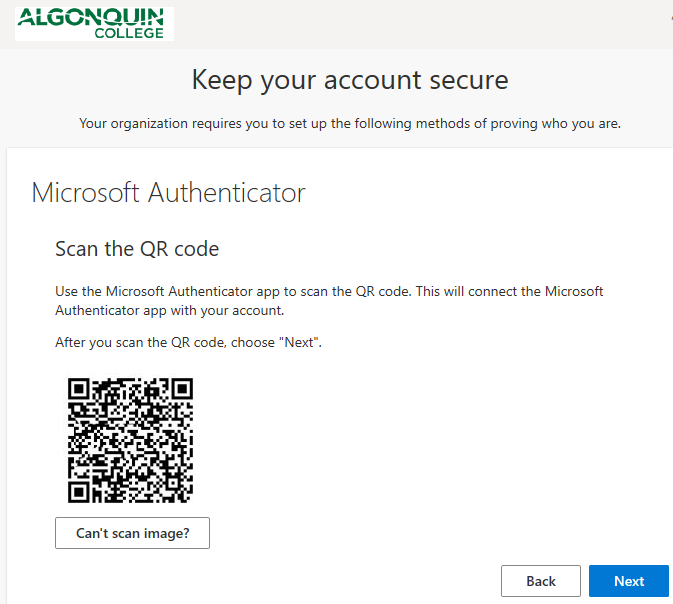
3. Select ‘Scan a QR code’ on your mobile device.
4. Position the QR Scanner over the middle of the QR code in your web browser, and it will automatically recognize it and create the account.
5. Select ‘GOT IT’.

6. Return to your browser where and select ‘Next’ on the ‘Configure mobile app’ QR page.
7. The web browser will send a Number Matching Notification to your mobile device. Enter to number shows on screen to complete the configuration.
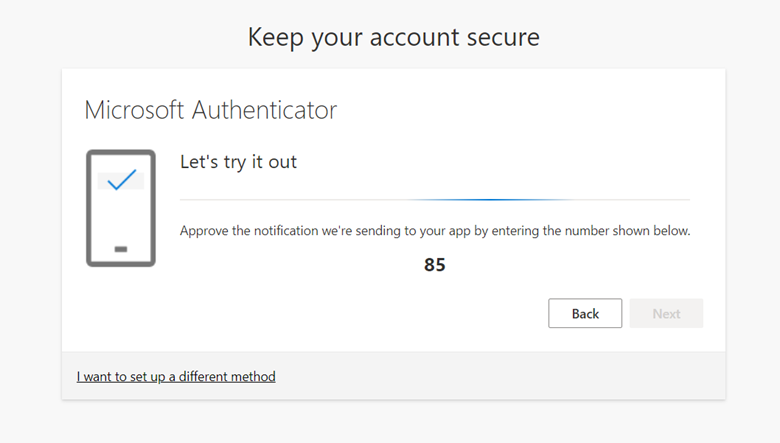

8. Once you enter the number on the app and click ‘Yes’ to approve the notification, the process will be completed.
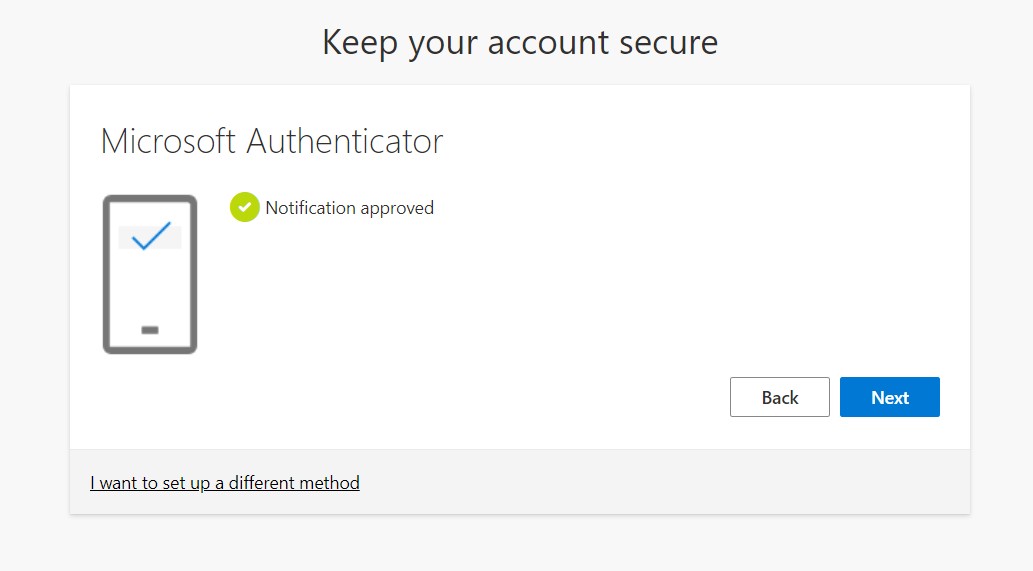
9. Select ‘Next.’
10. Select ‘Done.’
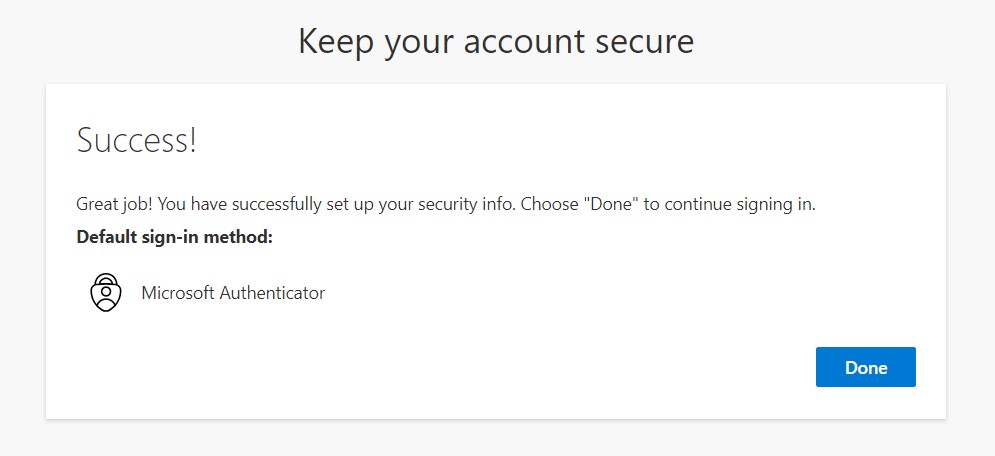
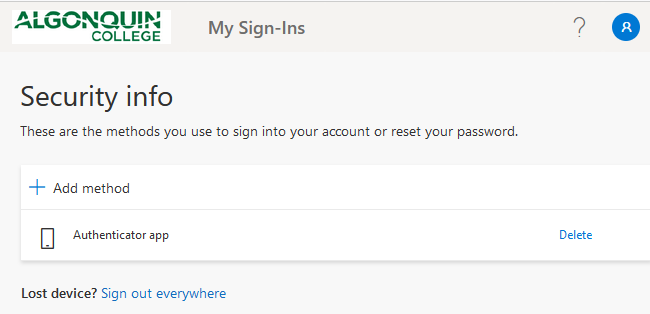
If the previous step is completed successfully, you will see the Authenticator App listed as a Sign-In method.
Step 3/3 Configure Cisco AnyConnect and use Microsoft Authenticator to sign into VPN
Select the Cisco AnyConnect application version that matches your device’s operating system.
Downloading and Installing Cisco AnyConnect Secure Client – MacOS
Please note that majority of College issued laptops have the required Cisco Client/App installed, use the search function on your laptop to locate it, if you do not have it, please follow the instructions to download and install it.
1. Click on the link below appropriate version for you operating system.
Note: If prompted login using your full college e-mail address and network account password. Once logged in, you will have the option to download the file.
64 Bit MacOS: AnyConnect – MacOS 64 Bit
2. Download the required file.
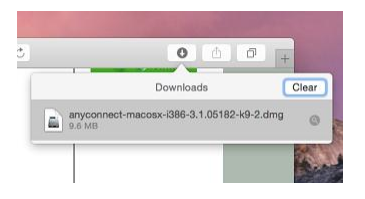
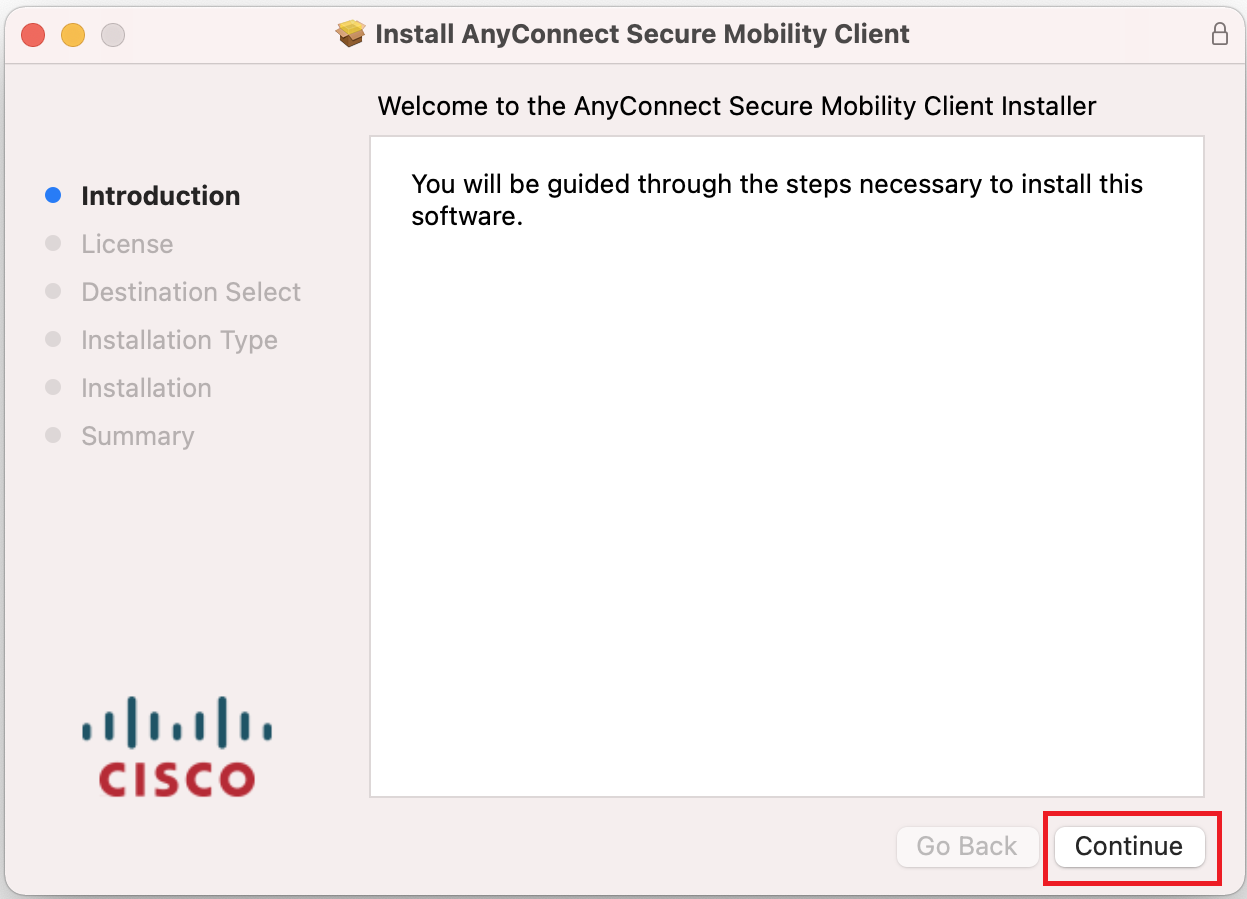
3. Find the Anyconnect DMG file in your downloads folder and double click it to mount the image and open the location of the install file.
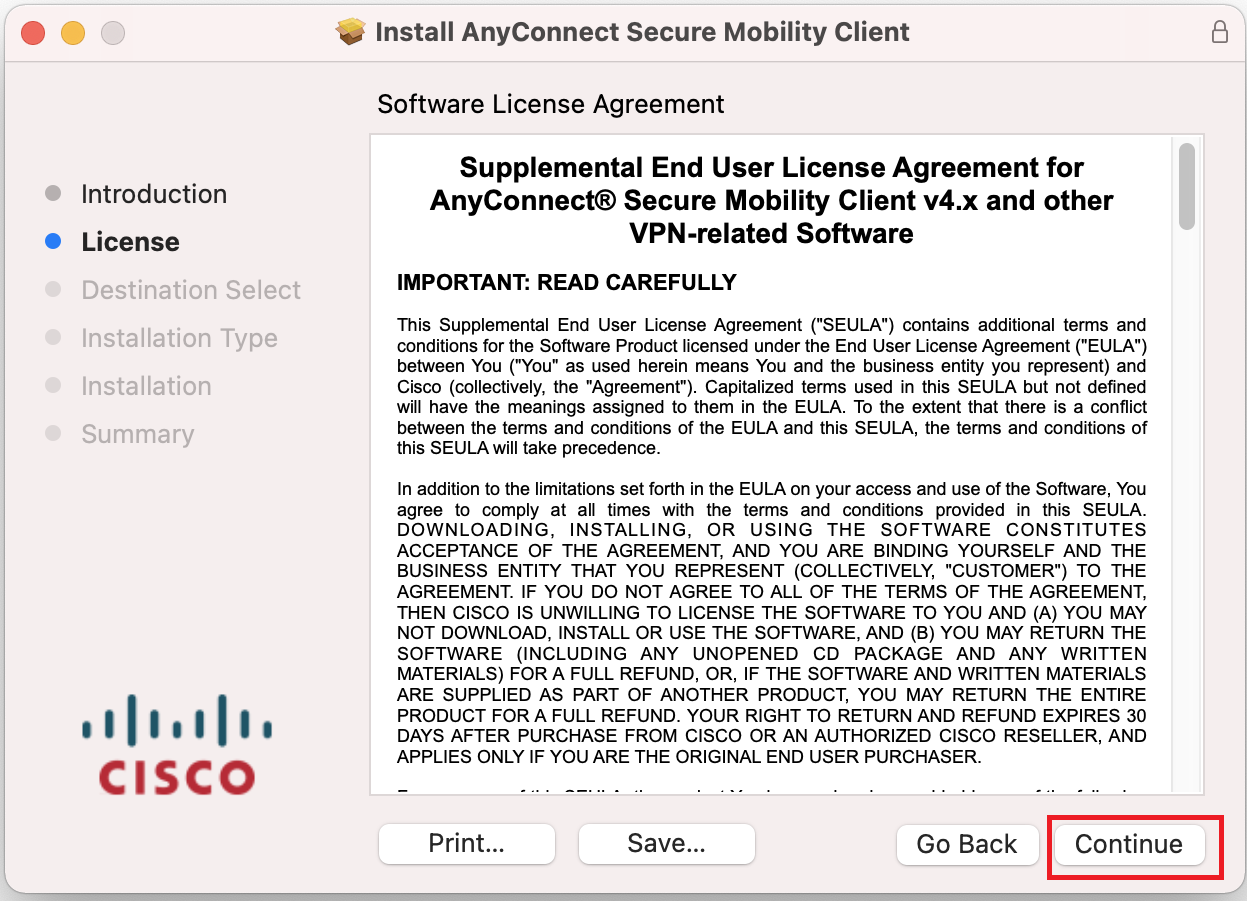
4. Press ‘Continue’.
5. Press ‘Continue’.
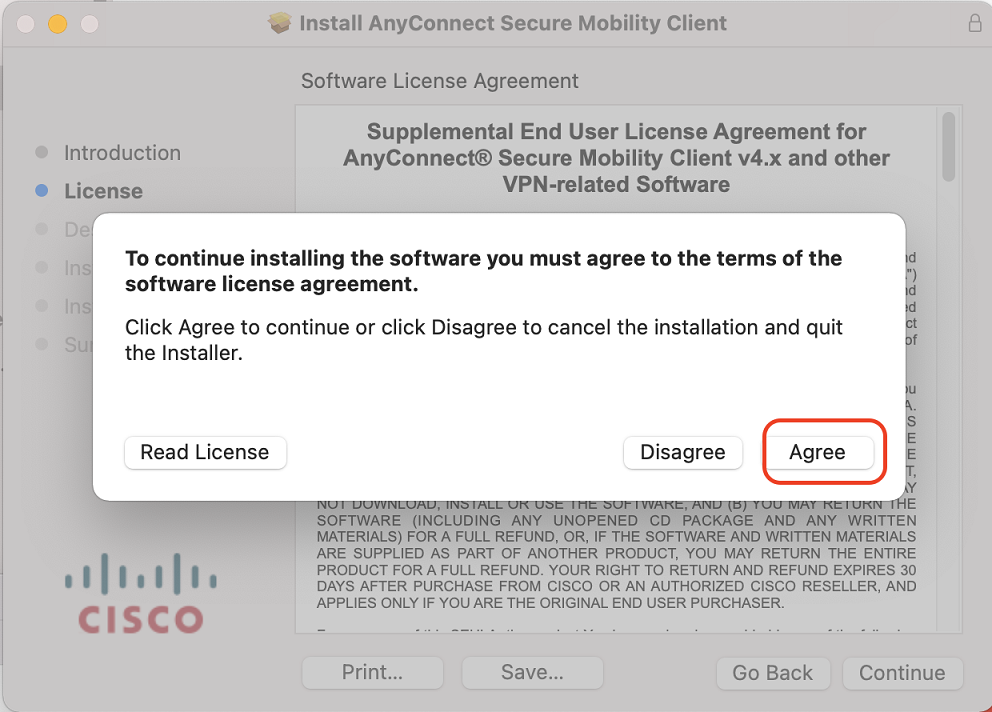
6. Click ‘Agree’ to continue.
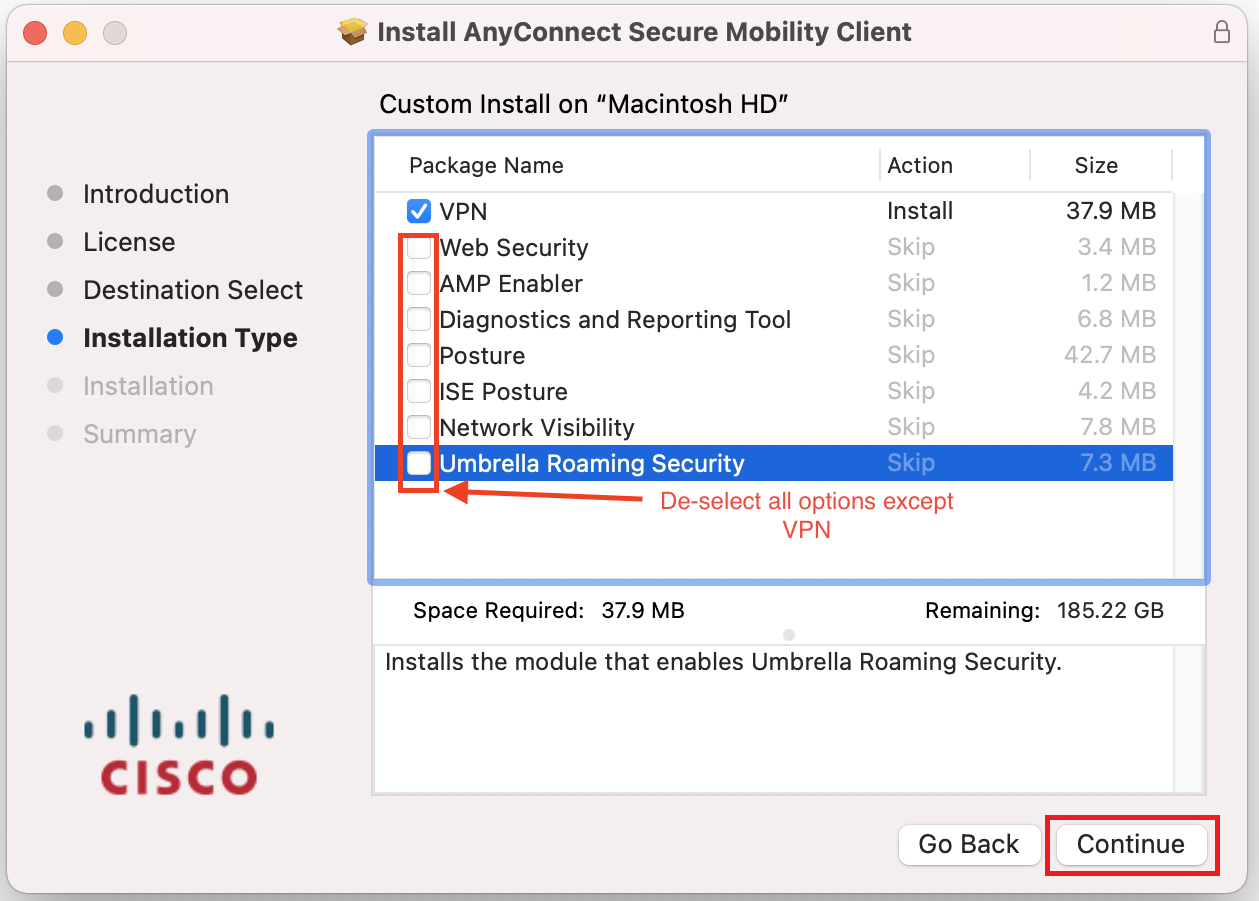
7. Deselect all options except VPN and press ‘Continue’.
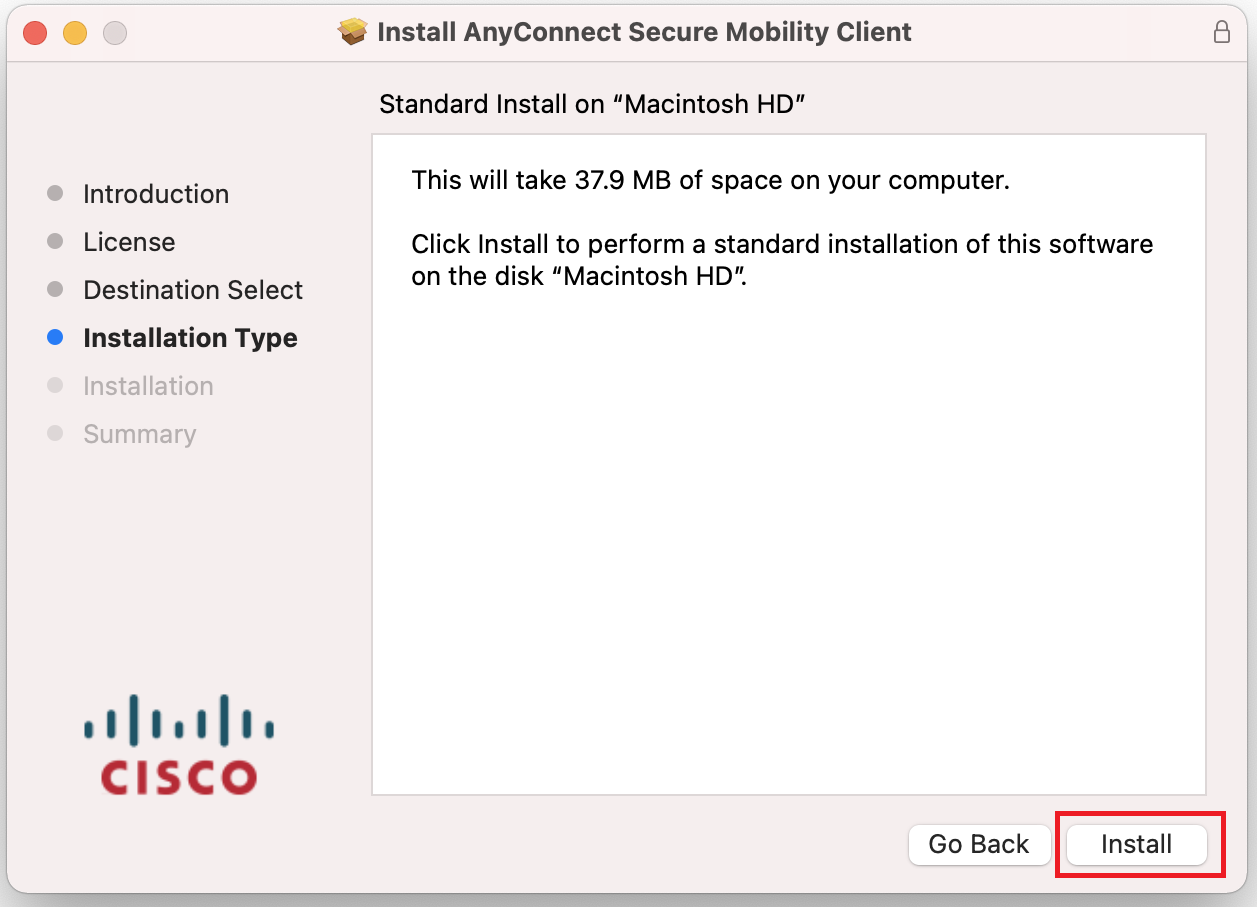
8. Press install to start the installation.
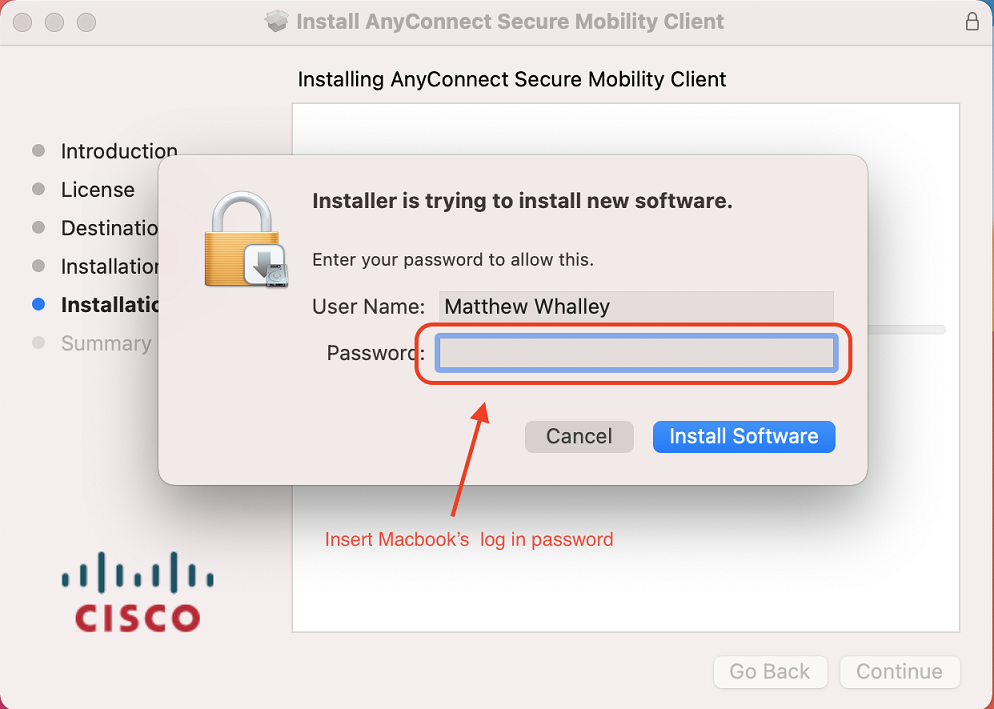
9. If prompted input your Macbook login password and press “Install Software“
10. When prompted press ‘Allow’ and press ‘Close’ to complete the installation.
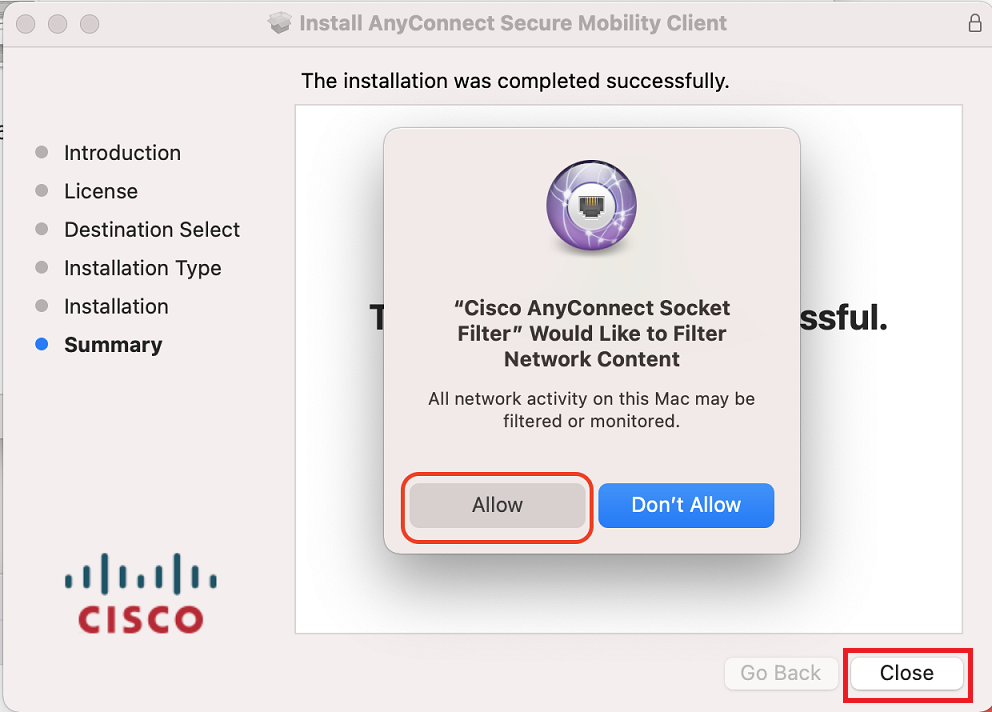
- If applicable, press “Move to Trash” to clean up the installer from your device if prompted.
You can now proceed to the next step “Login using the CISCO AnyConnect Secure Client”
Downloading and Installing Cisco AnyConnect Secure Client – Windows
Please note that majority of College issued laptops have the required Cisco Client/App installed, use the search function on your laptop to locate it, if you do not have it, please follow the instructions to download and install it.
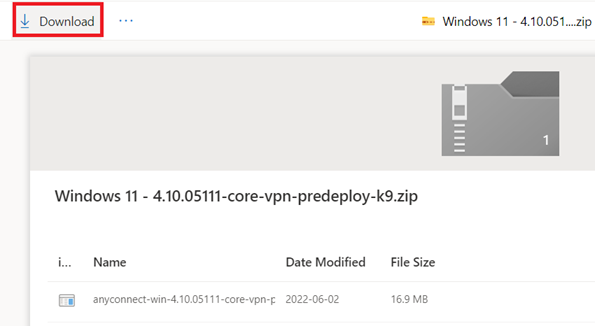
1. Follow the link to access the Cisco AnyConnect – Windows file (if prompted, log in using your full college email and network account password.)
2. Click the ‘Download’ button in the top left corner of the page.
3. Once downloaded, locate the file and double click to open it.
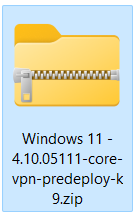
4. Next, double-click the installer file to begin the installation

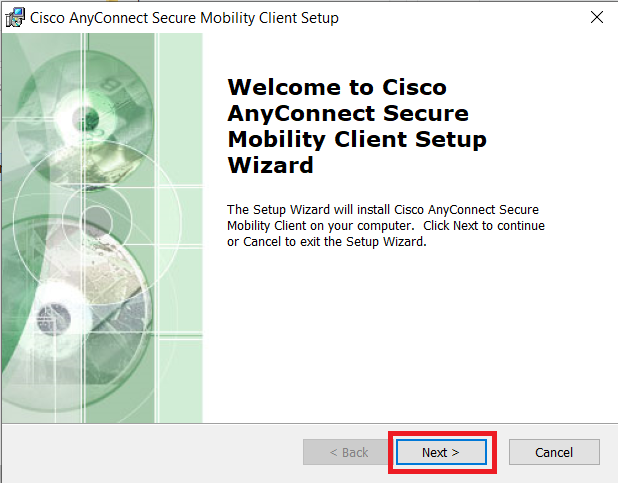
5. Click ‘Next’.
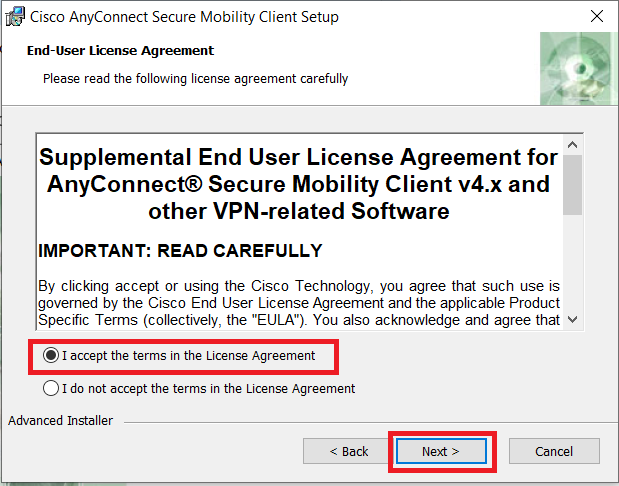
6. Select ‘I accept the terms…’ and click ‘Next’.
7. Click ‘Install’ to begin the installation.
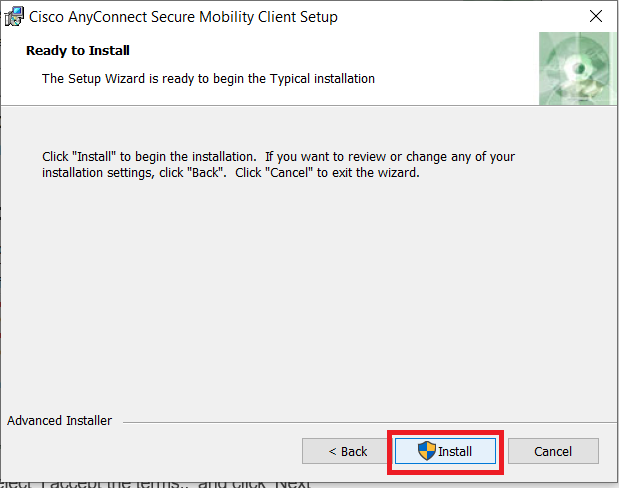
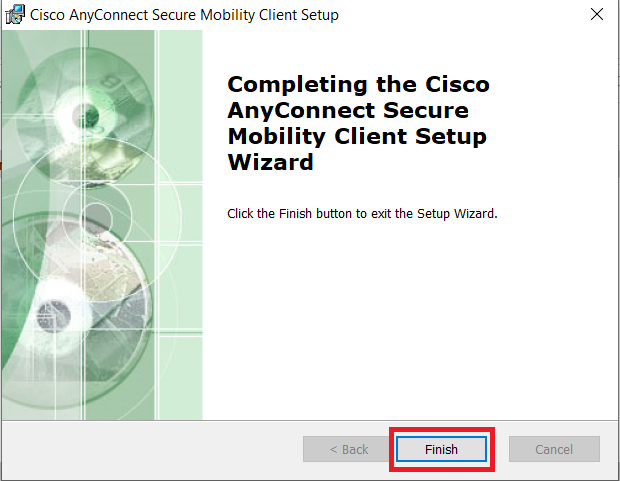
8. Click ‘Finish’ to complete the installation.
Once the installation process is complete, you can proceed to the next step “Login using the CISCO AnyConnect Secure Client“
How to use the Microsoft Authenticator App to sign into VPN
Logging into the VPN
Note: VPN connection will not work when you are on campus.
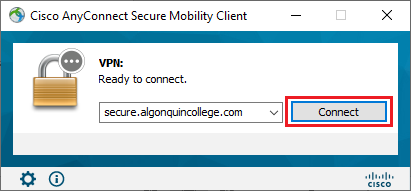
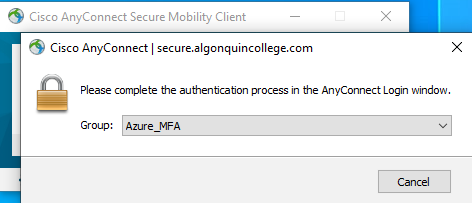
1. Open ‘Cisco AnyConnect’

2. If connecting for the first time, type ‘secure.algonquincollege.com’ into the connection window.
Select ‘Connect’ in the popup window.
3. Choose ‘Azure_MFA’ from the Group drop down menu to use the new method of MFA.
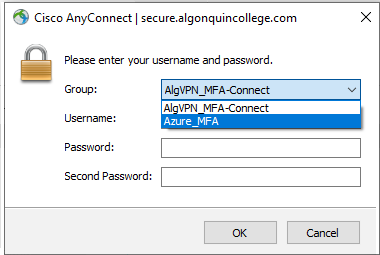
The next time you sign into VPN, you will not have to do this step, Azure_MFA will be the default selection in the Group drop down menu.
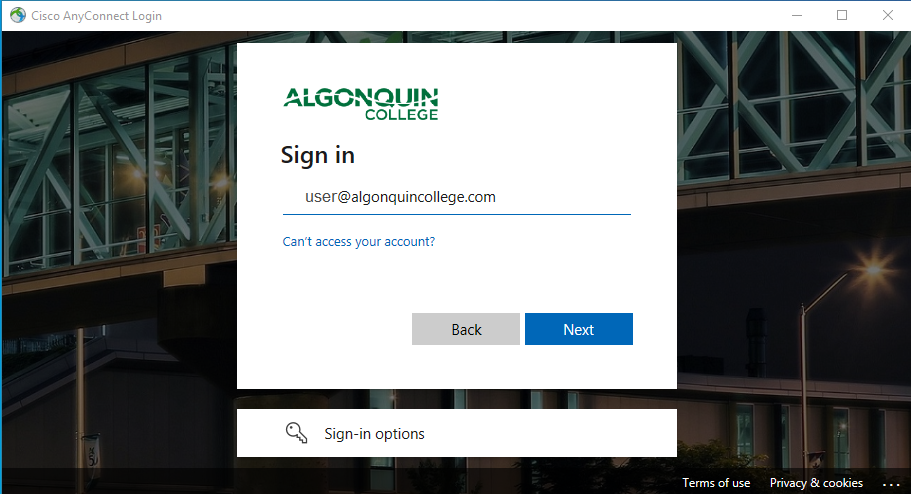
4. Your VPN Sign In Prompt will change to a new User Interface.
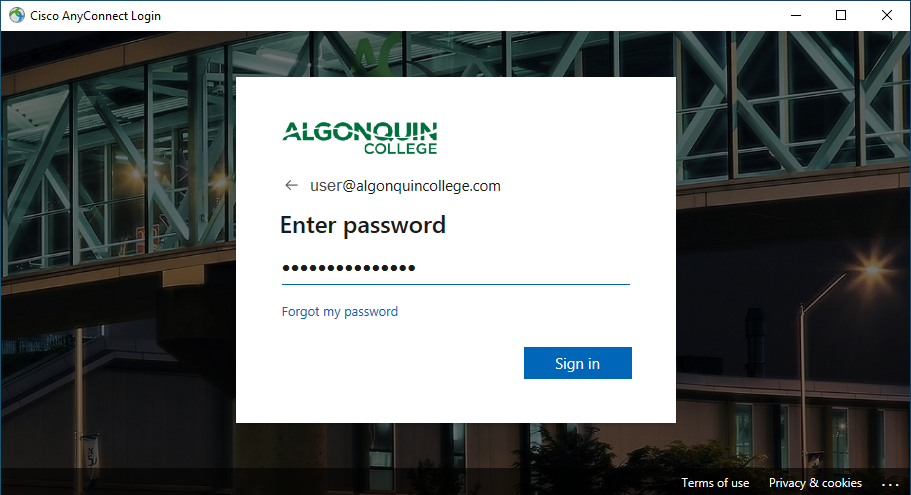
5. Enter your email address, and password when prompted.
6. Enter the code from the Microsoft Authenticator app or hardware token into the MFA ‘Code’ field and select ‘Verify.’
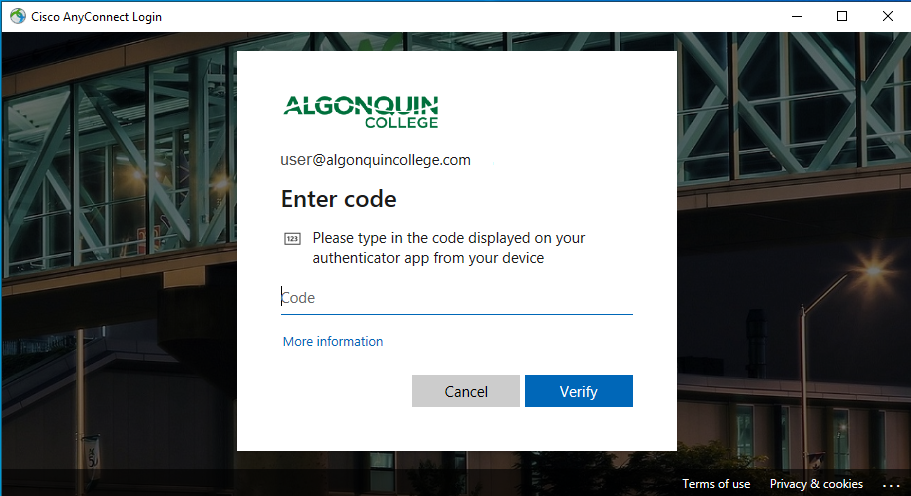
In the past, this is where some users would have entered the code from Entrust soft token or the grid card.
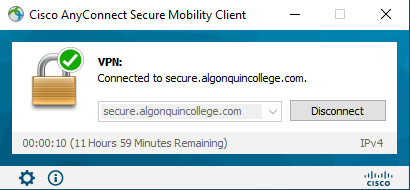

CONGRATULATIONS! You have successfully logged into the VPN.
Instructions for connecting to VPN on mobile devices
How to use the Microsoft Authenticator App to sign into VPN
Logging into the VPN
Note: VPN connection will not work when you are on campus.
1. Open ‘Cisco AnyConnect’
2. If connecting for the first time, type ‘secure.algonquincollege.com’ into the connection window.
Select ‘Connect’ in the popup window.
3. Choose ‘Azure_MFA’ from the Group drop down menu to use the new method of MFA.
The next time you sign into VPN, you will not have to do this step, Azure_MFA will be the default selection in the Group drop down menu.
4. Your VPN Sign In Prompt will change to a new User Interface.
5. Enter your email address, and password when prompted.
6. Enter the code from the Microsoft Authenticator app or hardware token into the MFA ‘Code’ field and select ‘Verify.’
In the past, this is where some users would have entered the code from Entrust soft token or the grid card.
CONGRATULATIONS! You have successfully logged into the VPN.
Connecting to VPN on Android (phone or tablet)
The following instructions are for Android devices 4.0 or higher
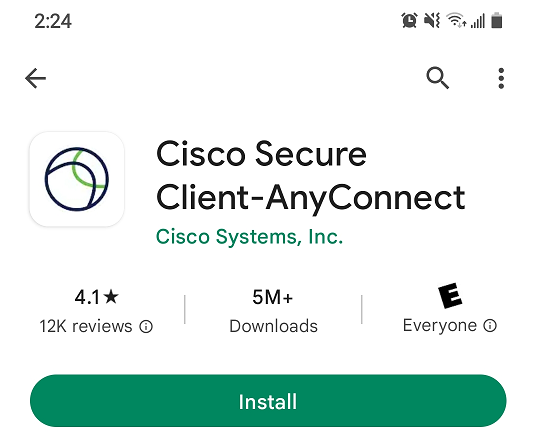
- Go to the ‘Play store’ and search for ‘Cisco Secure Client – AnyConnect’ app
- Press ‘Install’ to install the app on your device
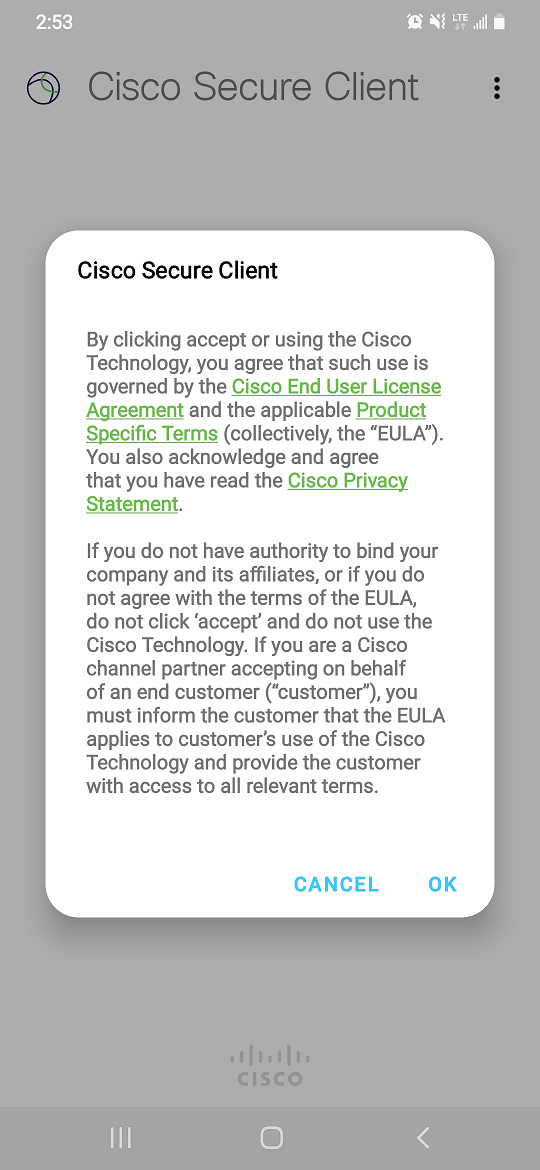
- Once installed, open the app and accept the License Agreement
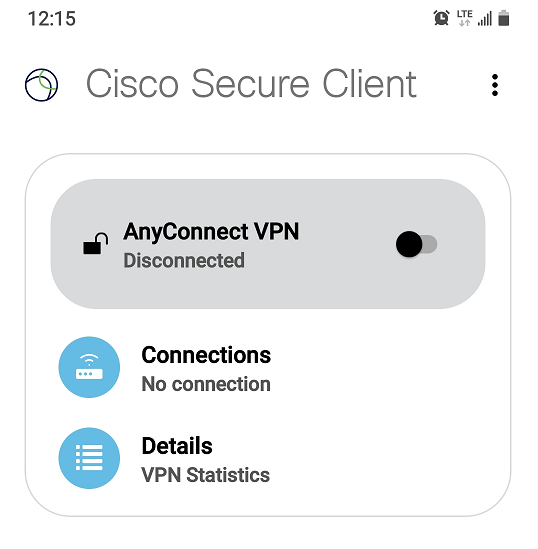
- On the next screen, press ‘Connections’
- On the next screen, press the + in the bottom right corner to add a connection
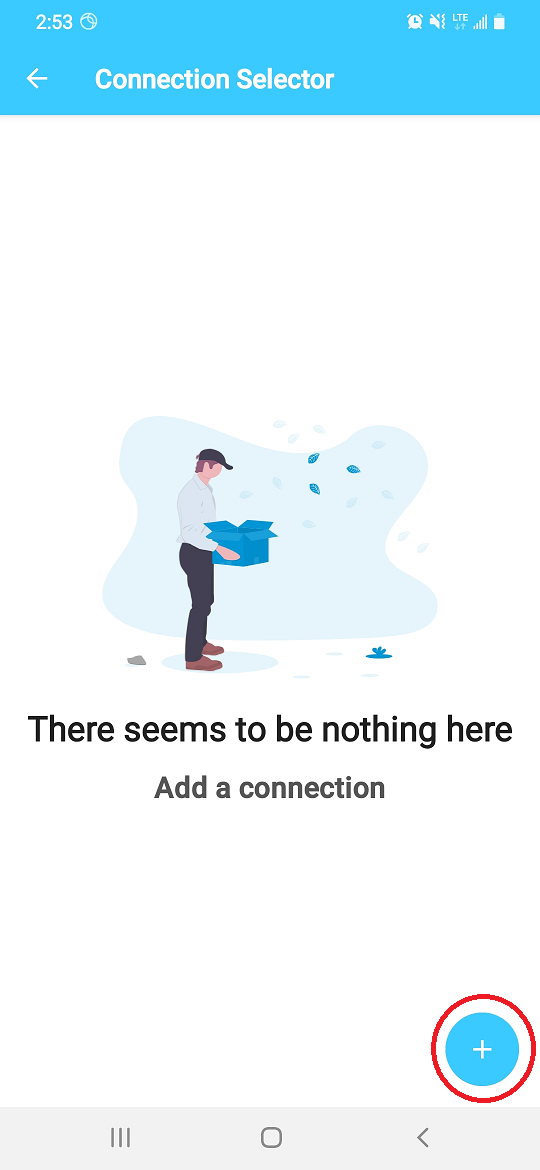
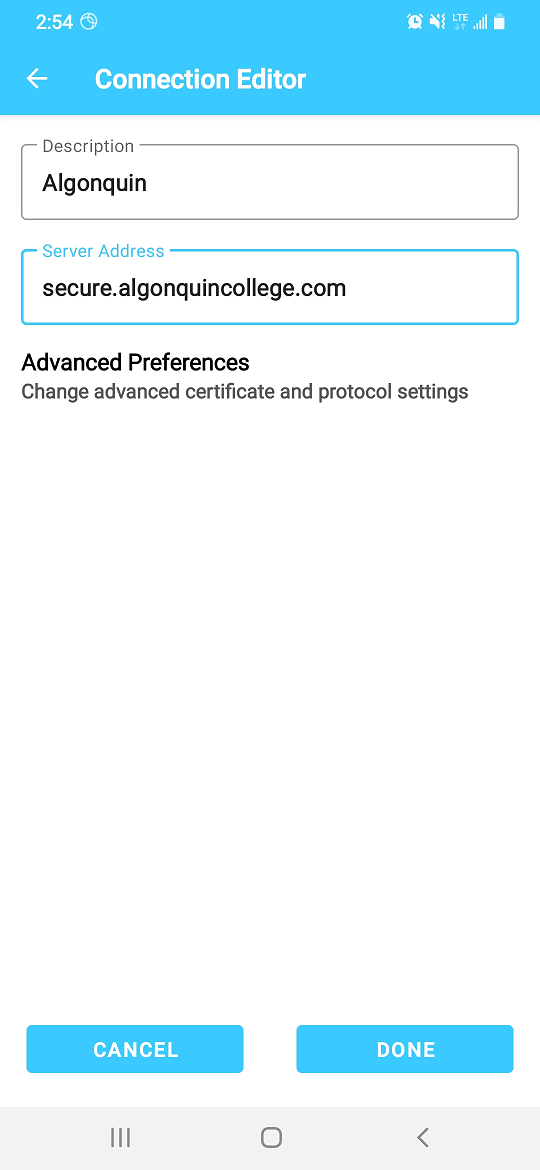
- In the Connection Editor, type in the description and server address as pictured below and click ‘Done’.
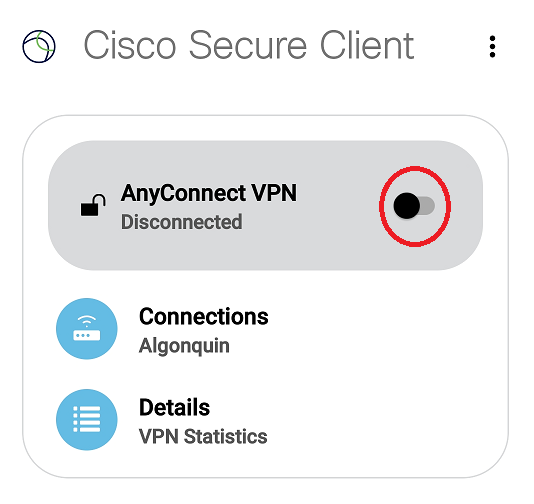
- Click on the arrow to return to the Connection Selector’ and slide the ‘AnyConnectVPN toggle to on position
- You will now be prompted for your network username and password (do not use your full email address). Leave the ‘Second password’ field blank and press ‘Connect’
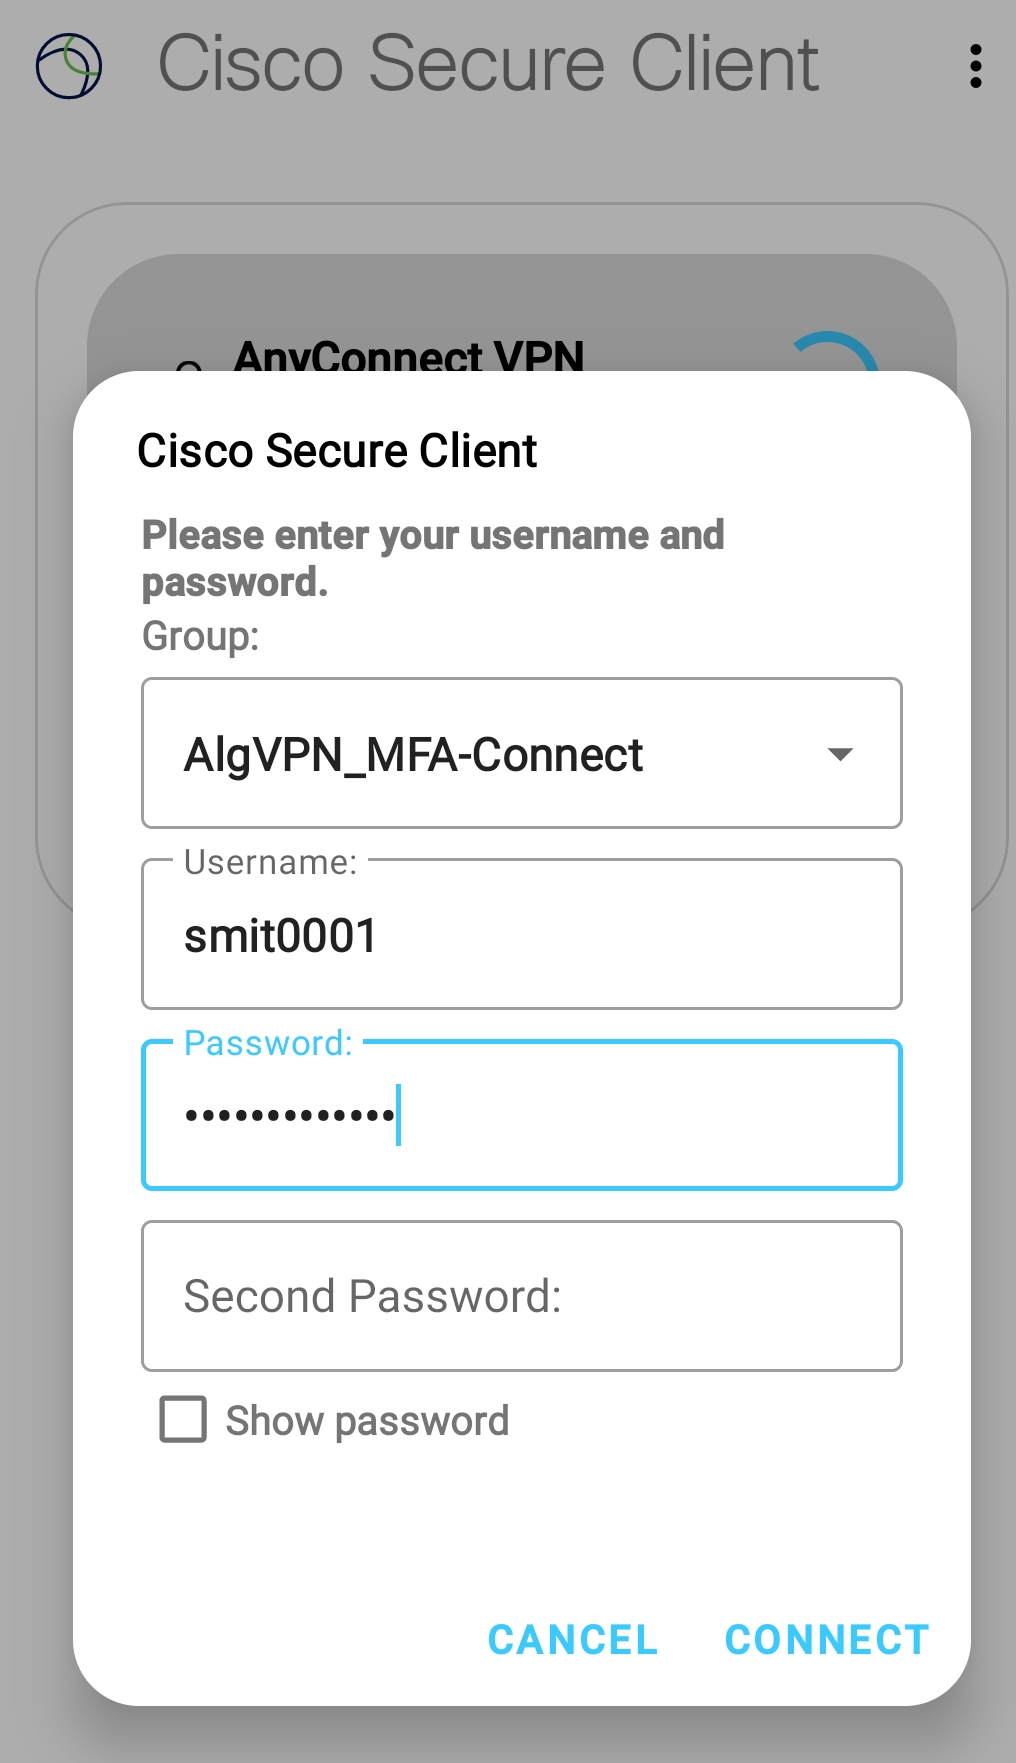
- Next, you will be prompted for the answer to the eGrid or Entrust token challenge. Input the answer and click ‘Continue’
- On your first attempt, you may see a prompt asking you to allow a connection request, you must allow it to complete your connection.
Connecting to VPN on iOS (iPhone and iPad)
The following instructions will work with any iOS (iPhone and iPad) device with iOS version 10 or higher.
- Go to your devices App store
- Search for the “Cisco Secure Client” application
- Press “Install” or the cloud button to install/Re-install Cisco Secure Client.
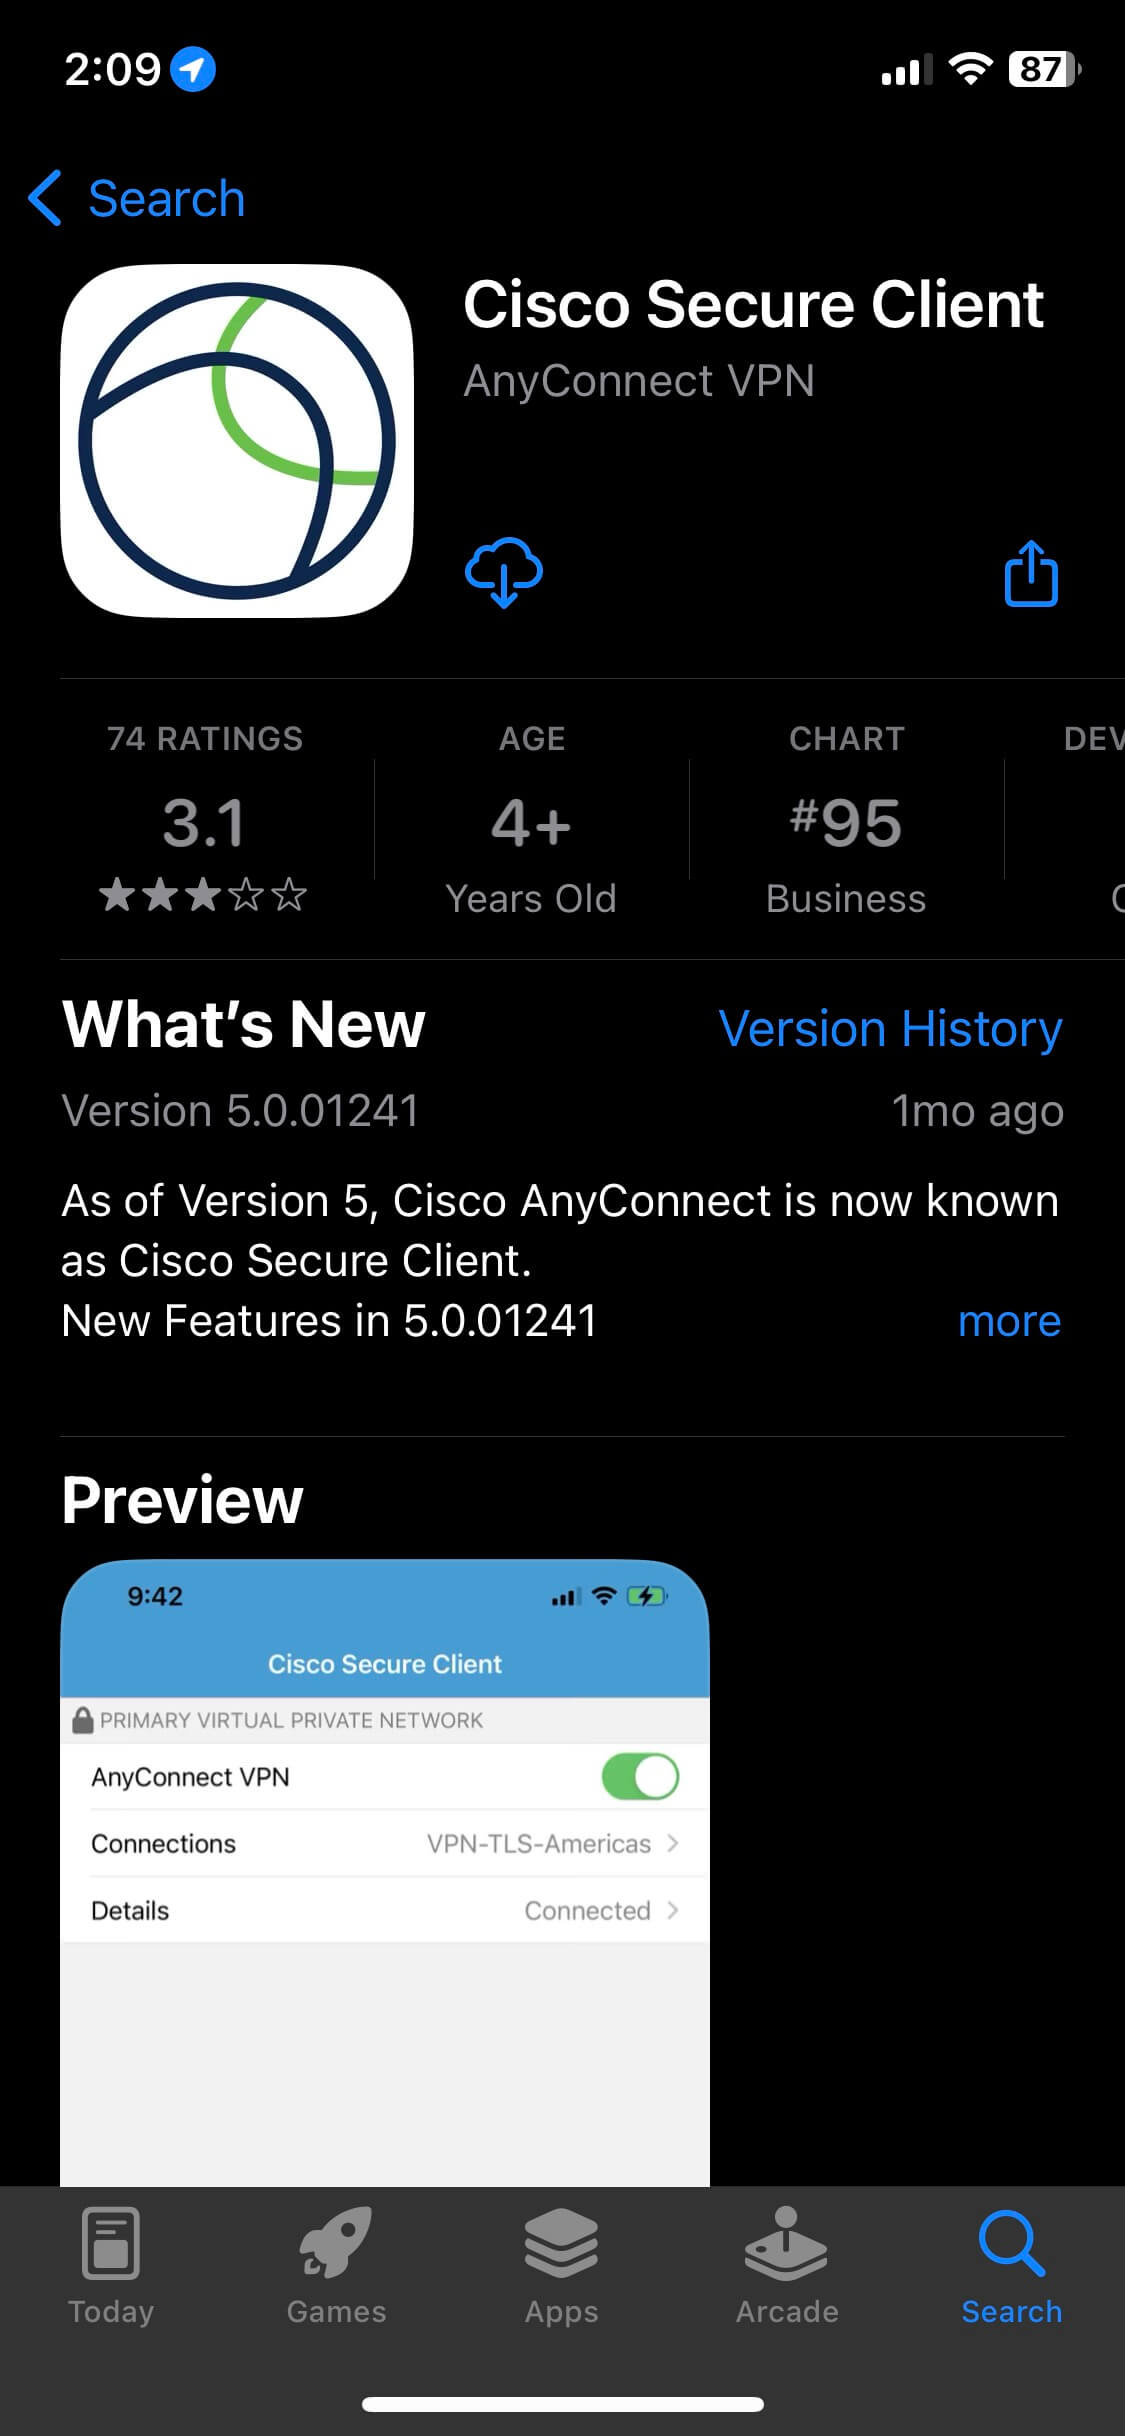
4. Once installed open the application and press the toggle next to “AnyConnect VPN”

5. A prompt will appear on your first time connecting requesting permission to add a VPN Configuration. Press “Allow” once added you will be navigated back to the Cisco Secure Client Application.
Note: You may be prompted for a TouchID/FaceID/Pin Number for verification.

6. The Cisco AnyConnect Application will prompt for a Description and Server Address which can be found below. Once filled out press “Save”
Description: Algonquin College (Or any other name that helps you identify this connection)
Server Address: secure.algonquincollege.com

7. You will be taken back to the main page of the Cisco Secure Client Application. You can now toggle the connection for the colleges VPN connection.

8. You will now be prompted for your username and password for the college once entered press “Connect”
Note: Leave “Second Password” blank and don’t enter your full email address as your username, leave out @algonquincollege.com.

9. You will now be prompted for your eGrid or Entrust MFA answer. Input the answer and press “Continue”
Note for Entrust Users: Within the Entrust app navigate to your code and tap the numbers to allow you to Copy it to your clipboard. You can then navigate back to the Cisco Secure Client Application and double press the answer field to bring up the Paste option.

10. The connection will now be established and you can verify the connection by the toggle showing green in the Cisco Secure Client Application and the VPN icon in the top left corner next to your internet connection icon.
Note: You can disconnect VPN by pressing the green toggle in your Cisco Secure Client Application.

11. You’re now successfully connected to Cisco AnyConnect on your mobile device and may now navigate to VPN dependent services such as your N drive or Workday Website.
Multi-Factor Authentication Frequently Asked Questions
What is multi-factor authenticaton?
Authentication is the process of verifying a person’s identity. It answers the question, “Who are you?” Multi-factor authentication uses both a password and a one-time code provided through an application on a mobile device.
Why is it important?
Security breaches due to compromised credentials have unfortunately become a regular occurrence. With an increasing number of passwords to remember, people are prone to re-use the same passwords for many accounts or to use passwords with easy-to-use and easy-to-access information (date of birth, names of family members or pets, etc.). When other non-College services (social networks, websites, etc.) have breaches, these in turn can lead to your credentials being compromised and used to access confidential or restricted College information.
Multi-Factor Authentication (MFA) is an additional service in the authentication process. It validates the identity of the user accessing online systems and applications. MFA works on these principles: what the user knows (their password), what the user has (their mobile phone or a physical device that generates one-time passwords).
How will the standard MFA improve the employee login experience?
You will log in to one of the listed applications once and be logged in to all applications on the list for the rest of the day – no further logins required! The experience will continue to improve as applications are added to the list.
Do I need to have my work email on my phone?
No, you do not need to have your work email on your phone. MFA only uses the device to send you a code via the mobile app. No cell numbers are stored anywhere, and we do not collect, store, or track any personal information through your mobile phone or device.
Which Algonquin College applications will require employees to use the standard multi-factor authentication method?
Workday, Brightspace, MyAC, Salesforce, VPN network access, and the Microsoft 365 suite of apps (Outlook mail, PowerPoint etc.) are among the high-demand applications that will require employees to use the standard multi-authentication method.
If I use another MFA app to access an Algonquin application, do I need to switch to the Microsoft Authenticator?
Yes. We are eliminating the use of different MFA types and streamlining them, so you only need one MFA type (the Microsoft Authenticator App) to access Algonquin applications. There are no issues if you use another MFA app for personal reasons, as well as the Microsoft Authenticator App.
If I already have the Microsoft Authenticator app, do I need to reinstall it?
If you already use the Microsoft Authenticator app for other services, you don’t need to reinstall it. You can register your Algonquin account.
Why can’t I see the ‘Work or School account’ option when adding an account to the Authenticator App?
Users who do not see the ‘Work or School account’ option when adding an account to the Authenticator App need to select the ‘Other account’ option.
Select ‘Scan a QR code’ on your mobile device.
How to use the Microsoft Authenticator App to log into College Applications?
Using the Microsoft Authenticator App to log into Single Sign On (SSO)
These instructions are for Algonquin College employees and contractors who need to access high-demand applications on the College’s computer network using multi-factor authentication.
You will use the Microsoft Authenticator app to log in to high-demand College applications, including Microsoft 365, Workday, Brightspace, Salesforce, and VPN.
To log in using MFA, you will need:
- Your Algonquin College credentials (username and password)
- Your work computer with web browser
- Microsoft Authenticator installed on a mobile device
- An internet connection
As you follow these instructions, you will open a high-value application, sign-in using your Algonquin College credentials, and enter a one-time code using Microsoft Authenticator.
Logging in
- Sign into any high-demand web-based application (i.e. VPN, Brightspace, Workday, Microsoft 365 suite, etc.), with your Algonquin College username and password.
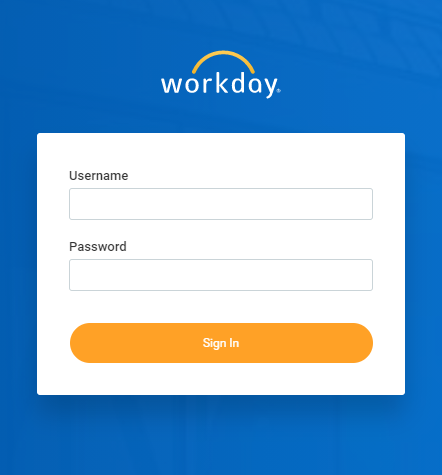
Once you have successfully entered your username and password you will be prompted to enter a Security Code.
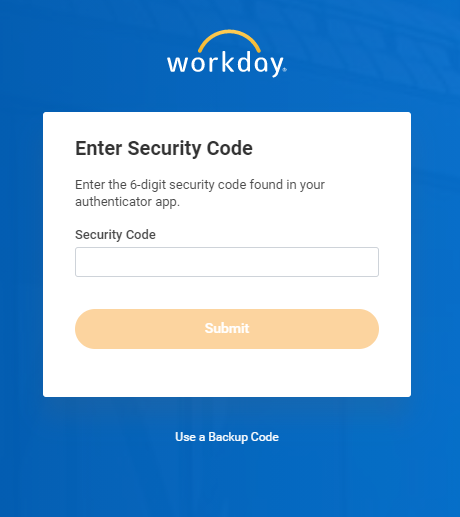
2. Open the Microsoft Authenticator App.
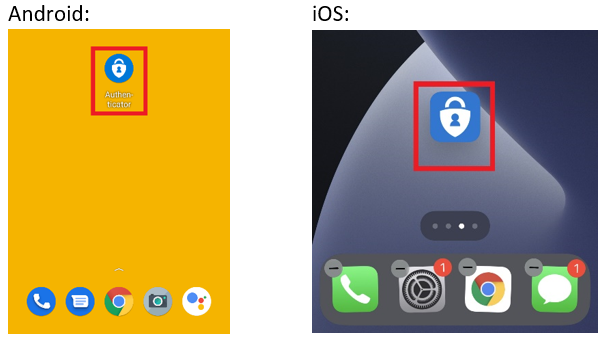
3. Unlock the Microsoft Authenticator app on your mobile device using your passcode or, if set up, Touch ID.
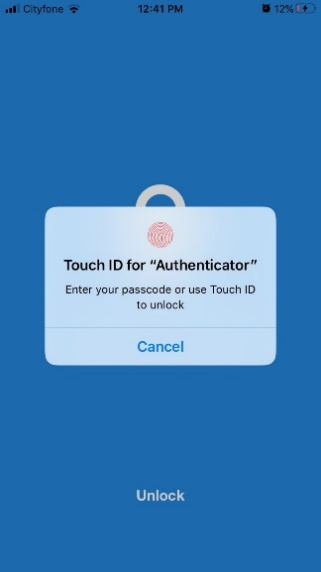
4. Select the Algonquin College account if there are multiple options.
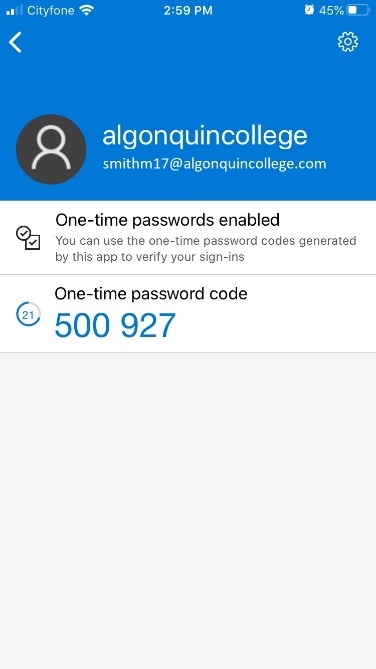
5. Make note of the six-digit code that appears.

The six-digit code is valid for 30 seconds. Once 30 seconds has expired a new, valid, six-digit code will appear.
6. Enter the six-digit code on your computer and select ‘Submit.’
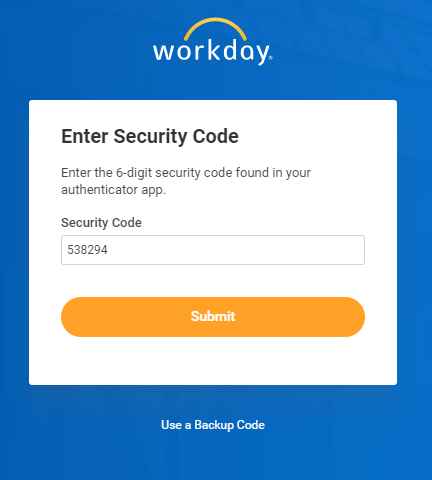
If you do not enter the correct code for three continuous attempts your account will be locked for 5 minutes.
Congratulations! You have successfully logged into your application using MFA.