ParaMed Clearance
Introduction
ParaMed is an Algonquin College partner organization that employs Registered Practical Nurses who are authorized to review and confirm medical clearance. The nurses at ParaMed clear students from multiple colleges, programs, and deliveries.
The role of the nurse with ParaMed is to review and confirm placement clearance only; they do not plan placements and are not authorized to grant extensions on behalf of the program. If students are not cleared by ParaMed they are required to contact the Field Placement Officer directly and may not be eligible to complete their placement in their preferred term.
Before Getting Started
- Ensure this page is for you. While the ParaMed preparation steps are similar for students studying on-campus, this page has been designed to support students studying full-time and part-time online in the following programs only:
- Addictions and Mental Health
- Autism and Behavioural Science
- Autism Studies
- Child and Youth Care (Year 1)
- Community and Justice Services
- Early Childhood Education
- Early Childhood Education Administration
- Fitness and Health Promotion
- Fitness and Lifestyle Management
- Working with Dementia Clients
If you are an on-campus student, please contact your Program Coordinator for further information regarding field placements.
- Ensure you are available and committed to placement. Most programs require block placements running full-time (30-40 hours per week) Monday-Friday over 4-12 weeks. Students must be fully available throughout this time; exceptions will not be made for childcare, employment, or other personal obligations.
Understanding ParaMed Requirements
While each program has specific ParaMed clearance requirements, the overall ParaMed process is the same for all students:
- Create or log in to your Placement Pass account.
- Download your program-specific ParaMed form.
- Complete all medical and non-medical requirements.
- Upload your completed documentation and make your payment in the Placement Pass Portal.
- Review your results in the Placement Pass Portal.
These steps are broken down further below.
Student ParaMed Access
Please review the steps below to create your account and navigate through the ParaMed Placement Pass site.
How to Create an Account
- Go to the Placement Pass Portal.
- Click on the Student Sign Up option on the home page or the create account option in the upper right corner.
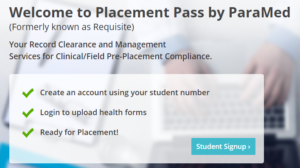
- A pop up will appear advising that you require a Student Account ID and a College issued email address in order to continue. If you have both of these requirements, continue to the next step by clicking on the Continue button.
- Enter in your Student ID and Date of Birth or Email Address depending on what is being requested and click the Continue
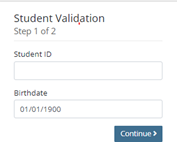
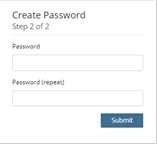
- If the student ID and Birthdate/email address entered are a match, you will be taken to the next step to create a password. Enter the password twice and click the Submit icon.
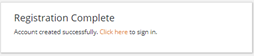
- A pop up will appear identifying if registration was successful. Click on the pop-up at the Click here option which will take you back to the login screen.
- Enter your Student ID number and the Password you created to log into the site.
Resetting Your Password
- If you have forgotten your password you can trigger a password reset from the sign-in screen, by clicking on the Forgot Your Password option.
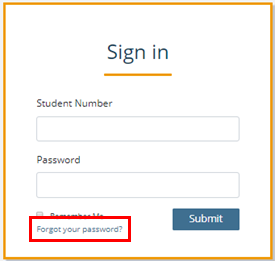
- Enter your email address and student number. An email will be sent to your account with the instructions to reset your password.
Accessing the Requirements and Downloading the Form
- When you log into your account you will be shown the programs that are associated with your registered account with the college. Click on the View Details icon.

- The display screen is broken into 3 sections:
- The Status box will show your current status. If no documents have been submitted, it will identify what the next steps are in the process.
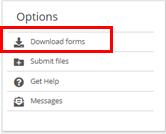
- The Options box identifies the actions in the process to submit the forms.
- The Requirements box identifies which requirements are needed for the program that you are registered in.
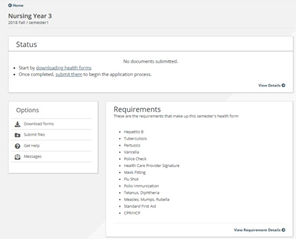
- Clicking on the view Requirements Details option on the bottom right corner of the requirements box will create a single page outlining all the requirements for your program. Details about those requirements can be found on this screen.

- Review this page to understand which documents are required to be submitted. Click on the Dashboard option at the top of the screen to return to the previous page.
- Click the Download Forms Option in the Options box to print a copy of the form that needs to be filled out by your Physician. Review the form and gather all the necessary documentation as outlined in the form and Requirements page.
Messages
- Messages that have been entered from the College can be reviewed in the messages center. If there is a new Message it will be flagged as new.
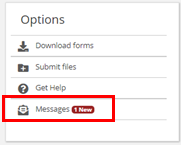
- Click to open the message. All messages will be displayed in the Message center.

Video Walkthrough
If you would like a video walkthrough, please watch the video here
Student Form Submission
Once you have completed all your medical and non-medical requirements, you will upload copies of all supporting documentation into your ParaMed account and make your payment.
You must upload your documentation on or before the placement deadline for your program. If you are not cleared by ParaMed by the deadline, you are required to contact the Field Placement Officer directly and may not be eligible to complete your placement in your preferred term.
Submitting Completed Health Forms
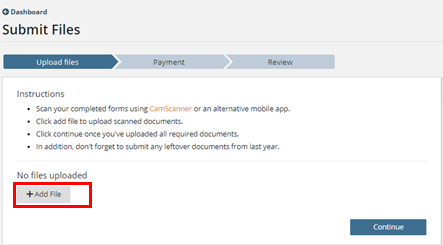
- Scan all of the documents you are required to submit. Cam Scanner or an Alternate mobile app can be utilized to complete the process.
- Click on the Submit Files option from the Options box.
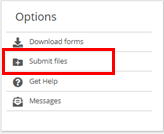
- Click the Add File icon to upload the files from your device.
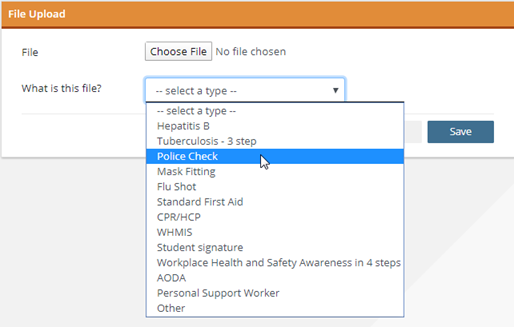
- Click on the Choose File icon and locate the file you scanned and click on it to attach it. From the Drop-down option identify what the file type is that you have uploaded.
- Once you can see the file has been attached, click the Save button to save what you have uploaded.

- If the file was attached successfully it will now be showing in the Files section. Continue uploading all the files by following Steps 3 & 4 for each file.
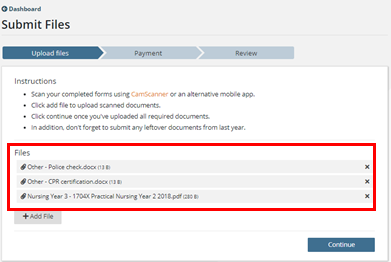
- Once you are satisfied that you have uploaded all the required files click the Continue icon in the bottom right corner to proceed to the Payment screen.
Please ensure you review all documentation before you proceed to the payment screen. You will be charged an additional fee for submitting documents after your payment is complete.
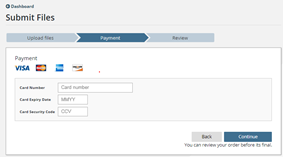
Making a Payment
- On the payment screen enter your Credit card number as well as the expiry date and CCV code from the back of the card and click the Continue icon.
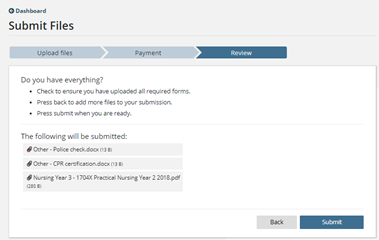
- A final review page will pop up allowing you an opportunity to review your uploaded documents to ensure that you have not missed uploading one. If you determine you have not uploaded a document you can click the Back icon and return to the upload page. If you are satisfied that you have uploaded all the necessary documents click the Submit icon to submit your documents and complete your payment process.
- If the files have submitted successfully you will get a pop-up identifying they were submitted. Click on the click here option to return to the main details page.

- You should also receive an email at the address for your College account identifying that your submission was successfully received.
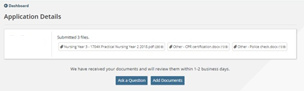
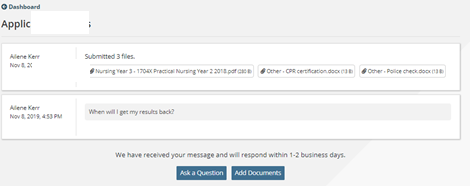
Reviewing Status After Submission
- In the Status box, it will identify that the files have been received and when they will be reviewed. If you wish to review further what was submitted or ask any questions you can click on the View Details option in the bottom right corner.

- From the view details tab, you can submit additional documents if you realize you have forgotten to send one in your original transfer or ask a question to be answered by the nurse by clicking on one of those option icons.
Please note you will be charged an additional fee for submitting documents after your payment is complete.
- If you wish to ask a question click on the Ask a Question icon and enter your question in the free text box. Click submit.
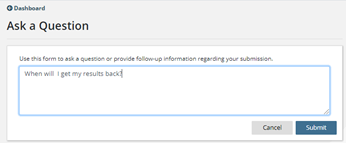
- Your question will appear in the Application Details and when a nurse responds to your question it will be located at the bottom of the Clearance screen.
Reviewing Your Clearance Results
Once your clearance has been completed you can log into your account and review the results of each component.
![]()
Frequently Asked Questions
How can I pay for my appointment?
Your payment will be made by Credit or pre-loaded cards. The current rates are posted on the ParaMed website.
What if there are requirements that I cannot complete?
Please contact the Field Placement Officer immediately.
What supporting documentation do I need from my healthcare provider?
At the end of your visit, you will need copies of all supporting documentation: the completed Clinical/Field Pre-Placement Health Form, your yellow immunization card and/or municipal/regional health unit documentation denoting a record of your immunization history and blood test results if applicable.
What if my healthcare provider says I don’t need an item listed on the form?
All items on this form are required for placement. It will be your responsibility to impress upon the health care provider that if you don’t have this, you cannot be cleared for field placement and will not be able to participate in this mandatory program course.
What if I don’t have a primary health care provider?
If you are in the Ottawa Capital Region please go to Algonquin College Health Services. If you are outside the Ottawa Capital Region please visit a local walk-in clinic.
Why do I need to meet with a healthcare provider?
Section A of your forms cover all the medical requirements as outlined by your academic facility and your field placement facility/organization. It is your health care provider’s responsibility to complete and sign all the areas on section A where it requires his/her signature. These are the shaded areas. While they will guide you through what will be required from you in the process, it will be your responsibility to make sure the health care provider completes all the shaded areas required and provide you with the proof of the identified immunizations and blood test results.
Where can I complete Standard First Aid/CPR Level C training?
If your program requires a current CPR and Standard First Aid Level C certificate, it must be completed through a Red Cross, St. John’s Ambulance, or equivalent First Aid course. You should be able to find an offering in your area by doing a quick Google search for “CPR and Standard First Aid Level C + your city/town.”
This course must be completed in-person to be valid, while blended options are approved online only first aid certification will not be accepted.
How can I request a letter for my PRCSVS?
Some districts will require a letter from the college indicating why you require a PRCSVS. If you require a letter, please complete this online request form.
What if my clearance expires before my next field placement?
You are responsible for making sure your medical and non‐medical requirements are valid for the duration of your placement. If you are in a program with more than one placement, you will need to update any expired items prior to the placement deadline.
How long does it take to obtain clearance?
In a worst-case scenario for students who are missing specific immunizations, completing these requirements can take up to 6 months. For students with current immunization records the average time to prepare all ParaMed documentation is 6-12 weeks. If you are not cleared by the placement deadline, you will not be eligible for placement. This will prolong your graduation and may result in additional fees.