Multimodal-Enabled Classrooms and Technology
Common Multimodal Tools
Multimodal Classrooms
Checklists: Standard Classroom Set-Up
Checklists: Active Learning Classroom Set-Up (e.g. T232)
Common Multimodal Tools
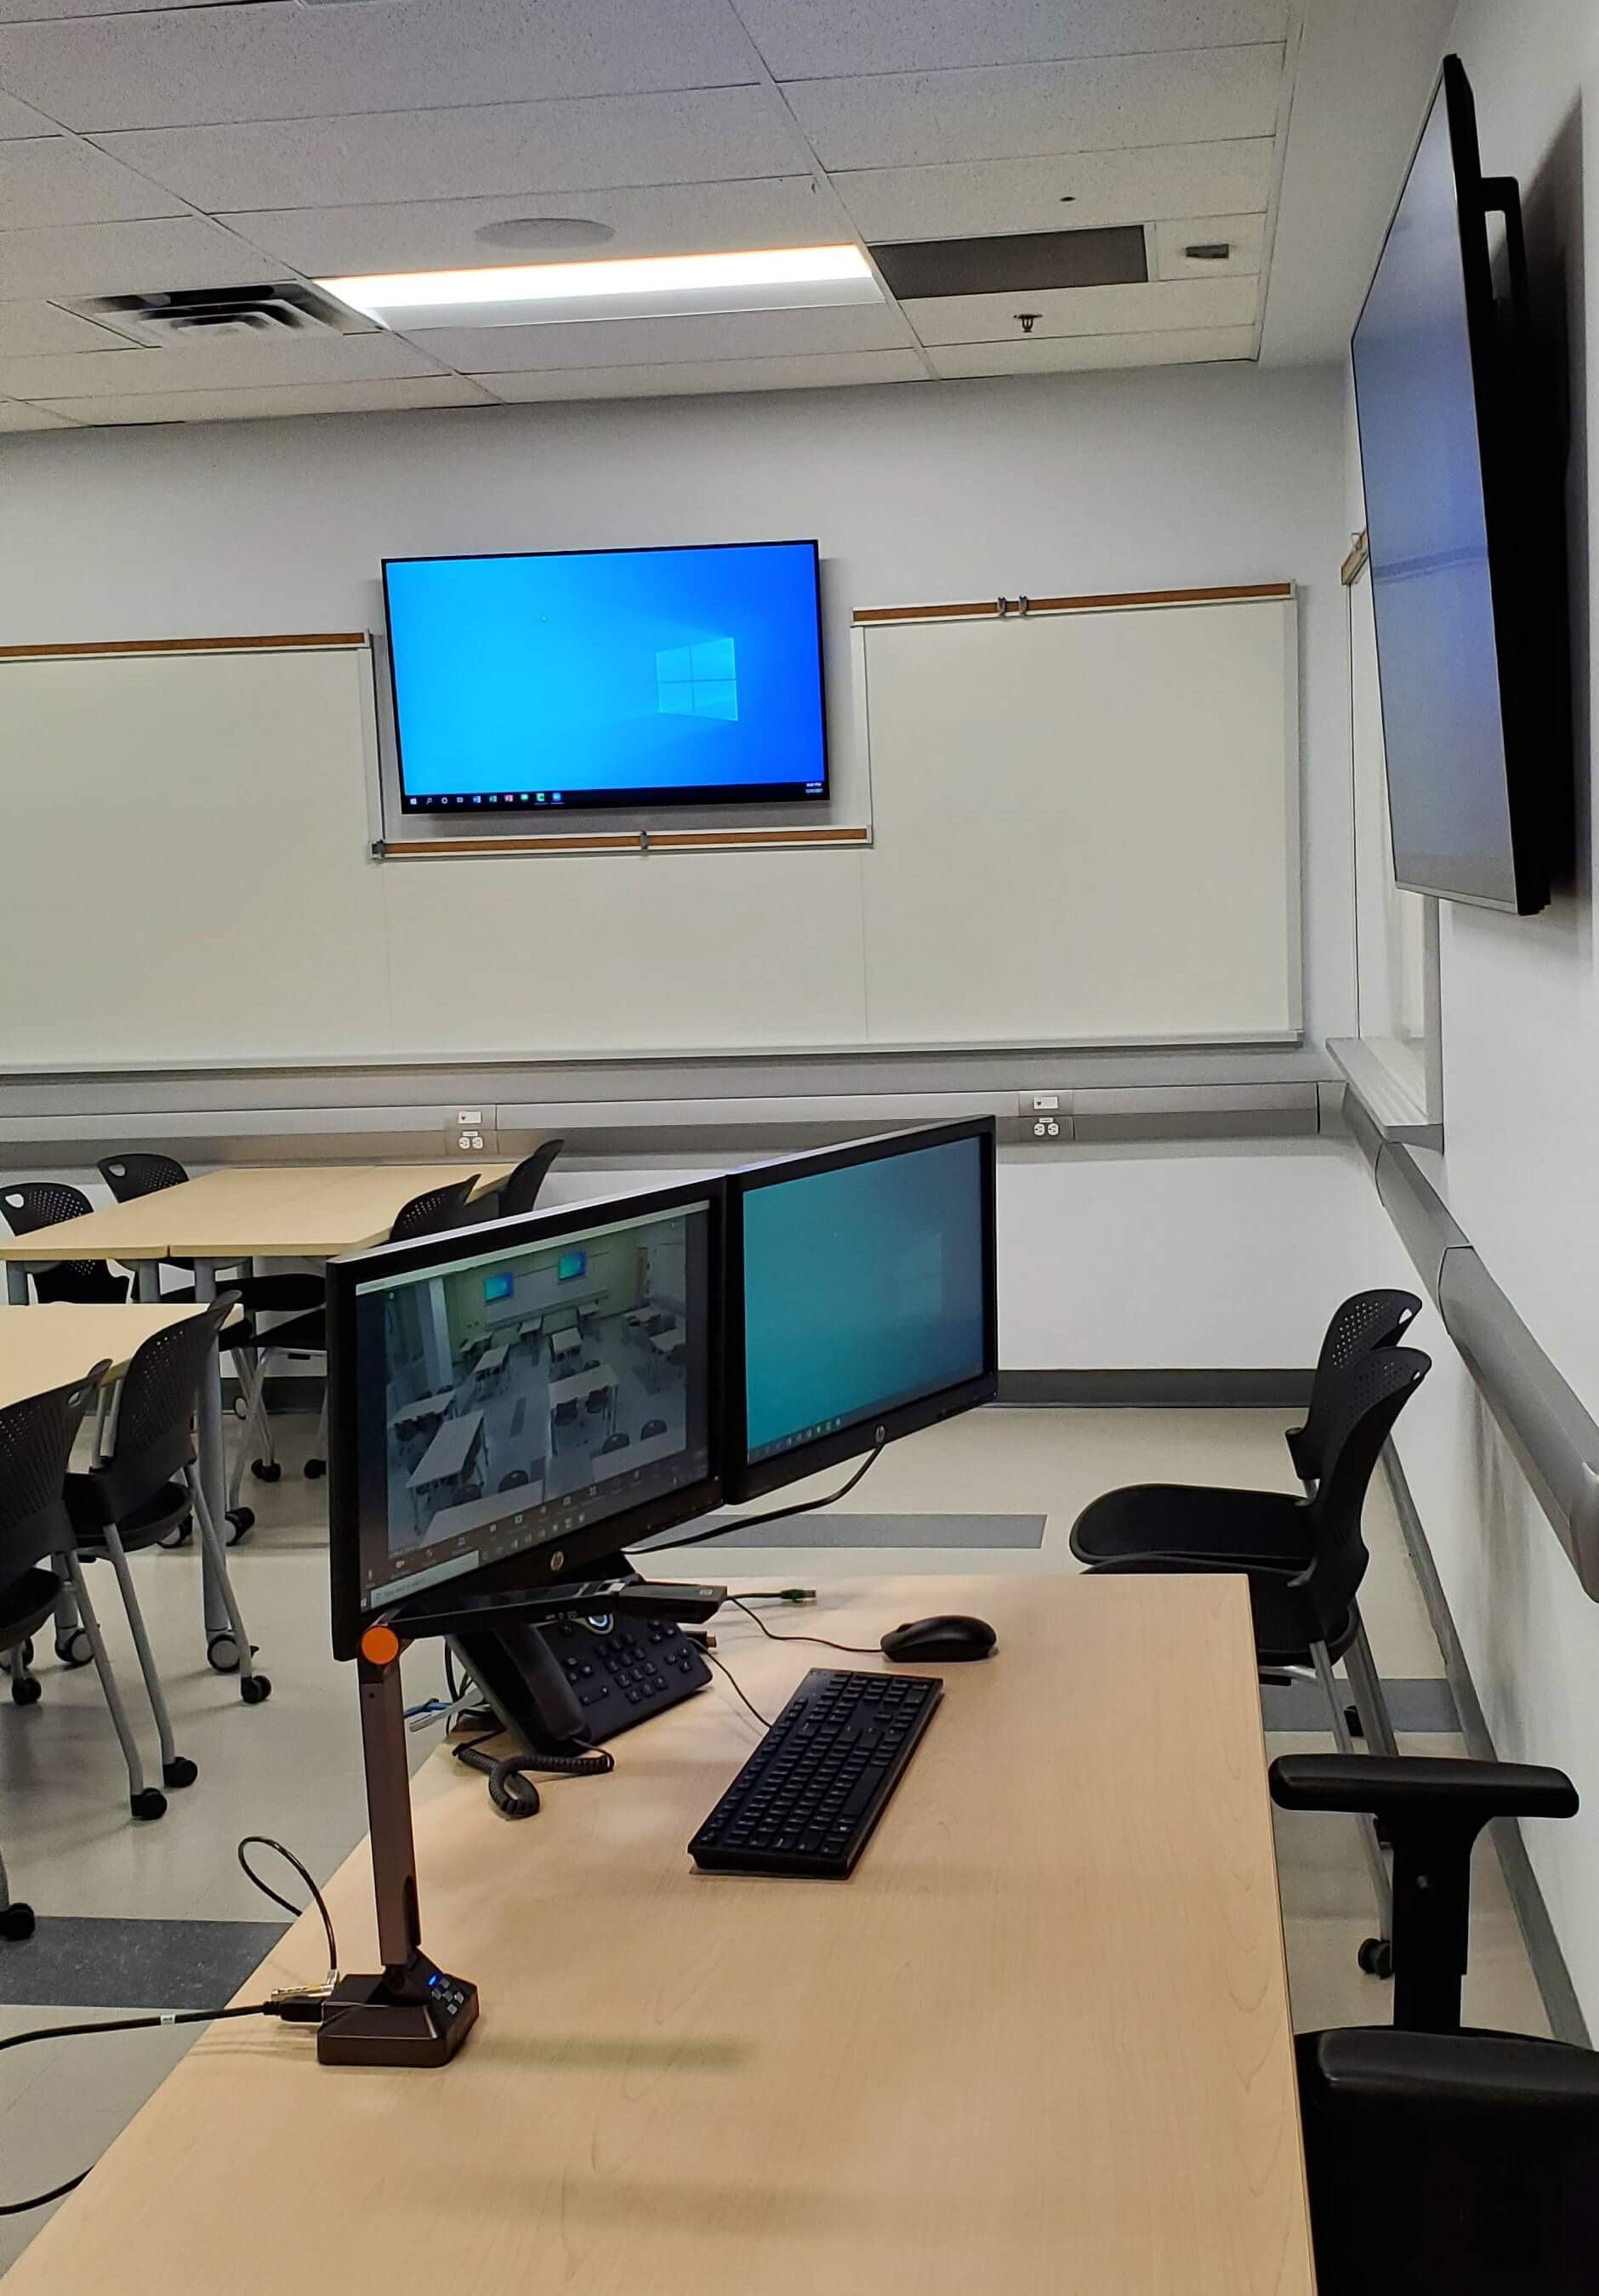
All standard multimodal-enabled classrooms include the following technologies:
- two classroom cameras (faculty and student-facing) Faculty facing camera also tracks teacher in standard multimodal classrooms.
- one HovercamSolo8+ document camera
- whiteboard camera (to capture/broadcast writing on classroom whiteboard to virtual students) in standard multimodal classrooms.
- microphones (ceiling and station station array mic with full-classroom audio pick-up)
- two teacher station monitors
- two wall-mounted confidence monitors
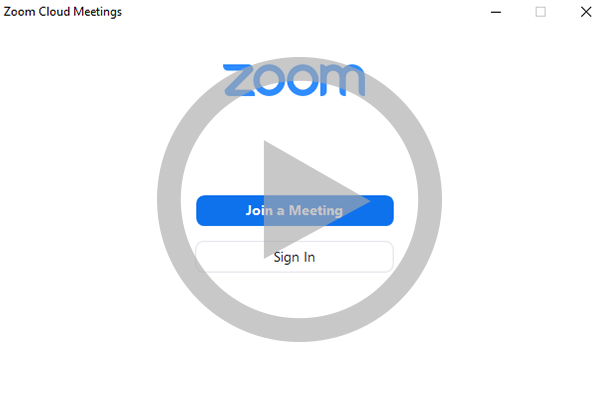
Currently, Zoom is the main web conferencing tool used at Algonquin for virtual class sessions.
Logitech Whiteboard Camera
This camera appears above the physical whiteboard in the classroom. It is used to capture and broadcast what you write on the whiteboard to virtual students via Zoom.

Logitech Whiteboard Camera
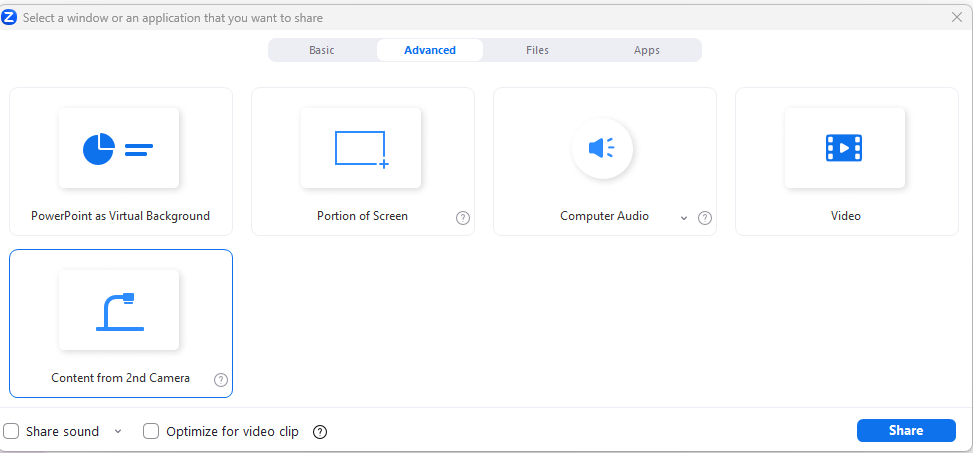
Advanced Screen Sharing – Second Camera
Use Screen Share > Advance Tab > Camera from 2nd Camera in order to share your whiteboard writing. Then, click on Switch Camera button several times until you see the white image of the whiteboard.
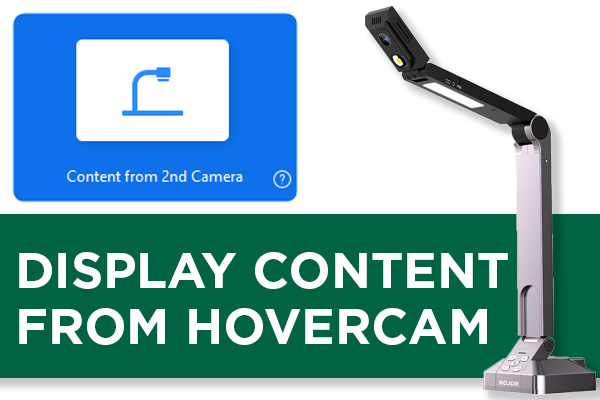
Hovercam Solo8+ Camera
The Hovercam Solo8+ is a document camera that can be used in class or distance learning. You can show physical objects via the camera such as tools, books, iPads, hardware etc.

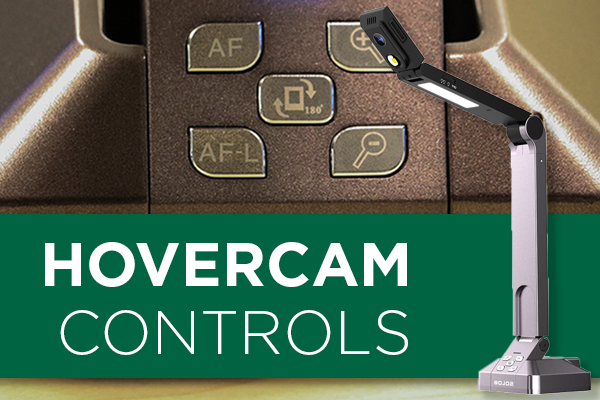 Hovercam Controls
Using Zoom in Multimodal-Enabled Classrooms
See below for resources on how to best manage Zoom in a multimodal-enabled classroom.
 Running the Zoom Installer
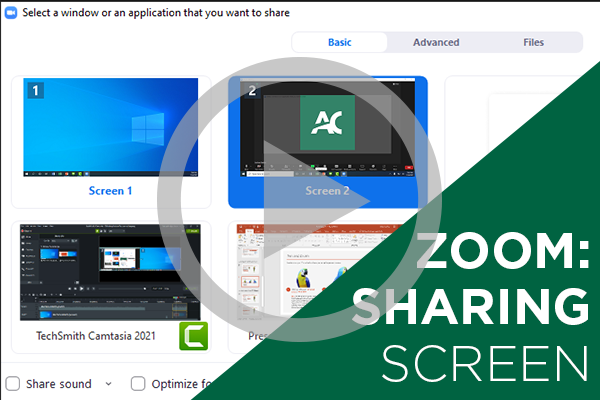 Screen Sharing with Zoom
Classrooms
Multimodal-Enabled Classrooms
Standard mobile learning classroom with camera and room audio.
Classrooms included: B130, B319, B419, T327, CA205, A150, H214, J217, P201, T334
Classroom Set-Up Checklists
It is highly recommended that you use the teacher station computer if you can. This set up connects to all multimodal equipment in the classroom.
Teacher Station Computer Set-Up
Standard Multimodal Classroom Checklist (pdf)
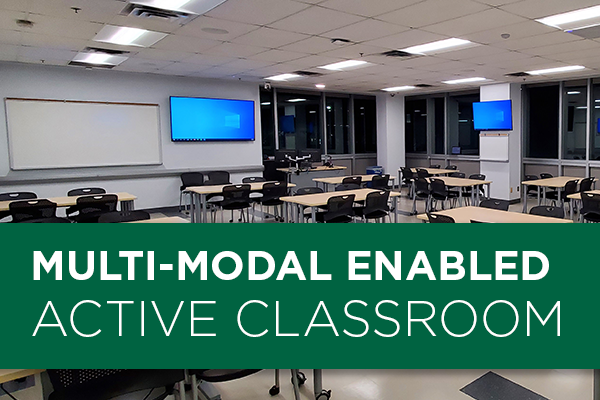
Multimodal-Enabled Active Learning Classroom
Classroom Set-Up Checklists
It is highly recommended that you use the teacher station computer if you can. This set up connects to all multimodal equipment in the classroom.
Teacher Station Computer Set-Up
Printable Version – Active Learning Multimodal Classroom
Before Class
01
Restart and Log Into the Teacher Station Computer
(a) It’s a good idea to restart the computer to make sure the previous professor is logged out.
(b) Then, log in with your username and password.
02
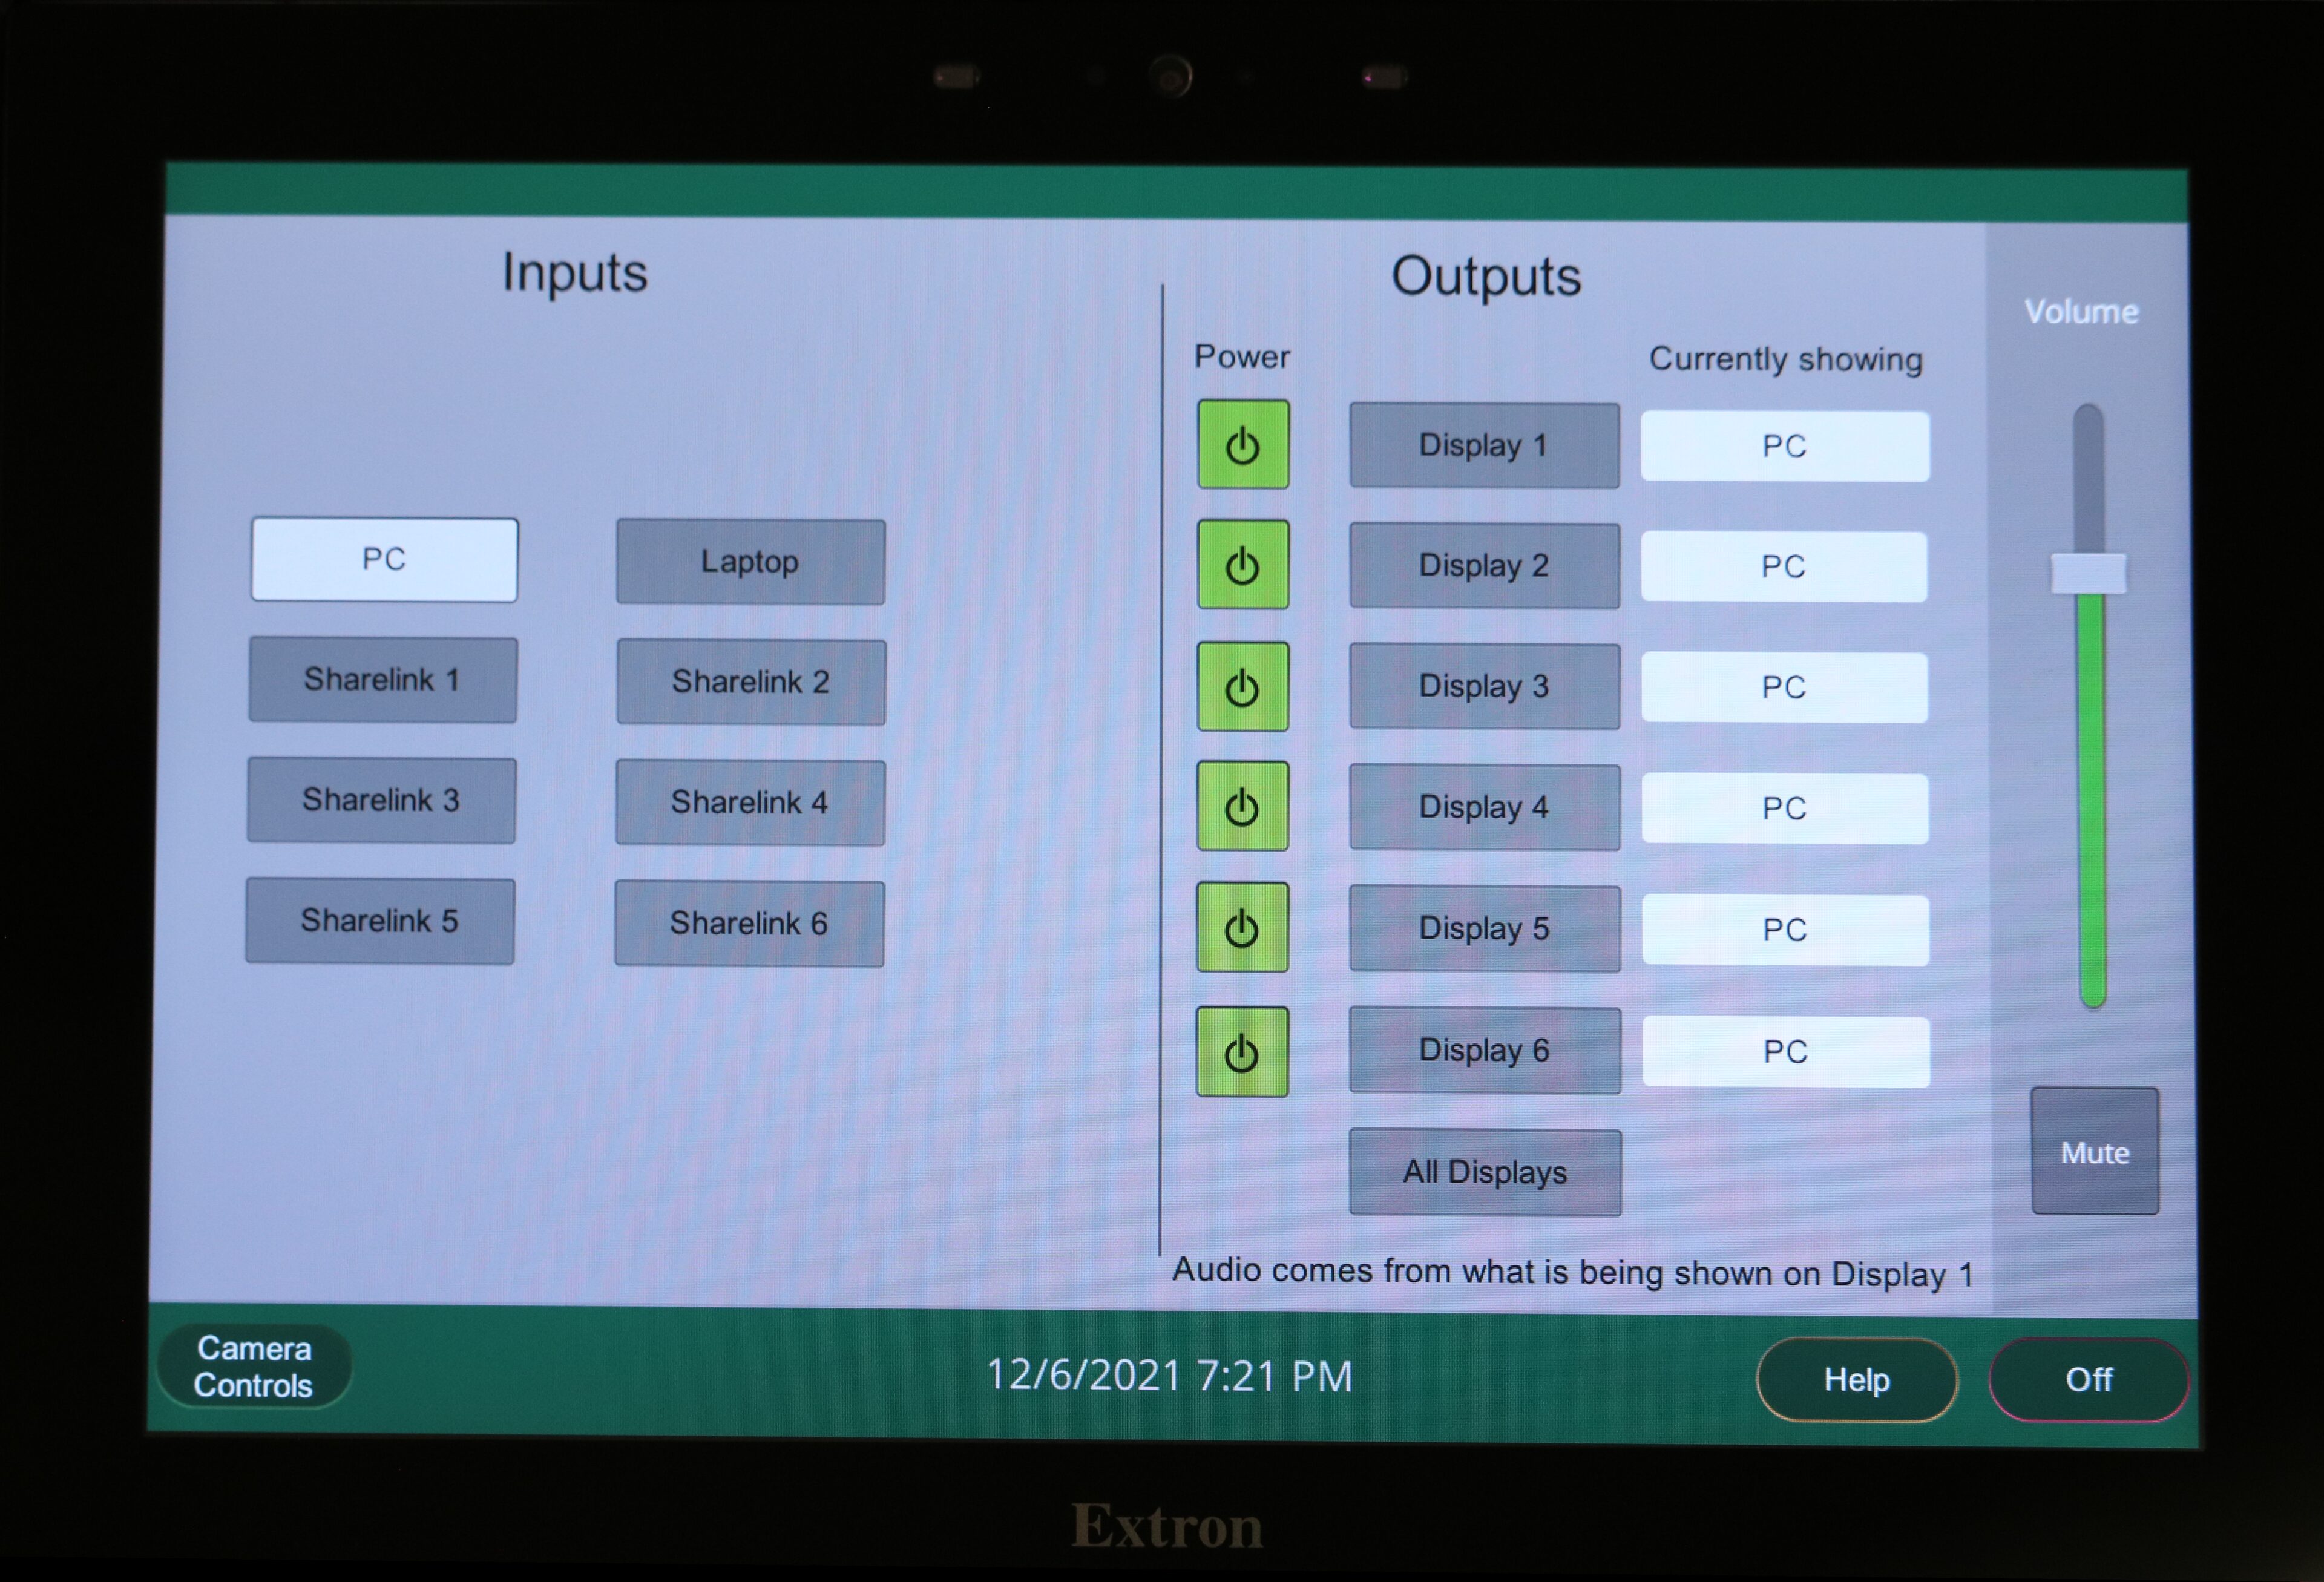
Turn on Monitors
(a) Touch the flat screen Extron display on the cabinet behind the teacher station to activate.
(b) Make sure that all displays are set to PC
03
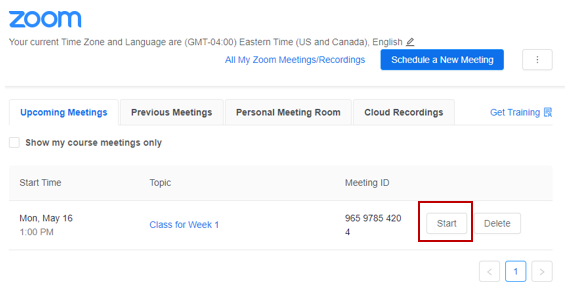
Launch Zoom Class in Brightspace
(a) In your Brightspace course, go to Tools > Zoom Classroom
(b) Under the Upcoming Meetings tab, click the Start button of your Zoom class link.
(c) Click on the downloaded Zoom Installer to run it.
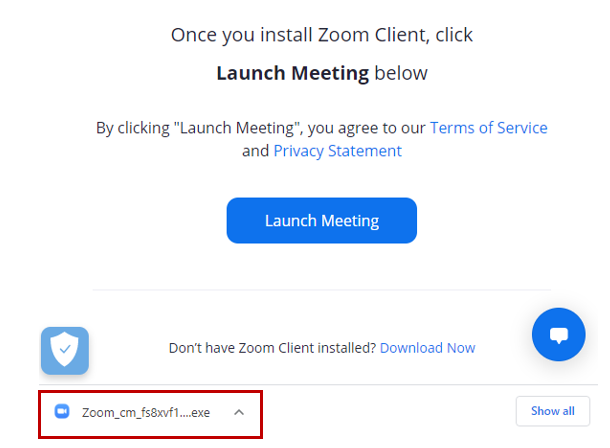
Click on blue Launch Meeting button to start Zoom meeting.
NOTE: If you use the Zoom Desktop Client to launch your class meetings, you will need to run the Zoom installer every time you log into the Teacher Station Computer.
Go to the Zoom Installer Short Cut

Or to the Software & Links folder, then click on the Zoom Installer.
![]()
04
Set-Up Your Cameras
(a) In Zoom, click on the Video button to see camera options.
- HoverCam Solo8
- Class Facing Camera
- Teacher Facing Camera
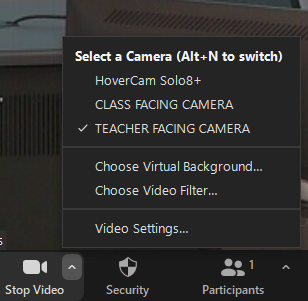
NOTE: HoverCam Solo8+ can also be used as via Screen Sharing in Zoom. See HoverCam Solo8+
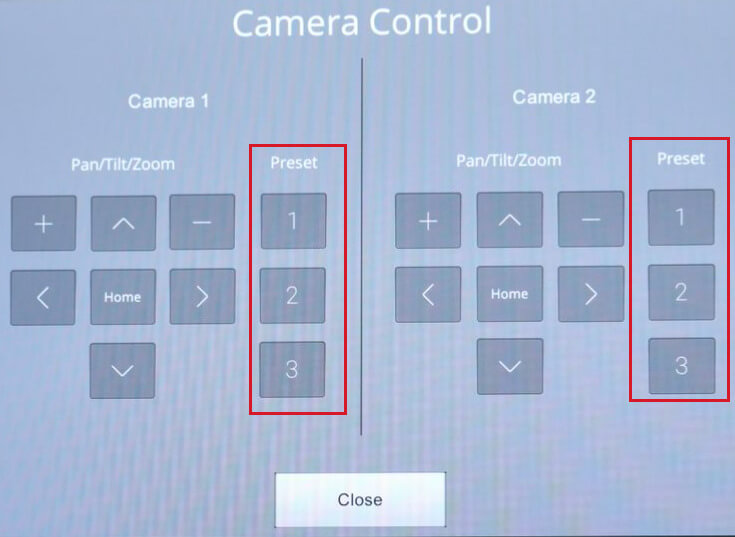
(b) On the Extron control display, press Camera Controls.
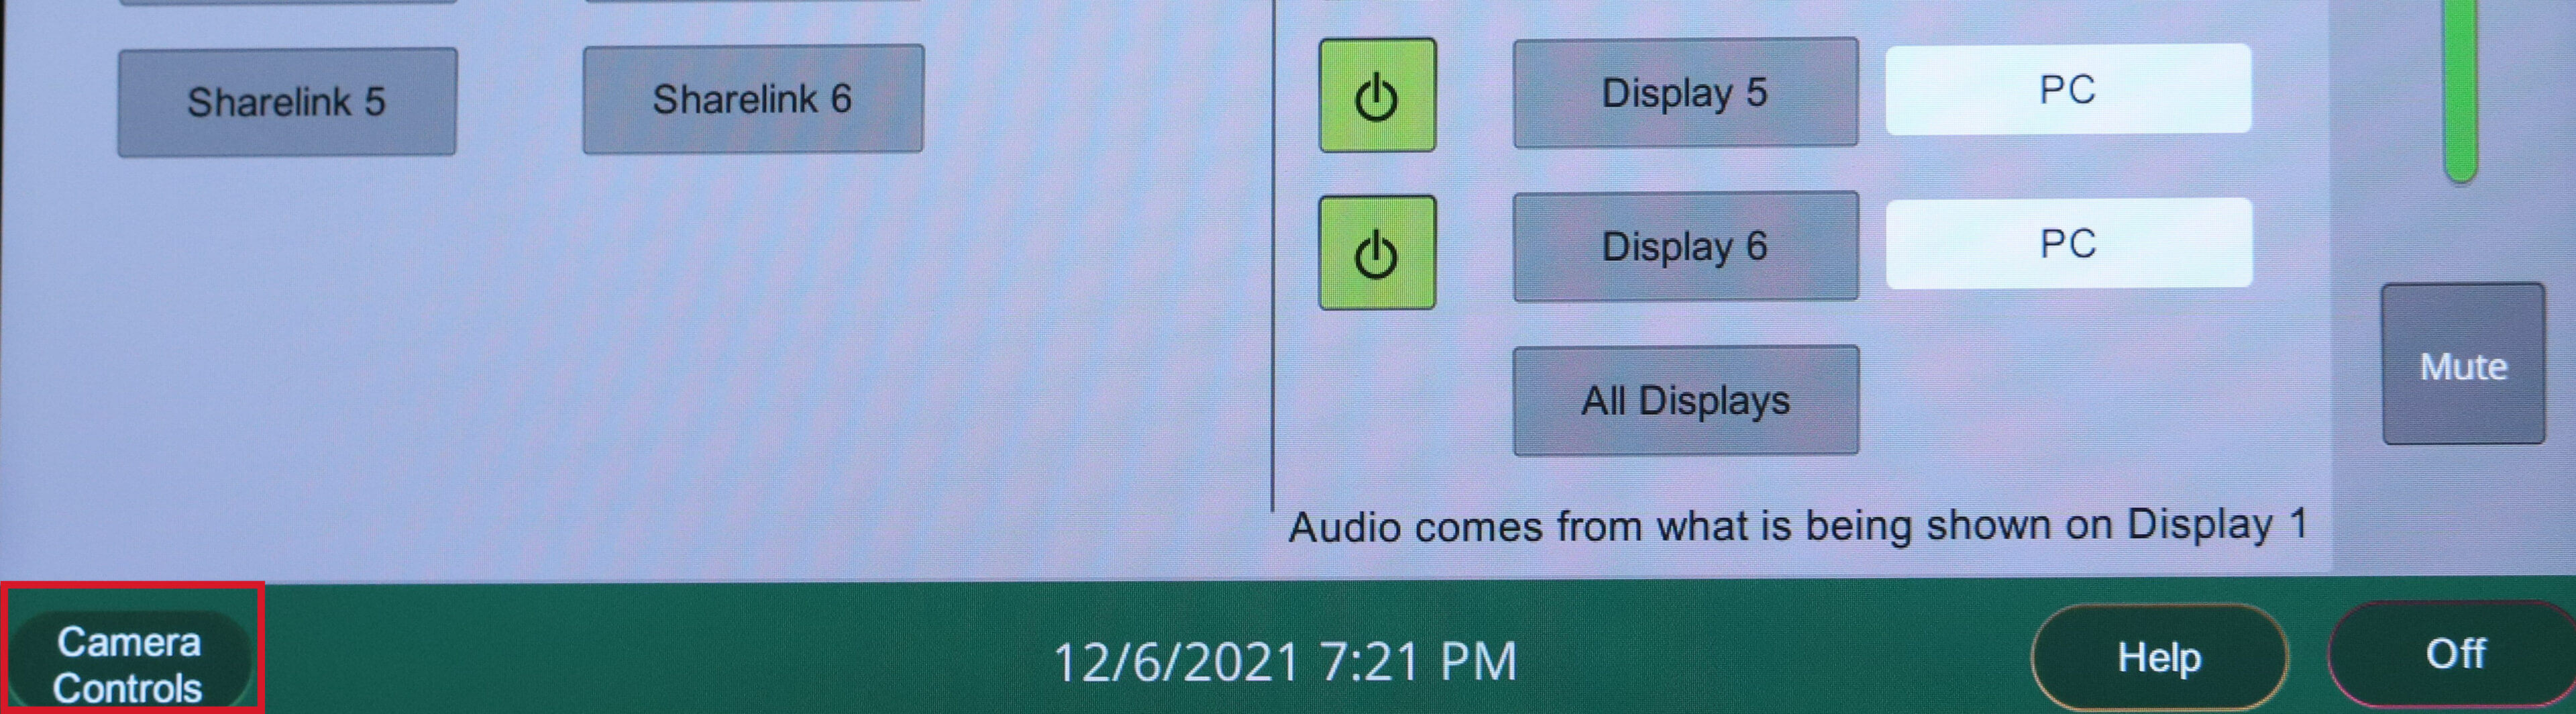
(c) There are Zoom In Pre-Sets on the Extron display that zoom-in closer to the teacher, classroom space, or one of the whiteboards.
Select the pre-set that you prefer.
You can also make adjustments using the + and – and arrow buttons.
05
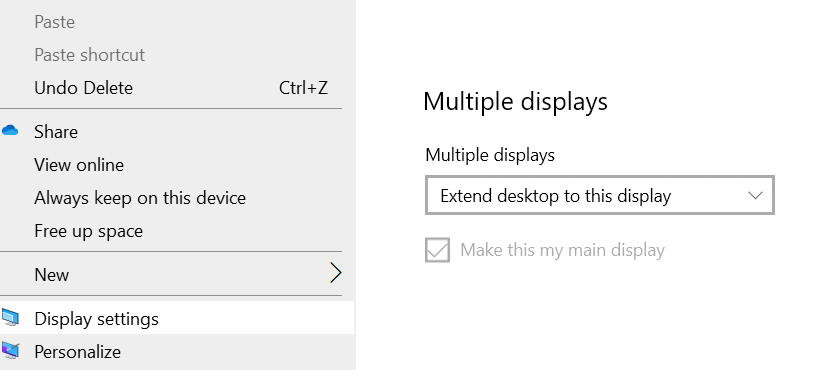
Confirm that the Display Settings
(a) Make sure that displays are set to Extended Desktop view rather than duplicate screens.
To check this, right-click on desktop and select Display Settings. Go to Multiple Displays and make sure that Extend Desktop to this Display is selected.
06
Open Your Lesson Documents
Have your PowerPoint presentation and other lesson documents open and ready for screen sharing.
07
Test Your Screen Share in Zoom
In Zoom, click on Share Screen and select the content screen that you wish to share.
NOTE: Pay very close attention to what screen that you select to share. You will see two screens but virtual Zoom students will only see the screen that you share. And it is easy to share the wrong screen. Students on Zoom will see the screen that is in the green box.
View Zoom Screen Sharing tutorial for more information.
08
Check the Screen that you are Projecting to the Room Displays
Only one of the two teacher station monitor is projected to the wall-mounted displays in the room
If you are not seeing the content that you want projected, you can drag the content window over to the next monitor.
9
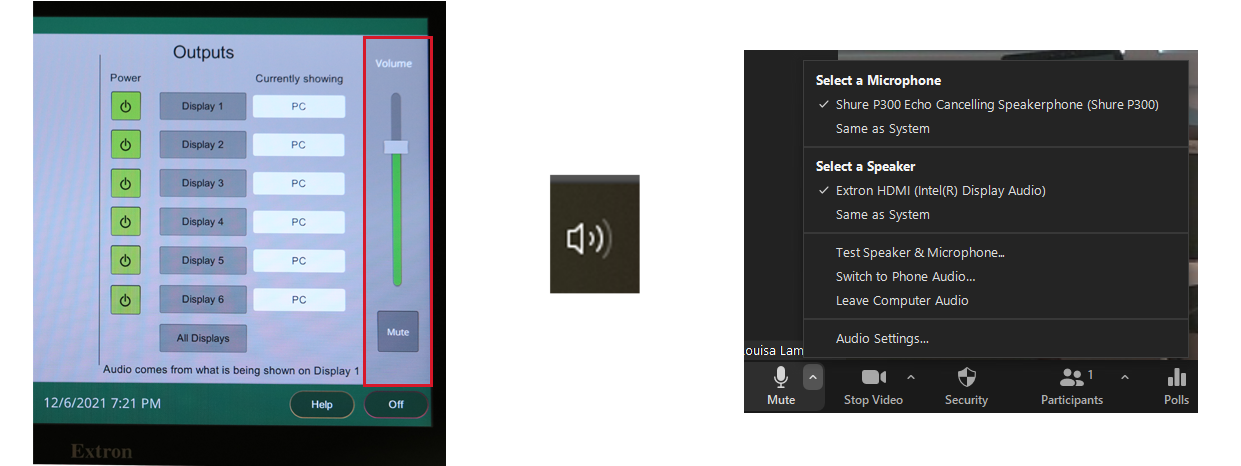
Test Your Microphone and Speakers – For Every Class
By default, Zoom should have the microphone set to Shure P300 Echo Cancelling Speaker Phone. Click on the arrow on the Mute button to confirm the settings.
Run the Audio Test Wizard by clicking on the Microphone icon.
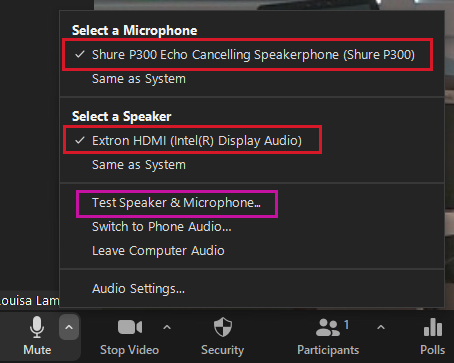
IMPORTANT: Have a virtual student say something through Zoom, and adjust the volume accordingly.
Volume controls include:
- Volume slider on the Extron display
- Audio settings on your computer (bottom of screen)
- Audio settings via Zoom (e.g. Mute icon, and Audio Settings)
10 Set Up Your Chat Box
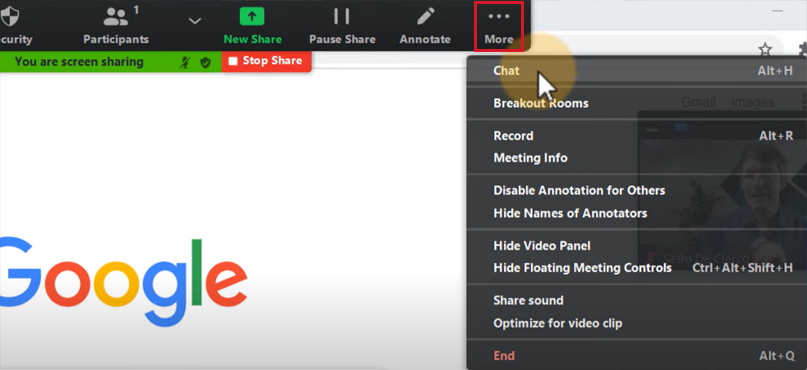
In Zoom, click on the Chat icon to open it up and have ready for class. To see it on the room displays, while you walk around the classroom, you can pop out the chat box and move it to the second monitor.
NOTE: When you Share Screen, the Chat box automatically closes. You can bring it back by moving you cursor to the top to show the Zoom Tool Bar. Click on More and select Chat.
TIP: Consider asking a student to monitor the chat for comments and questions. This will prevent remote students from being forgotten about.
11 Record Your Zoom Class
If you plan to record your classes, be sure to click on Record.
TIP: When the video recording is ready, you can set a playback range. For example, you can set the start time of the recording to ignore the pre-class din that happens before you begin teaching.
View steps for setting up a recording video playback range.
End of Class
01
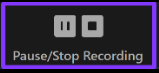
Stop Recording in Zoom
As soon as class is finished, stop recording the Zoom session immediately.
Remembering to stop recording will prevent inadvertent recording or private end-of-class conversations with students.
02
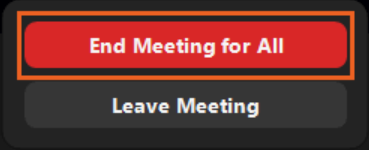
End the Zoom Class
To end the Zoom class, click on End Meeting for All.
03
Log Out of the Teacher Station Computer
It is important to not leave the classroom computer logged into your Algonquin account.
Log out by going to the Windows icon at the bottom left of the screen and select Log Out or Restart.
Active learning classroom (e.g. furniture on castors, extra whiteboard space, multiple monitors for wireless screen sharing for faculty and students) with most advanced camera and room audio options.
Classrooms included: T232, B156
 Room Overview