Closed Captioning and Transcription
Having a properly closed-captioned video is not only valuable for the hearing impaired, but has also been shown to support the learning of all students; especially students with disabilities, those with English as their second language, and those unfamiliar with unique subject-specific terminology.
Transcription
For the instances where Closed Captioning is not possible, a transcription can be produced as an alternative.
Usually this will be for videos that are not owned by you, or you don’t hold the copyright for.
However, when choosing resources for your class, always strive to find resources that are already closed captioned/accessible.
Closed Captioning in Zoom
To add closed captions to your recorded video uploaded to Zoom
By default, Zoom should automatically caption your videos when uploaded to the cloud. If it doesn’t, you may need to check your settings to ensure auto-captioning is enabled.
- Navigate to https://zoom.us/profile/setting.
- Search for Closed Captioning.
- Enable all the options for that setting.
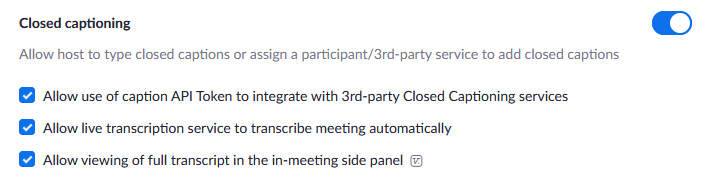
Visit https://support.zoom.us/hc/en-us/articles/115004794983-Automatically-Transcribe-Cloud-Recordings- for more info on Zoom closed captioning.
To edit closed captions to your recorded video uploaded to Zoom
- Navigate and sign in to https://zoom.us/
- In the navigation menu, select Recordings.
- Select the name of the recorded meeting.
- Select the play icon.
The text of the transcript displays on the right-hand side of the video. - To edit the text, select on the pencil icon to the right of the block of text you want to edit, and then click into the text block itself.
- Make any changes to the text, then click the check mark.
The updated version of the text is displayed when you play the audio or video file.
Enable Live Closed Captions in Zoom
- Navigate to https://zoom.us/profile/setting
- Search for Closed Captioning
- Enable “Allow live transcription service to transcribe meeting automatically”
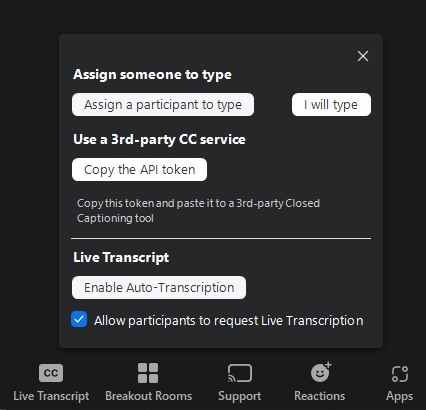
After enabling that option, launch your Zoom meeting. You will then have a “Live Transcript” button at the bottom of your Zoom window.
Click the button, then choose Enable Auto-Transcription.
Note: You may need to update your Zoom if you find it is crashing the application when enabling live transcripts.
Closed Captioning in Clipchamp (Microsoft Stream)
For instructions on how to closed caption your videos in Microsoft Clipchamp, visit https://clipchamp.com/en/blog/clipchamps-auto-captioning-feature/
Closed Captioning in YouTube
For instructions on how to closed caption your videos in your own YouTube account, visit https://support.google.com/youtube/answer/2734796?hl=en